
|
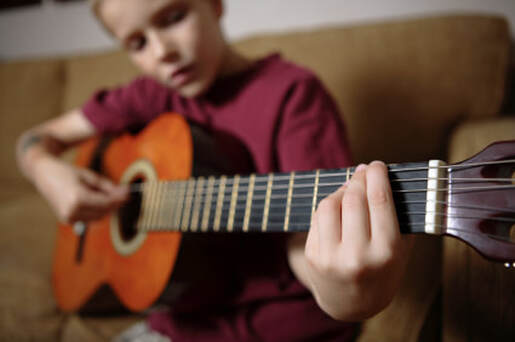
So, you (or someone in your family) has finally signed up for those violin lessons you've been wanting for ages. What to do about an instrument? We at Los Angeles Music Teachers firmly believe that for beginners, rental is the best option for the first few months (at the very least). Purchasing an instrument is a very personal thing which requires the development of the musical "ear", or the ability to distinguish the qualities of one instrument from another. 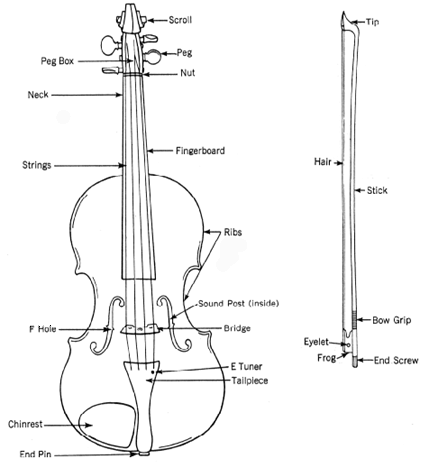 It takes time to reach this point. From our perspective, it makes sense to wait until one has sufficient experience before making a major investment in an instrument. Another advantage to renting a violin or cello is that size exchanges can be made at any time. As your child grows the size of the violin or cello also needs to grow. At some point, your child will outgrow the first instrument. The rental insurance coverage for theft or damage assures peace of mind, which is particularly important when it is a child who is handling the instrument. Considering all of these benefits, making rental payments for a time can constitute money well spent. And, if one decides to purchase an instrument later on, Depending on where you rent the Violin, a percentage of what has been spent in rental fees can be applied towards this purchase. Tips on care and maintenance:
If you have any questions you are welcome to call us for advice on best practices for renting or buying a string instrument like violin or cello. Our teachers will also help answer any questions and guide you as you take lessons. If you're interested in signing up for lessons on Zoom or In Person in Burbank, Glendale or North Hollywood, please contact us at (818)902-1233 or on our website at https://www.losangelesmusicteachers.com/online-violin-lessons-in-burbank-ca.html
 Musical performances have always been part of history. Since the advent of the piano, as a musical instrument, performers have always stunned their audience at concerts so phenomenally. History is replete with the remarkable achievements of piano grandmasters such as J. S. Bach and Franz Liszt. Generally, 18th-century musicians opine that music should be performed with good execution as it must possess something to say or talk about. Interestingly, learners can gain the right technical approach to this practice by seeking the best piano lessons in Burbank. Here are some helpful piano training tips that can substantially elevate a learner’s skills when incorporated.
Beginner Drum Beat Breakdown
3/6/2023
 This is the basic form of showing a student how to count a basic beat and separating it by steps. In this guide you will see the breakdown of the beat and then when it is all together, you will be playing your very first beat. First we will start off counting 1-2-3-4 and Repeat 1-2-3-4 because he will be playing to these numbers. Each Number represents a beat. And I will show you during the lesson and put it on the sheet for your son. So you can practice his homework with him. Hi Hat: (If he is a righty, use right hand on Hi-Hat) (If Lefty he plays Hi Hat with his left Hand) Snare: (If he is a Righty, He will use his Left hand on the Snare) (If he is a lefty, he will use his right hand on the snare) Bass Drum: (if he is a righty, his right foot will be on the bass Pedal) ( if he is a lefty, His left food will be on the bass.. pedal) Would look like this below: R-Right Hand, L - Left Hand Snare: R,L 1,2 Tom 2: R,L 3,4 Tom 3: R,L 5,6 Floor Tom: R,L. 7,8 Crash Cymbal R. Crash Lesson Number 1 (first Beat) Step 1 Tap Hi Hat on Every Number. Tap on 1, on 2, on 3, on 4 (Count out loud when doing this) Repeat (Twice) It will look like this when I write it out. Hi Hat: 1-2-3-4 Step 2 Next we will add the Snare Tap Hi Hat and Snare on 2 and 4 at the same time. (So we will Count 1 then have him hit the hi-hat and snare at the same time. So we will count 1, Tap on 2, count 3, then tap on 4) it will look like this. Tap Hi Hat and Snare on 2 and 4 with sticks Count: 1-2-3-4 Hi Hat: 2 4 Snare: 2 4 When he’s comfortable doing this, we will tap the hi hat on every number Tap Hi Hat on all numbers and Snare on 2 and 4 with sticks Count: 1-2-3-4 Hi Hat: 1-2-3-4 Snare: 2 4 Step 3 Next we will add the Bass Drum/Pedal We will be taping the Hi-hat and bass pedal with his foot and we will be doing this at the same time but on number 1 and 3 (So we will tap and step on 1, count 2, then tap and stomp on 3, and then count 4) it will look like this below Tap Hi Hat and step with foot on 1 and 3 Count: 1-2-3-4 Hi Hat: 1 3 Bass: 1 3 When he’s comfortable doing this, we will tap the hi hat on every number Tap Hi Hat on all numbers and Foot on 1 and 3 Count: 1-2-3-4 Hi Hat: 1-2-3-4 Bass: 1 3 Final Step Next we will put step 2 and 3 together Now we will slowly put step 2 and 3 together. (On 1 it will be Hi Hat and Bass Drum, on 2 hi hat and snare, on 3 hi hat and bass drum and on 4 its hi hat and snare. Then we will end with a crash cymbal. Tap Hi Hat and Bass on 1 and 3 and Snare on 2 and 4 I’ve color coded for you. (The Hi Hat will be going all the way through Count: 1-2-3-4 Hi Hat: 1-2-3-4 Bass/Foot: 1 3 Snare: 2 4 If you're interested in taking Drum lessons on Zoom or In Person in Burbank, Glendale or North Hollywood, we have some of the best drum lessons in Los Angeles. Our drum instructors are picked by interviewing hundreds of drum instructors and we have really high standards on both their teaching ability as well as their personality. If you'd like to talk to one of our instructors or set up a first lesson we have a guarantee that if you don't absolutely love your first lesson you don't have to pay for it. Please contact us at (818)902-1233 or on our website at https://www.losangelesmusicteachers.com/online-drum-lessons-in-burbank-ca.html
The Grand Staff and Clefs
2/28/2023
The Grand Staff This is what is known as the grand staff. It includes the treble clef and bass clef. Pianists read from the grand staff. 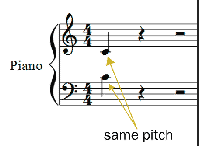 Note that the two notes shown above are the exact same pitch. Each is called "middle C." Clefs in Relation to Middle C Middle C is the note exactly between the bass and treble clefs, as noted in the image above. It is known by many other names, but for these tutorials I will be calling it "middle C". Middle C is located in a different spot for each clef, but it remains the exact same pitch. To show how each clef is related, here are images of each clef with middle C. Yes, this means that the clefs overlap each other. Treble Clef The treble clef is also known as the "G clef." The easiest way to remember this is seeing that the clef circles the note G (second line from the bottom). 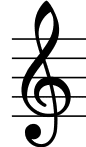 The image below shows where middle C is located on this clef. 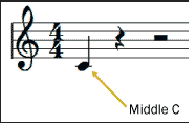 Bass Clef This clef is also known as the "F clef." One way to remember this is that the line between the two dots is F (second line from the top). 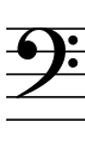 Middle C is located on the first ledger line above the staff of the bass clef. 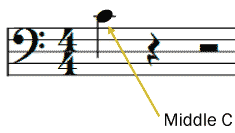 Tenor Clef 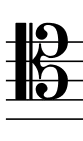 For the tenor clef, middle C is located on the second line from the top of the staff. 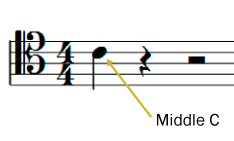 Alto Clef On the alto clef, middle C is located on the middle line of the staff. The tenor and alto clefs are referred to as the "C clefs." Notice that middle C is located at the middle line of each of those clefs. Why all of the clefs? Each instrument has a range of notes that it can play. If every instrument read from the treble clef, for example, there would be a lot of ledger lines for lower instruments, which would make the music very difficult to read. Different clefs are assigned to different instruments based on the notes each instrument is able to play. If you're interested in taking lessons on Zoom or In Person in Burbank, Glendale or North Hollywood, please contact us at (818)902-1233 or on our website at https://www.losangelesmusicteachers.com/online-music-lessons-burbank-ca.html
What Violin Strings Are Best For You?
2/22/2023
 Most violinists stick with the strings they’ve been using for years, while others constantly seek different strings that might improve their instrument’s sound or make playing easier. These days, string players face a multitude of choices when it comes to picking violin strings, including a cavalcade of E strings that come plated in platinum, gold, and silver, among other materials. Trying every available string on the market to find your dream strings is probably unrealistic, but you can make an educated guess about a string’s sound if you understand some of the qualities of its core and winding materials, string tension, and the general tonal and playing qualities of each brand.
Of course, talking to other musicians about their experiences and preferences is also helpful in building your knowledge about different strings, but keep in mind, each instrument has its own characteristic sound. And while your violin can be adjusted and tweaked, changing to a new brand of strings alone probably won’t make a huge change in the tone or playability of your instrument. CORE MATERIAL, TENSION & GAUGE Gut core These are the original type of strings and their design goes back several centuries. Typically made from sheep intestines, gut strings are lower tension than synthetic- or steel-core strings and have a complex tone that is rich with overtones. Because of the low tension and winding method, they are more pliable under the fingers than other strings, tend to have slower response, and require players to finesse the sound from their instruments with the bow. Gut-core strings also need more frequent tuning, especially if there is a rapid change in room temperature, like stepping under hot stage lights. Steel core The steel E string was introduced for violins at the beginning of the 20th century and was followed by the other steel-core strings and various windings, usually chrome steel. The steel E quickly became widely used and cellists took to steel-core strings fairly quickly. In general, steel strings have a quick response and a clear, focused, brilliant tone. But, don’t expect a great deal of depth and tonal complexity from steel-core strings. Normally, classical players prefer other types of strings, but others, such as fiddlers, tend to prefer steel-core strings. They’re also widely used on fractional-size instruments. Generally, they are the least expensive strings on the market. The violin E strings are available in three different types: plain steel, plated steel, and wrapped steel. The original is the plain steel E. In recent years, a number of steel E strings plated with various materials like tin, gold, and platinum have been introduced. The gold-plated steel E, for example, has a brilliant, clear, pure sound that many like, though they do tend to wear out quickly (the gold-plating wears off, and some instruments tend to whistle when going from the A to open E). The wrapped E has a steel core, usually with a chrome steel wrapping, and tends to have less edge and brilliance than unwound E strings, leaving them a bit warmer and mellower, but slower in response. They might be a good choice for someone who finds steel E strings too shrill or for instruments that tend to whistle when going quickly from the A to an open E. In a situation like this, I recommend the Kaplan Solutions E from D’Addario. Synthetic core About 40 years ago, the Austrian string-making company Thomastik-Infeld introduced Dominant strings with a core made of Perlon (a type of nylon). They were an instant success, and some would say that Dominant strings changed violin playing forever. Synthetic core is much more stable in pitch than gut. Though “gut-like,” they tend to have a more focused tone with fewer complex overtones. In the last 15 years, other core materials have been used that combine different synthetic materials for a more complex sound, thus the commonly used term “composite” core. While not quite sounding “just like gut,” these newer strings have interesting and sophisticated tonal characteristics. String gauge Though often used interchangeably with string tension, a string’s gauge, or width, is different altogether. Unwound gut strings are a great example of this. Tuned at the same pitch as a steel- or synthetic-core string, a gut string will need to be thicker than other types of strings, even though its tension will be lower. Players who switch to a wider type of string, like gut, may need to have a luthier widen the slots on their instrument’s bridge and nut to accommodate the thicker gauge of the strings. Still, at a basic level, when shopping for strings, you will be confronted with three gauges of the same string and it’s helpful to understand the differences. Compared to a medium gauge set of the same make of string, a thinner (also sometimes called “weich” or “dolce”) string will be lower tension, with a brighter, more responsive tone, but it will be lower in volume. A thicker (“stark,” “forte”) string, will do just the opposite, giving you a darker tone, but with a slower response. String tension Though it’s one of the biggest factors determining the tonal differences between different types of strings, string tension is often confused with string gauge. Within specific types of strings, tension and gauge are related, but they are not the same. Almost all strings, even the least expensive student strings, are available in different tensions: light, medium, and heavy. Gut-core strings tend to have a lower average tension than either synthetic- or steel-core strings. You can feel that lower tension as pliability under the fingers—the strings are easier to press down and you can feel them roll. Synthetic-core strings have a higher tension than gut-core strings, with the darker, warmer-sounding strings (e.g., Pirastro Evah Pirazzi) tending to have a slightly lower tension, although there are some exceptions to this (Thomastik Infeld Blue vs. Infeld Red, which have almost identical tensions). Steel-core strings tune up to a higher tension better than any other types. When experimenting with different strings, it’s usually best to begin with medium-gauge strings first and then go to a different gauge only if necessary. On some instruments, the higher tension can actually choke the sound. String winding In recent years, a number of string manufacturers have offered interesting and exotic winding materials, especially for steel-core strings. Altering the winding material allows manufacturers to change the string’s response and tension with such heavier materials as tungsten, resulting in a high-tension string that is thinner than one made from a less dense metal, like aluminum or silver. A player’s chemistry may also be a factor in choosing strings. Some players, with acidic perspiration, will find that their sweat tends to corrode aluminum-wound strings. The wrapping quickly develops a rough gray surface, which usually doesn’t happen with other kinds of wrappings. Those players might want to try a silver wrapped D, for example. MATCHING THE STRINGS TO YOUR NEEDS Each violin, viola, cello, or bass has its own tonal characteristics that may be improved by a skilled luthier. If you would like to fine-tune the sound of your properly adjusted instrument, you may want to experiment with different strings. Before you begin experimenting, you may want to answer a few questions about your current sound. What is your instrument’s characteristic sound? What strings you are using now? What sound do you want to hear? Once you’ve addressed these questions, you can use the following guide to get the sound you’re seeking. If your instrument is too bright, you may want a string that has darker, warmer characteristics. You may want to try something with a synthetic core, like Pirastro’s Obligato or Violino, or the Aricore brand, or Thomastik’s Infeld Red or Vision Solo strings. If you want gut-core strings, consider Pirastro Eudoxa. Pirastro’s popular Evah Pirazzi strings are more brilliant than these others, but still have some warmth compared to the more brilliant strings. If you are on a budget, try D’Addario Pro-Arté or Super Sensitive Octava strings. While lacking in complexity and character of tone, these can be useful on inexpensive student instruments. If your violin is bright to the point of sounding shrill, a low-tension string, like Larsen Tzigane, may tone down a harsh-sounding instrument. An instrument that’s too dark may benefit from a brilliant string, like Thomastik’s Vision, Infeld Blue, or Dominant strings, or Pirastro’s Tonica or Wondertone Solo. Gut-string fans may want to look at the new Pirastro Passione Solo or the Oliv. If steel-core strings are your preference, try D’Addario’s stranded steel-core Helicores. If your instrument is unclear or unfocused, light-gauge versions of the brilliant strings that can help an instrument that’s too dark or dull will usually help focus an instrument with a mushy core sound. Players are frequently looking for more (or occasionally less) volume. Different strings don’t seem to offer much volume difference, but you perceive brilliant, focused strings as sounding louder under the ear and they may project better. SHOULD YOU MIX STRINGS? The ideal instrument is balanced on all four strings, with no single string jumping out in comparison to the others. Sadly, the reality is different, leading many string players to mix and match strings to get the best sound out of the instrument. For years, many violinists and violists used the same kind of string for the three lower strings, sometimes using a different top string. For instance, a standard setup was Thomastik Dominant A, D, and G, and a Pirastro Gold-Label E. Violists have used Dominant D, G, and C, with a Jargar (or Larsen) A. But this has changed with the introduction of so many new strings, so experiment to find the best match for your desired sound. However, strings alone don’t determine the balance. If you have an unbalanced instrument, the first step should be taking it to a qualified luthier for an adjustment. Sometimes, just moving the soundpost can make a difference. If you want to solve a balance problem by changing strings, start first by trying a different gauge on the offending string. Thomastik introduced the Infeld Red and Blue strings (red=darker, blue=more brilliant) with the idea that you can mix and match them to get a proper balance. Keep in mind that if you mix different brands and types of strings, a difference in tension might affect the sound of the other strings as well. You may also find the difference in actual thickness of strings to be distracting. Things are a bit different for cellists, who seem to mix and match strings far more often than other string players. For a long time, a favorite set up was Jargar A and D with Thomastik Spirocore Tungsten G and C, though some cellists opt for Larsens on the upper strings. This setup is fairly brilliant. If you want a complete set that is warmer, you can try the new Kaplan Solutions from D’Addario or Pirastro’s Evah Pirazzi. Lifetime of a String: When to Make a ChangeWhich strings last longer? Given the price of strings, it’s a reasonable question. It doesn’t seem like any one type of string lasts longer. What seems to be most important is how you play on the strings and how your body chemistry affects them. Depending on your sweat and technique, you may need to change strings every couple of months, or perhaps, once a year. Either way, you should wipe off the strings after every playing session. Also, remember, strings deteriorate, the core fatigues, and the sound gradually becomes more dull and dead. The process is so slow that you usually don’t realize it until you change strings. Choosing strings can be very complex, and you may wonder: what’s the best string? The answer is that there is no best string—there’s only the best string for you and your instrument, so consider your needs and examine your options. If you're interested in taking Violin lessons on Zoom or In Person in Burbank, Glendale or North Hollywood, we have some of the best Violin lessons in Los Angeles. Our violin instructors are picked by interviewing hundreds of violin instructors and we have really high standards on both their teaching ability as well as their personality. If you'd like to talk to one of our instructors or set up a first lesson we have a guarantee that if you don't absolutely love your first lesson you don't have to pay for it. Please contact us at (818)902-1233 or on our website at https://www.losangelesmusicteachers.com/online-violin-lessons-in-burbank-ca.html  Right now in 2021 the piano/keyboard is the most requested instrument to play by young musicians at least in the U.S. It’s the number one instrument in most music schools with the guitar a close second. It’s probably the most versatile of all musical instruments and is used in every style of music. It can be played or accompany other instruments and is often played as a solo instrument. It also covers a range from the lowest of bass instruments to the highest piccolo sounds.
In addition, many musicians who’s main instrument is a woodwind, string, brass or percussion learn the piano because it is a very visual instrument that makes it easy to learn theory and work out compositions. Many composers think of it as “having the orchestra in their hands,” therefore most of the great composers for hundreds of years were pianists and used the piano to compose and that remains the same currently in contemporary music. The electric keyboard makes it possible for more parents to be able to afford to buy a piano because electric keyboard companies are able to make them for as low as 50.00 and even good 88 key electric keyboards with weighted keys are less than 500.00. If you're interested in taking piano, guitar or singing lessons on Zoom or In Person in Burbank, Glendale or North Hollywood, we have some of the best piano, guitar and singing lessons in Los Angeles. Our instructors are picked by interviewing hundreds of drum instructors and we have really high standards on both their teaching ability as well as their personality. If you'd like to talk to one of our instructors or set up a first lesson we have a guarantee that if you don't absolutely love your first lesson you don't have to pay for it. Please contact us at (818)902-1233 or on our website at https://www.losangelesmusicteachers.com/contact-us-for-info.html  Musical performances have always been part of history. Since the advent of the piano, as a musical instrument, performers have always stunned their audience at concerts so phenomenally. History is replete with the remarkable achievements of piano grandmasters such as J. S. Bach and Franz Liszt. Generally, learners can gain the right technical approach to this practice by seeking the best piano lessons in Burbank. Here are some helpful piano training tips that can substantially elevate a learner’s skills when incorporated. 1. Maintain a natural posture Keyboardists are always advised to maintain a calm posture and portray good deportment when addressing the keyboard. This can be effectively achieved by ensuring a comfortable seating posture while maintaining an appropriate distance from the keyboard for enhanced ease of movement. 2. Ensure proper use of the full arm As a constituent of the full arm, the forearm provides support to the hand which in turn supports the fingers. It is best to ensure that the forearm is well-positioned to ensure easy movement of the hand (sideways, upward and downward). 3. Make the wrist flexible Playing with a supple wrist can bring about a seamless execution of gestures. The legendary music tutor, Beethoven strongly advocates the development of a unique feeling of musical impulse when playing slurred notes. This would require the light withdrawal of the hand purposely. 4. Play with a compact hand By default, the hands are meant to be kept in a compact position when playing the piano. Apart from helping to keep the arm and hand calm, this also helps to enhance finger movements. 5. Flow naturally with the fingers There is no need to exert force while playing the piano. As a best practice, players should try to keep the muscles relaxed, as well as maintain a natural arch when working with the fingers. 6. Follow the right finger motion (fingering) It is very easy to play the wrong note when adopting the wrong fingering. To avoid creating execution difficulties, pianists should ensure that they articulate gestures with the right fingering. 7. Try to be consistent To achieve greater reliability, it is best to ensure full consistency by maintaining a regular hand shape. 8. Understand the structural function The left hand is the foundation of playing the piano. This is where the bass line which is responsible for clarifying harmonic rhythm, maintaining timing, providing direction, sustaining the rhythmic energy, and setting the tempo is located. Ensure to work with the left hand by listening and building from the bass up. Conclusion As it is commonly said, practice makes perfect. Following the best piano lessons in Burbank can set anyone on the right track to perfection. If you're interested in taking Piano lessons on Zoom or In Person in Burbank, Glendale or North Hollywood, we have some of the best piano lessons in Los Angeles. Our piano instructors are picked by interviewing hundreds of drum instructors and we have really high standards on both their teaching ability as well as their personality. If you'd like to talk to one of our instructors or set up a first lesson we have a guarantee that if you don't absolutely love your first lesson you don't have to pay for it. Please contact us at (818)902-1233 or on our website at https://www.losangelesmusicteachers.com/online-piano-lessons-in-burbank-ca.html
Best tips for Online Music Lessons
2/14/2023
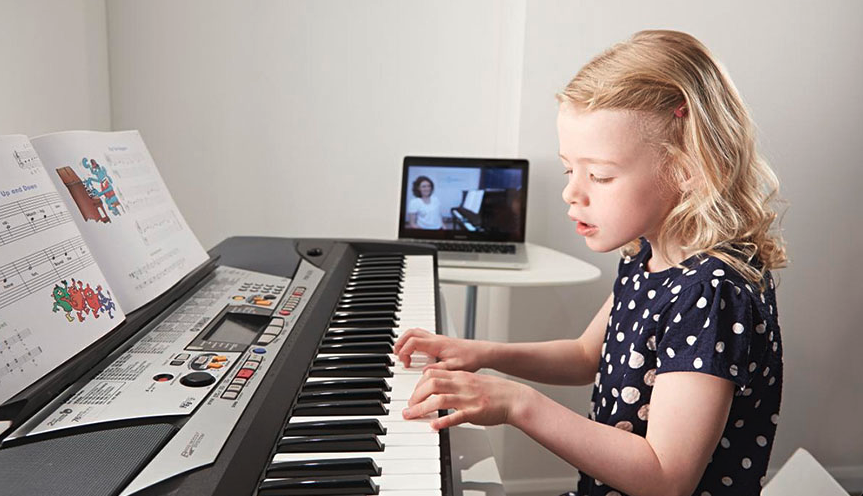
 How To Get Started Teaching Music Lessons OnlineRight now there are a lot of lessons being moved online because of the corona virus. So we put together a list of tips and best practices to help you make the most out of online music teaching.
Sound Quality All of the platforms that are readily available to us are not designed for instruments, they are designed for voice. This means that tone and dynamics are very difficult to hear. The best workaround that I have found is to ask the student to record a video of their playing on their phone or computer ahead of time, upload the video to YouTube as an unlisted video (not private) and send it through as a link. Even the most basic of phones will likely produce better audio quality than you will find in a video call. The pre-recorded video can then be used and referenced in the lesson as you work on repertoire or exercises. The added benefit of this is that it brings a certain degree of focus, preparedness and organization to a teaching session. In my experience the most impactful element that affects sound quality is the speed of connection to the internet. While you can ensure that you have a fast connection, you will not be able to control that of all your students. To get the best connection possible you can turn the wifi off on all other devices connected to the same router and at best have an ethernet cable run from your computer directly to the modem so that you are not relying on wifi at all. A microphone will boost your sound quality too but not as much as a good internet connection from all parties. Teaching with live video can be very off-putting with regards to sound but you also get used to it. I have found over the years that I can somewhat decipher what I am hearing and pick up some nuances that might sound garbled to others. Facetime, Skype, or Zoom?My recommendation : Zoom There are many video platforms that can be used but perhaps the most common ones will be Facetime, Skype, and Zoom. Facetime and Skype will be excellent tools for one-to-one teaching scenarios and many people are already familiar with how to use the programs, which is a big plus. Skype has the added advantage of being able to send files and text messages while also on the call, which can be very useful for sharing scores, links, and pdfs. Facetime tends to be a bit more stable in my experience as a platform and can have better audio. Zoom is a popular platform that is free to use for sessions up to 45 minutes in duration. For longer sessions you will need to purchase a subscription. Zoom is very useful for teaching because of the extra functions that it provides and I would recommend investing some time to learn this platform. For this reason I will focus on using the Zoom platform in this article, but many concepts can be applied to other platforms. Zoom features for music teachingBy the way, I have no affiliation with this company. Share your screen The share screen function will allow you and your student to read off the same PDF score. As you are sharing your screen this means that you can open the score in a program (like Preview on a Mac) where you can annotate the score and point out sections with your cursor. Anything that you can see on the screen can be seen on the students screen. Just remember that people tend to be on smallish screens so you might need to zoom in on the score if you want to refer to small details. Record the Lesson It is very easy to record a Zoom lesson. Simply hit record whenever you like and a little red dot will appear on the feed showing that the session is being recorded. You have the possibility to pause the recording at any time – perhaps if you want to engage in casual conversation or there is a technical issue – and continue when you are ready. When you end the session Zoom will take a few minutes to render a movie file that you can playback, upload to youtube or send to the student. “Turn on Original Sound” Zoom does have a setting that let’s you get around the dreaded sound quality that we normally experience and it is called original sound. This means that the software stops trying to be smart and detect when you are speaking and just transmits the raw audio feed of the microphone. This is GREAT but it comes with a couple of problems. This is currently only available to the host, which means the teacher can better demonstrate sound but not the student. It causes echo. The sound quality gets better and in part this is because the signal gets a little more complex. The buffering needed to carry this signal puts you slightly out of synch with your student you will get an echo. The solution for this is to use headphones. Multiple Students The biggest advantage of Zoom is that you can have multiple people in a “room”. This means that you can work with more than one person at a time and have a shared discussion. When there is more than two people in a room, you can choose to toggle your screen mode from featuring the person who is talking (or making sound) to a grid of video feeds where you can see everyone. Shareable Links In order for people to join your session you will need to give them a link that looks something like this “Join Zoom Meeting https://zoom.us/j/422347″ When you have a zoom account you will have a default “personal meeting room” link and also the ability to create new rooms with distinct names and links. This means that you could create a room called “Tracy’s Teaching Room” and send out the link to all your students. When a student clicks on a link the first time they will be promoted to download the zoom app to their device. Once this has been installed for the first time it will simply launch the meeting room directly from the link. The apps are free and easy to set up, even for the technology averse. If someone comes to a room early, before you initiate the session on your side, they will just see a screen saying that the host has not started yet. If they come in while you are in there with another student they will still get access but you can mute them until it is time to work with them. Multiple Cameras One benefit for music teachers is that you can set up multiple webcams to use for your teaching session. I am a guitarist, so it can be very useful to have one camera set up for a shot of my right hand whereas the main camera is the typical view from the front. To toggle between cameras all you need to do is select what camera you are using from the video icon. Muting As the host in Zoom, you can mute participants. This is incredibly useful if you are in a group of people and you don’t want to hear the various sounds coming from all the microphones. You can “mute all” or mute one at a time. Participants can also mute and unmute themselves. Dealing with Dropouts If the internet cuts out for you or the student the room is still there and it won’t disappear for everyone. This is inevitable at some point so it is nice to know that you or the student can simply fix the problem (usually plugging the computer into power) and re-join a few minutes later. Best Practices and SuggestionsPreparing Materials Save yourself a lot of time by making sure that you both have the same materials to refer to. If you have different scores you might spend a lot of time trying to communicate exactly what part of the music you are referring to. It is possible to hold up sheet music to the camera but it is not particularly convenient. Talking differently One of the more subtle changes that you will have to make is regarding how you talk and listen. In our regular teaching you might find yourself interjecting simply to encourage or acknowledge something. Online, this will potentially stop the flow of conversation with the inevitable “oh, sorry you go ahead – no you go ahead”. By speaking and then giving a clear amount of time to listen to the response or playing you will make the interaction more effective and less frustrating. Getting Different Camera Angles If you only have one camera available, which will be the case for most of you, you can still get multiple points of view by physically moving or adjusting the current camera. Take a few moments playing around with what angles might be useful in a teaching situation. How close do you need to be to see details and what details are visible at what positions. One thing to remember is that you don’t always need to have your face visible. Of course it is nice to see people’s faces but if you need to see a cello bow hold, perhaps you can adjust accordingly. If you are on a phone or laptop you will have some ability to maneuver the camera either by tilting or holding the device in your hand. Handholding can be very disorienting for the viewer so don’t do it too often, but it can be useful for getting very specific points of view. If you are using an inbuilt camera on a laptop, don’t be afraid to tilt the screen to get the right angle. Lighting The vast majority of cameras will be on automatic settings and adjust for light as they think is necessary. The only real problem that arises for our purposes is if you have a strong light in the background. If you have strong backlighting – perhaps a sunny window behind you or a strong lamp – then the camera might think it is necessary to adjust for that light source. The result will be that your face will be very dark. To fix this, aim to have the strongest light source in front of you, or potentially maneuver your torso to cover a specific back light. As soon as you do this you will notice that your camera adjusts on its own. If you want to look your best, you will want to aim for a large lighting source – like a window -and a soft lighting source – like a window with transparent white curtains. A small and bright light source will give you harsh highlights and shadow. A simple layout that works is putting a soft lamp next to your computer screen that lights your face from the front, turn on the overhead room light for a bit of ambient light, and potentially have some light in the background for depth. Of course, lighting can get very sophisticated and you can spend some time experimenting to find a setup that works for your space. Warmups keep your hands from Hurting
2/13/2023
 Guitar learners are curious about how to prevent their hands from hurting while playing on the guitar. Truth be told, the simplest and easiest way to achieve this feat is by warming up. As with most exercises, it is always important for people to warm up first before engaging in any strenuous activity which can go a long way in helping to prevent them from hurting themselves.
Warm-ups are essential for both novice and professional guitarists. Before doing anything on the guitar it is highly recommendable for players to perform a series of warmup exercises such as rehearsing, playing a gig or doing some recordings. Just so you know, many muscles, tendons, and bones are responsible for finger movements. This is why it is essential for guitarists to perform some warmup exercises before they even start flailing them around recklessly. Here are two important things you need to know about these preparatory exercises. They help to prevent injuries Ultimately, warming up can be every efficient in helping to improve your playing skills and technique. However, it is also important to note that these little exercises can go a long way in helping to prevent injuries from occurring. Carpal Tunnel Syndrome and tendonitis are some common problems that can occur as a result of not warming up before play. Just so you know, that are many guitarists that have been forced to retire from playing the guitar due to problems of this sort. This is why warming up before playing is important as it goes a very long way to help to prevent body injuries. Parting shot Warming up should be regarded more like a precautionary exercise than an optional thing. There is no better way to avoid those nightmare experiences associated with hurting hands than this. Now that you know how warmups can keep your hands from hurting on guitar, it is imperative to ensure that you make these activities a norm. Don’t just grab your guitar and let rip without taking the time to do some warming up exercises. Medically speaking, it is advisable to observe some finger stretching routines before setting out to play the guitar. There is no need to cut your guitar playing dreams short due to your inability to perform proper warm up routines before playing which has finally messed up your hands. In fact, doing so doesn’t even make any sense. The main aim of engaging in warmup routines is to awaken all the necessary ligaments, tendons, and muscles needed for playing the guitar. This can go a long way in preparing the hand and even the mind for the vigorous playing demands you are about to engage in. If you're interested in taking lessons on Zoom or In Person in Burbank, Glendale or North Hollywood, please contact us at (818)902-1233 or on our website at https://www.losangelesmusicteachers.com/online-guitar-lessons-in-burbank-ca.html 3 Voice Lesson Bad Habits To Avoid
2/10/2023
 The Top 3 things to avoid Bad singing habits. These cringe-worthy bad habits are high up on my list of things that make beginner singers sound well… beginner. If your voice gets tired after a warm up routine, or you feel a strain in your neck, you might be missing a step somewhere.
If you’ve had any formal training, you already know this: expanding your diaphragm is good, raising your shoulders is bad. To make sure you know how to breathe correctly to improve your singing skills, stand in front of a full length mirror and place your hands at the bottom of your ribcage on both sides to locate your diaphragm muscles. While you’re breathing in through your nose and exhaling through your mouth, your goal should be to expand your diaphragm, while keeping your shoulders down.
So many singers make the mistake of whispering during their vocal rest days, thinking that if their cords are not vibrating, whispering should still count as resting. Not true. Whispering, especially loud whispering, leads to tense muscles in the front of the neck. When you strain your neck, it becomes more difficult to sing with a healthy technique, because your voice box lacks the support from the surrounding muscles it usually relies on. So Try to avoid these 3 vocal warmups that could end up creating bad habits for your vocal lessons. If you're interested in taking vocal lessons on Zoom or In Person in Burbank, Glendale or North Hollywood, we have some of the best vocal lessons in Los Angeles. Our vocal instructors are picked by interviewing hundreds of vocal instructors and we have really high standards on both their teaching ability as well as their personality. If you'd like to talk to one of our instructors or set up a first lesson we have a guarantee that if you don't absolutely love your first lesson you don't have to pay for it. Please contact us at (818)902-1233 or on our website at https://www.losangelesmusicteachers.com/online-voice-lessons-in-burbank-ca.html
Music lessons for children aged 7 and up. We are offering lessons for piano, saxophone, violin, and many other instruments. Our music teachers teach rock, blues, metal, country and classical music lessons. Beginner students can get to work on chords, simple songs, melodies, music theory, and tabs reading. We try to make each lesson joyful to learn. All the theory and technical concepts are divided into small parts and end in something fun. No matter if you want to learn your favorite guitar riff or learn to play your favorite song, you are welcome to bring your CDs or iPod to the class to learn it from the teachers. If you are wondering who we are and what we do, in this blog we will cover all the aspects of our website and give you an overview of what we do. You will also learn a lot about our mission like why we founded this company and how you can benefit as a musician by choosing us as your music teachers. Who We Are We have professional and accomplished teachers and performers in the LA area who combined their expertise to form Los Angeles Music Teachers. In our long careers, we have taught for so many music schools but we were unable to produce the results we wanted due to the restrictions. It was the need of the hour to form a business that could overcome all the weaknesses of the competitors and offer something that could really provide benefits to the young students. Our Mission We believe that it is not necessary for a music school to have a complicated website that could confuse the student right in the very beginning. This is the reason why we made a website that is easy to navigate and provides all the information in the best way possible. Secondly, being music teachers, we want to offer lessons that are tailored to your needs and goals. Being musicians, we know that no two musicians are same and they cannot be taught in the same way. It is one of our mantras to offer special discounts to our students. You can pay all your fees in advance either for a month or a year, whatever you are comfortable with. However, customer satisfaction is our main priority and if you are not satisfied with your first lesson, you can claim your full fee back. We won’t ask you any questions. As we mentioned earlier that we like to offer discounts to our students, our referral scheme is something we take pride in. Just refer a friend to us and get a full month of free classes as a reward. We never impose our teaching plan on our students. We teach you what you are interested in learning; which is the beauty of our classes. No matter if it is a specific song or a riff, our experienced teachers will teach it to you. This is why we brag that it is a fun learning with us. Hopefully, this post is enough to answer all your queries and introducing ourselves to you. If you still have any further questions, please call us now at (818)902-1233, or leave your question in the contact form. We will answer you as quickly as possible. Hope you have a good time reading, we look forward to hearing from you. If you are interested in taking lessons on Zoom or In Person, please contact us at (818) 902-1233 or on our website at https://www.losangelesmusicteachers.com/online-music-lessons-burbank-ca.html 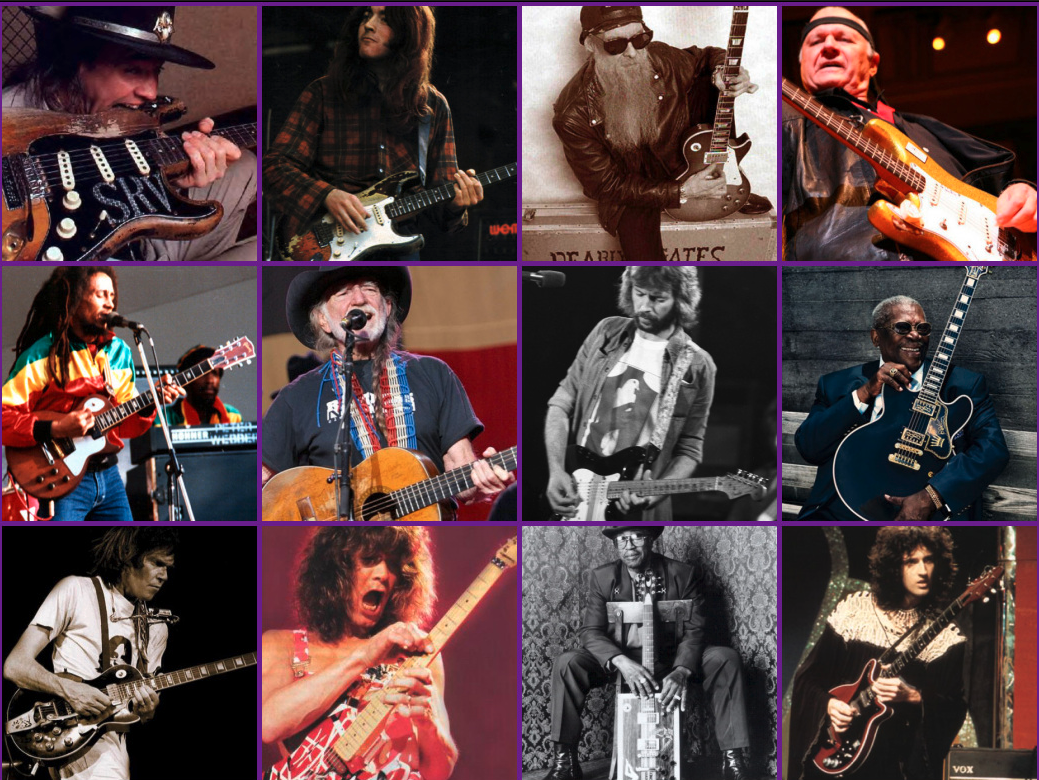 In the world of the electric guitarist, there are great players and then there are legends. What sets them apart from being mere mortals? Read on for ten of the best and why. Who knows, maybe you have a budding electric guitar prodigy in your family that will be inspired to become the next big deal. With guitar lessons for kids readily available, there’s only one way to find out! See how the big names below have made an impact on the world of music through their guitars. 1. Les Paul Les Paul gave his name to one of the most iconic guitars in the world; he was also a nifty guitar player in his own right. 2. Eddie Van Halen With a unique sound and an amazing two-handed playing technique, Eddie Van Halen changed the sound of rock for generations and inspired more people to take up playing than any other electric guitar player. Being a ‘tone chaser’, he would experiment with guitar parts to make the perfect instrument. 3. Jimmy Page One of the first heavy metal bands, Led Zeppelin owes its distinct sound to Jimmy Page. Very few people fail to recognize the opening notes to Stairway to Heaven or the iconic riff to Whole Lotta Love! Jimmy Page was one of the most iconic guitar players in the world. 4. Jimi Hendrix No list would be complete without James Marshall Hendrix. Hailed as the world’s greatest guitarist, an outplayed Clapton walked off stage when Jimi joined Cream for a jam, saying to Jimi’s manager “You never told me he was that good!” 5. Eric Clapton When you have fans that spray graffiti on walls proclaiming ‘Clapton is God’, then you must be an amazing guitarist. A blues player, Clapton combines amazing solos and instantly recognizable riffs to be one of the most accomplished artists. 6. Joe Satriani Inspired by Hendrix, Joe Satriani is mainly an instrumentalist who occasionally sings. He has an amazing technical ability, and has taught many other famous guitar players. Among his students is Steve Vai, who couldn’t even string a guitar when he met Joe. 7. Slash Guns & Roses would not be where it is today without Slash. Slash’s style epitomizes the iconic rock guitarist and spawned many trying to follow in his steps across the world. Songs such as Paradise City and Welcome to the Jungle will have you reaching for your air guitar in no time. 8. Steve Vai A master of the space age sound, Steve Vai pushes the boundaries of what you can do with an electric guitar. With a unique style and technical ability, there aren’t many who come close to him. Steve played with Whitesnake and sold out crowds in the early 90’s. 9. Peter Green The founder of Fleetwood Mac, Peter Green is one of the most accomplished musicians around. A beautifully soulful blues player, he wrote many memorable tracks including Albatross and Black Magic Woman. When blues greats such as B.B. King say, “He has the sweetest tone I ever heard; he was the only one who gave me the cold sweats” you know he must be good. 10. B.B. KingA legendary blues player, and influence of many, B.B. King was the master of the clean, soulful blues. If you have never heard of King, then you’ve never heard the blues. Although many deserve to be on this list, these are the crème of the crop. Music has been forever changed by the influence of these legends. If you're interested in taking lessons on Zoom or In Person in Burbank, Glendale or North Hollywood, please contact us at (818)902-1233 or on our website at https://www.losangelesmusicteachers.com/online-guitar-lessons-in-burbank-ca.html
Music Lesson on What is an Octave?
2/6/2023
 An Octave is one of the most fundamental principles that relates to how music is written, composed, and perceived. All music you hear on the radio or on TV uses octave relationships in the melodies and harmonies that it is composed of, and the concept of dividing the octave into 5ths, 4ths, 3rds and finally whole and half steps has been around for centuries. It's the basic of what we call the tonal system of western music. In this lesson, we will cover the basics of what you should know about how the Octave is used in music. However, to best talk about octaves, we should cover what pitches and intervals are first. What is Pitch? When we play a note on an instrument or sing a note, that produces a sound. We can define that sound by a few different criteria, like how loud it is, how long it is, and what the pitch is. Pitch is just another word for the frequency of a note, or how “low” or “high” the note is. All frequencies, have "overtones". The very first overtone above the fundamental (which is the basic note) is an Octave. The piano keyboard is also laid out in Octaves, i.e. if you look at the basic piano you will see a pattern of two black keys and 3 black keys. That pattern continues up and down the keyboard. That pattern is what is easily visual on the piano and divides up the various 8 octaves of the piano. If we hear a note that sounds like a baby’s cry, that would be a high-pitched note. On the other hand, a rumbling sound like thunder or train wheels would have a low pitch. A note sounds higher or lower than another if it has a higher pitch, or frequency, than the other note. What is an Interval? Now that we know what pitch is, we can discuss intervals. An interval occurs when two notes – notes with different pitches – are played at the same time, and the interval is the distance in pitch between the two notes. If two notes produce a really big interval when played together, then their pitches are really far apart, and if the interval between the notes is small, then they’re close together. There are many different names for all of the intervals. The smallest interval (shown on the right side of the picture above) is called a “semitone”, or “half step”. If you put two semitones together, you get a “tone”, or “whole step”. Other intervals are given numbers as names, such as a “third”, “sixth”, “eleventh”, and so on. This brings us to the octave. What is an Octave? An Octave is a very unique interval. It is the interval between two notes, in which one of the notes has a pitch that is exactly double the pitch of the other note. Pitch, as we said before, is another word for frequency, and we can define a note by giving its frequency as a number. So, say for example that we have a note with a frequency of 220 Hz. We can call it A (in fact, the note with that frequency is an A). If we want to produce another note that will create an octave interval with the A, we have to either double that number – 440 Hz – or cut that number in half – 110 Hz. Therefore, if we have two notes, one with a pitch of 220 Hz and the other with a pitch of 440 Hz, then those two notes create an octave: You can also have notes that are two or three octaves away from each other. For example, the note with a 110 Hz pitch and the note with a 440 Hz pitch are two octaves away, because you have to double 110 twice to get 440. We can then determine the octaves above 440 by doubling (880, 1720, etc.), and the octave below 110 by cutting it in half (55). Octaves are sometimes heard as basically the “same” note – like if a man and a woman are told to sing a “C”, they will most likely sing C’s an octave apart. However, it still sounds like they’re singing the same note, because they sound so similar. Summing Up To sum up, the octave is one of the most common and easily-identified intervals in music. Each instance of the same note (but different pitch) on a piano or guitar occurs as an octave, and each octave doubles the frequency of the one before it. If you're interested in taking lessons on Zoom or In Person in Burbank, Glendale or North Hollywood, please contact us at (818)902-1233 or on our website at https://www.losangelesmusicteachers.com/online-piano-lessons-in-burbank-ca.html
 Music is not a competition.
But if it were, the guitar would win that competition and there would be trophies, a podium, champagne, fireworks, plus an abundance of large and colorful sashes. Here's our list of measured reasons why guitar is an Amazing instrument. 1. It’s portable When a guitarist wakes up on a glorious summer’s day, they simply amble down to the park with an acoustic. The same can’t be said for a drummer with a 10-piece kit, who has to lurk in their waterlogged basement, battering away in the gloom like Gollum, and eventually dying from a vitamin D deficiency. 2. It’s cheap After a shaky start back in the 70s, budget guitar factories in Asia can now make their CNC routers perform like keyhole surgeons, and you can now pick up an electric for around $100.. 3. It looks awesome Well, obviously. But, too strap on a guitar is to feel yourself imbued with outlaw cool. To hit a power chord is to send a tidal wave of pheromones sloshing through the venue. 4. It’s handy in a fight When a gig turns nasty, it pays to have a solid slab of timber in your hand. Just ask Keith Richards, Pete Townshend or Pete Doherty, who have all felled foes with a well-timed swing of their Guitars. 5. It’s sociable “This is a chord. This is another. This is a third. Now form a band”. So went the advice of 70s punk fanzine, Sideburns - and it pretty much sums up the lightning-fast transition between picking up a guitar and finding yourself in a van hurtling towards a Festival. 6. It’s versatile Some days you want to be Nick Drake, others you want to be Kerry King. Guitar is the only instrument out there that truly sheds its skin. 7. It’s expressive If you’ve got a personality, the guitar will bring it out, with your soul seeping through your fingertips in the form of bends, vibrato, slides and slurs. 8. It’s therapeutic Somehow, smashing through a few visceral open-position chords makes everything feel better, in a way that tooting on a kazoo doesn’t. 9. It’s best for songwriting Whether you switch things up with an alternate tuning, stick on a capo, stomp an effects pedal or batter on your soundboard like you’re in Stomp, there’s a thousand ways the guitar can unlock your creativity. It seems unlikely that Jimmy Page could have written Communication Breakdown if he’d played the triangle. 10. These Amazing Guitarists play it Slash. Jimmy Page. Keith Richards. Kurt Cobain. Jimi Hendrix. Johnny Thunders. Joe Strummer. Noel Gallagher. Are you noticing a pattern here? By picking up the guitar, you’re running with a baton handed down by rock’s most untouchable Icons. If you're interested in taking Guitar lessons on Zoom or In Person in Burbank, Glendale or North Hollywood, we have some of the best guitar lessons in Los Angeles. Our guitar instructors are picked by interviewing hundreds of guitar instructors and we have really high standards on both their teaching ability as well as their personality. If you'd like to talk to one of our instructors or set up a first lesson we have a guarantee that if you don't absolutely love your first lesson you don't have to pay for it. Please contact us at (818)902-1233 or on our website at https://www.losangelesmusicteachers.com/online-guitar-lessons-in-burbank-ca.html How to Hold a Violin Bow
2/1/2023
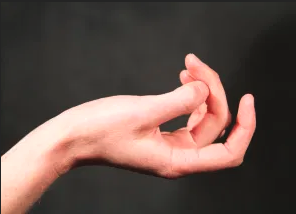 Sample 1: Turn your hand over so the palm faces up. Let your thumb curl inward. 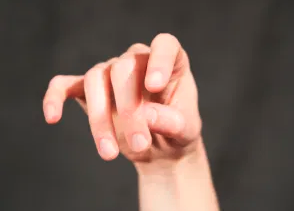 Sample 2: Turn your hand back over, but keep your thumb curling inward. That’s your natural hold.  Sample 3: Place your bent right thumb so that half of its tip rests on the lip of the frog and half of it rests on the bow stick. 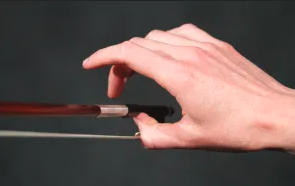 Sample 4: Allow the part of the thumb above the nail to lean against the hair. The Problem
You have difficulty getting a natural-feeling bow hold, one that produces the desired tone colors, strokes, and dynamics. The Solution As the foundation of your bow technique—literally how you and your bow connect—your bow hold can either support your technique or hinder it. Given the variety of bow holds demonstrated by talented artists throughout history, some argue that what you do with your bow is more important than how you hold it. However, these variations exist because of anatomical differences between players, the musical tastes of the times, and misinterpretations, and not because it doesn’t matter. A good bow hold feels so natural you hardly notice it and rarely think about it. It balances the elements of both flexibility and strength, facilitating complete command over the bow as a tool to produce a variety of tone colors, strokes, and dynamics. A troubled bow hold, on the other hand, has limitations in terms of flexibility and strength. 1. Rest your right arm at your side. Notice how your fingers curl slightly. Keeping this relaxation in your fingers, and your wrist floppy, bend your elbow and bring your hand up to shoulder height. Notice the spread of your top four fingers. Even if your thumb is already curling in toward the other fingers, turn your hand over so the palm faces up and let your thumb curl inward, most likely to touch the middle finger at the joint closest to the middle finger’s tip (Sample 1). 2. Now turn your hand back over, but keep your thumb curling inward (Sample 2). That’s your natural bow hold. 3. Now add the bow. Hold the bow stick in the left hand, hair facing you. Place your bent right thumb so that half of its tip rests on the lip of the frog and half of it rests on the bow stick (Sample 3). 4. The thumb should be slightly angled rather than vertical to the stick. Allow the part of the thumb above the nail to lean against the hair (Sample 4). This provides support and security. The thumb will likely rest here except when playing near the tip of the bow. 5. Keeping this position, rest the upper half of the bow on your left shoulder, hair down, bow stick parallel to the floor. Balance the bow between your shoulder and the right thumb tip. Keep your thumb bent down to the hair or the bow might roll away from you. Without upsetting the balance, lightly lower your fingers to the stick as the fingers fall naturally—the first three over, the pinkie tip on top. Your forearm will likely rotate inward. That should be a light, relaxed bow hold. If you're interested in taking lessons on Zoom or In Person in Burbank, Glendale or North Hollywood, please contact us at (818)902-1233 or on our website at https://www.losangelesmusicteachers.com/online-violin-lessons-in-burbank-ca.html How To Play The Shuffle On Drums!
1/30/2023
Can’t play a convincing shuffle? You might as well cross a whole range of potential gigs off your bucket list. Shuffles play a crucial role in every professional drummer’s vocabulary, and those still struggling to get the hang of this particular feel might be surprised to learn there’s a lot more to it than meets the eye. Shuffles can lightly bounce behind a track or drive like a freight train, and everything in between. You may be content knowing a handful of basic patterns, but there are dozens of types of shuffle grooves that can help you develop greater control and coordination while expanding your fluency. So let’s take your shuffle to the next level. WHAT IS A SHUFFLE? As you dig deep into shuffle pedagogy, you’ll find that they’re sometimes written as triplets in 4/4 and other times as 12/8. So, to help you adjust to this idea, we’ve presented the following examples both ways—in either case, they’re more or less equivalent. I’ll refer to both patterns as being counted as 1 & ah 2 & ah 3 & ah 4 & ah because it’s easier to count them that way, even though my music theory teacher would slap my wrists for that. Shuffles generally sound like a child skipping, with a cymbal pattern playing the pattern 1 – ah 2 – ah 3 – ah 4 – ah. However, as you’ll soon see, there are countless variations on this idea. Sometimes the feet play the shuffle, or it’s divided among several limbs, or occasionally it’s just implied. GETTING STARTED For those new to shuffles, we’ll start with a few blues beats that aren’t technically shuffles, but will help you get used to the feel of triplet-based beats. These grooves are written in 6/8, and since they’re shorter, they’re easier to master. Practice each slowly until it becomes comfortable, and then try speeding up the tempo. Keep your snare and bass drum medium strong, and play your hi-hat softer using the tip to create a musically balanced sound. Once you’re comfortable with these, you can link pairs together to create longer and more interesting patterns. The second line has some simple shuffles. When playing these on the ride cymbal, you may close your hi-hat with the snare note. The third line is trickier. To master these, play the unaccented snare notes very softly. More advanced drummers can expand these by buzzing or playing soft drags instead of ghost notes for different textures. Feel free to add variations on the cymbal, foot, or snare patterns to spice up any shuffle once you’re comfortable playing it. 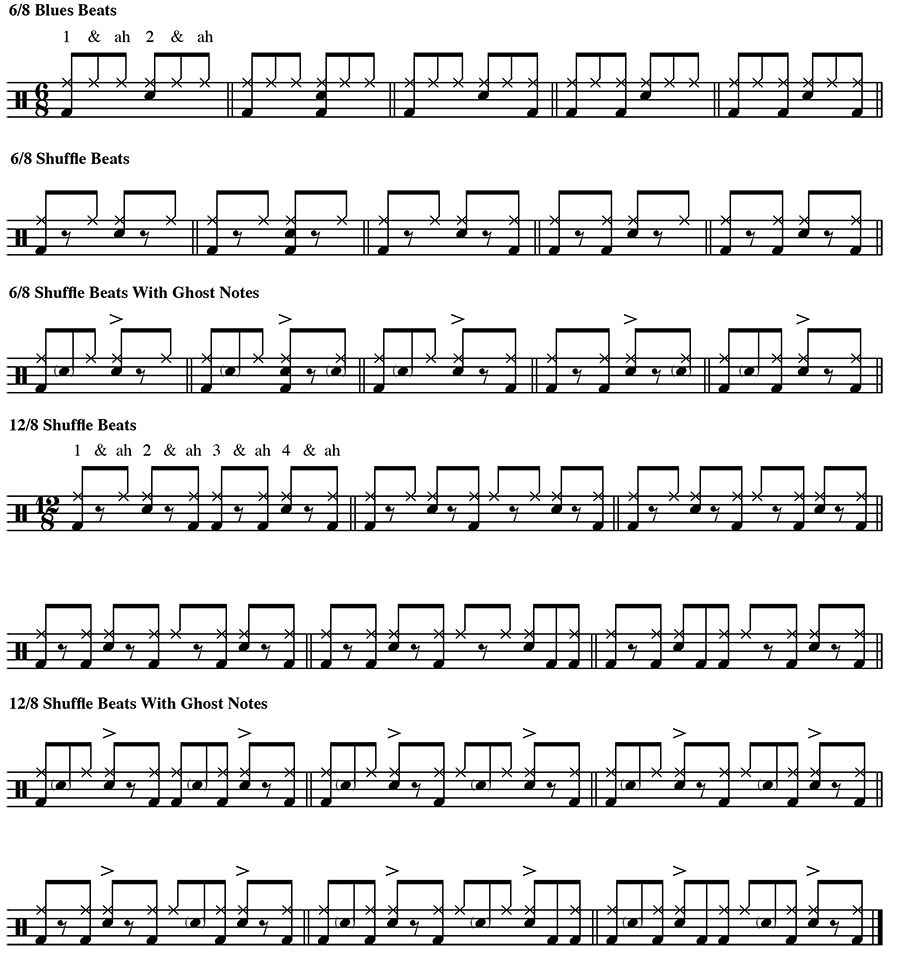 If you're interested in taking Drum lessons on Zoom or In Person in Burbank, Glendale or North Hollywood, we have some of the best drum lessons in Los Angeles. Our drum instructors are picked by interviewing hundreds of drum instructors and we have really high standards on both their teaching ability as well as their personality. If you'd like to talk to one of our instructors or set up a first lesson we have a guarantee that if you don't absolutely love your first lesson you don't have to pay for it. Please contact us at (818)902-1233 or on our website at https://www.losangelesmusicteachers.com/online-drum-lessons-in-burbank-ca.html
Best Way To Find Your Voice Range
1/27/2023
 If you're interested in taking Singing lessons on Zoom or In Person in Burbank, Glendale or North Hollywood, we have some of the best Voice lessons in Los Angeles. Our Vocal instructors are picked by interviewing hundreds of teachers and we have really high standards on both their teaching ability as well as their personality. If you'd like to talk to one of our instructors or set up a first lesson we have a guarantee that if you don't absolutely love your first lesson you don't have to pay for it. Vocal Range I’m sure we’re all familiar with words like bass, tenor, alto and soprano, but how do we actually find out our voice type when we start singing? Discovering our voice type is in fact a really simple exercise, and certainly one which is worth spending a bit of time on as a beginner. Knowing and understanding vocal range gives us an important guide on the notes and songs we are able to sing safely and effectively. It's important to remember that vocal range really isn’t related to singing ability: many experienced singers can have a narrow vocal range, and are still able to produce a beautiful, rich sound. As vocal range is mainly determined by the shape and structure of each individual's vocal folds, it's difficult to train to reach notes outside our range. However, we can strengthen the notes at the edge of our range, and much of vocal training focuses on improving the quality of the notes at the top and bottom of our register, giving us a wider range to sing with a clear and natural sound. Here are some simple steps for finding your vocal range and voice type: 1. Warm Up Before doing any type of singing, it’s vitally important to do a vocal warm up, particularly when singing near the edges of our vocal range. This is in order to avoid straining or damaging the voice. Simple techniques to warm up the vocal choirs include: humming scales, sirening, and singing scales using different vowel sounds. 2. Find Your Lowest Note Using a piano, find Middle C (also known as C4) and sing along as you play the note. Travel down the white keys to the lower notes and sing along to each note until you reach your lowest note. Any note within the octave of Middle C is designated a number 4, any note in the octave below is designated a number 3, and so on. Your lowest note will be the last note you can sing comfortably and sustain without croaking or breathing the note. Write down the note (for example G3). Once you’re sure you’ve found your lowest note, don’t attempt to try singing any lower as this might strain your voice. 3. Find Your Highest Note Much like finding your lowest note, travel up the piano from Middle C until you find the highest note in your normal voice and write the note down. Continue up the scale in your falsetto voice until you find the last note you can sing and sustain comfortably and again write the note down - this note it is the top of your vocal range. It’s very important not to push your voice and attempt to sing past this note. 4. Compare Your Lowest And Highest Note Once you know your lowest and highest note, check these against the voice types below:- - Soprano: C4 – C6 Mezzo Soprano: A3 – A5 Alto: F3 – F5 Tenor: C3 – C5 Baritone: G2 – G4 Bass: E2 – E5 You've now found your vocal range and voice type. However, it’s important to bear in mind that many singers within the categories above can often sing higher or lower than the ranges displayed, so don't worry if your range doesn't match exactly. The top and bottom note are not the only things to determine voice type: factors such as tessitura (the most comfortable part of the range to sing) and timbre (texture and quality of the voice) also inform voices types. As you gain more experience as a singer you will develop a better awareness of the parts you are able to sing most comfortably comfortably and naturally. If you're interested in taking vocal lessons on Zoom or In Person in Burbank, Glendale or North Hollywood, we have some of the best vocal lessons in Los Angeles. Our vocal instructors are picked by interviewing hundreds of vocal instructors and we have really high standards on both their teaching ability as well as their personality. If you'd like to talk to one of our instructors or set up a first lesson we have a guarantee that if you don't absolutely love your first lesson you don't have to pay for it. Please contact us at (818)902-1233 or on our website at https://www.losangelesmusicteachers.com/online-voice-lessons-in-burbank-ca.html
 At the end of the day, singing is a physical process. It requires precision movements from your entire body. Because of this, singers need to take just as much care of their voices before they sing as when they’re singing. Have you ever been to the gym and had a great workout but felt really sore the following day? Or perhaps you’ve been on a run with a friend and gone to bed that night with a clicking knee? Stretching can prevent the athlete from unnecessary damage and pain. Stretching your voice is just as critical. Here are some of the best reasons why you should take the time to condition your voice with regular warmups. Warmups bring you right up to your best voice. You may have noticed that some days you can sing all night without a problem. Other days, you might wear out by the second or third song. You may even have noticed that some days you can hit that high note, but other days it’s a stretch to come near it. You may find that you’re able to sing lower notes in your range at the end of the day than you can in the morning. All of this can be worked through ahead of time by warming up your voice prior to a recording session or performance. And if you record at home, it’s much easier to notice how your vocal strength improves day by day by listening back to the recordings you make. By gradually putting your voice through its paces, you’re able to loosen it up and get your blood circulating through all the different parts that make up your voice box. This gives you access to all the different abilities you have as a vocalist. By warming up, you don’t have to wait around for a “good voice day” to happen. Warmups grow your skills as a singer. Think of warming up as exercising for your voice. What happens to your voice when you warm up is actually similar to what happens to athletes’ muscles when they stretch and exercise. Here’s a simplified explanation. Warmups prepare you for the intense vibrations that come along with singing. Controlled, steady vocal exercises will increase acid in the muscles surrounding your vocal folds, which helps those muscles do their jobs more effectively. One of these jobs includes interacting with a tendon in your throat. When that tendon is properly engaged, it’ll stretch, giving you more flexibility and control over your voice. When you properly and regularly exercise your voice, you build upon your abilities and become a much more effective singer. Warmups help you sing healthily without damaging your voice. Remember all that stuff above about the muscle and tendon? If there’s a high or loud note you can’t sing right away, forcing yourself to do it can strain your voice. You could literally pull a muscle or give yourself tendonitis. Ouch! Not worth it. Have you ever tried to push through a long set on a “bad voice day” and felt tired and sore at the end of the night? Perhaps your speaking voice was mostly gone? Vocal warmups before a show prepare your voice for the strenuous activity that is singing. It may seem counterintuitive. “How does singing before I sing make me less tired from singing?!” This is because warmups are a controlled, steady way of singing that doesn’t stress your voice out. Warmups prepare your voice for the vocal event that is singing. When you sing something challenging in a performance without adequately warming up, you run the risk of damaging your voice and really hurting yourself. When should you warm up? Ideally, you should warm up every day. And if you’re not already, you should start slow. Do some simple exercises for 20 minutes every morning. Don’t try to belt out that high C just yet — you’ll need to work yourself up to that. Remember, warmups help grow and unlock the skills that you already have. If you don’t have a regular warmup routine, it’s wise to consult a voice teacher and build one together so that you approach the exercises correctly. These exercises should also be done the day of any strenuous vocal activity. If you have a show in the evening, warm up in the morning, then again an hour or so before the show. If you’re a public speaker, you’ll want to warm up ahead of your presentation as well. Choose your favorite warmups and then make sure you’re practicing correctly. If you’re familiar with vocal warmups, this will serve as a great reminder of what you already know. If you’ve never warmed up a day in your life, I highly recommend getting in touch with a teacher to properly lead you through your exercises. Relax. Relaaaax. Inhale, exhale. Good, healthful singing starts from a relaxed body. Do what you need to do to loosen yourself up — within reason, of course! Some singers like to start their day with a hot shower and a lukewarm mug of licorice root tea. Feel all your tension melting away and your muscles becoming looser. Practice proper breathing. Proper breathing for singing is the way we breathe when we lay down. You want to imagine your chest is filling with air from the bottom of your lungs, up. Imagine a glass filling with water; the water fills the bottom first, then rises to the top. To exhale, reverse it — empty your lungs from the top down. It will feel a bit unnatural at first, but you’ll become accustomed to breathing this way. This is how you breathe deeply. Release tension in your neck. The quickest way to damage your voice is to sing with tension. When you’re singing any note, you want to make sure your neck looks soft and relaxed. Sing in front of a mirror and watch your neck. Does it tense up? Can you see veins and ligaments protruding out at certain notes? Be mindful of where you’re feeling tension. Your neck should look the same when you’re singing as it does when you’re not singing. This is true for softly sung songs as well as big belters. Although, if you’re screaming to heavy metal every night, I’m not sure there’s much you can do about those veins. Stand up straight. There’s a correct way to stand when singing. Straight! Don’t allow your shoulders to hunch. Plant your feet firmly on the ground, shoulder-width apart. Now, imagine there’s a string that winds all along your spine and comes out the top of your head. Imagine yourself pulling that string and straightening out your spine, your neck, and lastly, your head. Your chin should not dip or rise, but be level with the floor. You’re ready to sing! Pace yourself, and enjoy your newly warmed-up voice. Vocal warmups should be challenging the same way that going to the gym is challenging. You should leave feeling better than when you came. One crucial difference, though, is that vocal warmups should not leave you feeling sore. A good exercise will have you feeling ready to sing anything! If you're interested in taking Voice lessons on Zoom or In Person in Burbank, Glendale or North Hollywood, we have some of the best Voice lessons in Los Angeles. Our Vocal instructors are picked by interviewing hundreds of voice instructors and we have really high standards on both their teaching ability as well as their personality. If you'd like to talk to one of our instructors or set up a first lesson we have a guarantee that if you don't absolutely love your first lesson you don't have to pay for it. Please contact us at (818)902-1233 or on our website at https://www.losangelesmusicteachers.com/online-guitar-lessons-in-burbank-ca.html
 Choosing A Private Music Teacher For Yourself Or Your Children Of course, music has been food for the soul since day one. No one can contest that. Music inspires people. You must have observed that successful musicians are often objects of hero worship. Musical artistes are nothing but idols. It is because of the power in music. Although many artists have natural talents in music, they still have to develop it through music lessons. Right now, there are musical institutes and music is studied in several colleges and universities. One good benefit of musical schools is learning how to play musical instruments. While you can acquire musical knowledge from YouTube or other similar platforms, you can’t compare any of them to hiring a highly experienced music teacher. One reason for this is that a teacher will tailor your lessons towards your unique deficiencies but what you’ll learn on the internet is general knowledge. Apart from going to a music school, you could also enroll for private lessons. If hiring a private music teacher seems like the best option for you or your children, remember that music teachers have different levels of experience and expertise. Besides, having a particular skill is different from being able to transfer the skill to another person. So, don’t just hire any music teacher that you come across first. Here are some important factors to consider. Interview several prospects before hiring one Scrutinize several prospective teachers before choosing one. Find out about their qualifications, experience, and areas of expertise. Teaching children requires different skills from teaching adults. So, if you’re hiring a teacher for your children, you should hire the one that has experience in teaching children. Let your child select the teacher that he or she is comfortable with. Also, you may also try to find out about the music teacher’s teaching techniques too. The learner should take trial lessons A good way to assess a musical teacher is to take his trial lesson. This will help you determine if the teaching technique is suitable for you. A technique that worked for your friend may not work for you. This is why you need to take trial lessons. If the lesson is for your kid, let him/her take the lesson, but you need to be there too. Evaluate each trial lesson Since you may have to take trial lessons from several teachers before you select one. You need to evaluate the lessons from both the learner’s perspective and the teacher’s angle. If your kid is the learner, ask him if he enjoyed the lesson. If not, find out why he didn’t enjoy it. Also ask him for the teacher whose trial lesson is the best. You also need to seek the teacher’s assessment of the learner. Was (s)he attentive? Was (s)he eager to learn? This will help you to make a balanced judgment. Conclusively, you can start your search on Google. A simple Google search will bring up the contacts of several music teachers within your location. The benefit is worth the search. If you're interested in taking lessons on Zoom or In Person in Burbank, Glendale or North Hollywood, please contact us at (818)902-1233 or on our website at https://www.losangelesmusicteachers.com/online-music-lessons-burbank-ca.html
Styles of Singing for Different Genre's
1/11/2023
 Voice Lesson on styles of singing. People have been singing since the discovery of the voice and the beauty of melody. Of course, many things have changed over the hundreds of years people have been singing. Cultures across the globe have with their own scales and modes, and at the same time different type of singing styles emerged. Music genres are diverse and varied as the cultures themselves. Different genres present unique challenges for singers. Here is a list of the most common singing styles and how to sing them. Pop Pop is short for Popular. The pop music of the 40's was Frank Sinatra and Jazz music. In the 50's it was Elvis and Bo Diddly. Each decade was a different style of music right up until the pop music of today. With dance and rhythm at its heart, this style has dominated the music industry. Tips: Learn how to control your vibrato without getting stressed. Experiment with varied vocal sounds like short popping sounds. Focus on your stage movements and gestures and dance a little to set the right energy. Rock Rock is the grandchild of the blues. Rock and roll is heavier and a more danceable rhythm. It grew up t o become harsh, rougher and edgier. Tips: Experiment with different vocal flairs like a growling sound at the end but make sure you don’t overdo it. Practice singing a huge range of dynamics from whispers to high notes. Opera/ Classical This style is always considered as the most formal and restrictive of all genres of singing as it requires the greatest amount of discipline. It is sung with a terminal vibrato and emotional release. Lack of intimacy with the audience makes it the least conversational of all genres. It gives the audience the impression of admiring astonishing paintings from afar. Tips: Listening to the style of the great vocalists will help you to understand the stylistic demands of this difficult style. Don’t force or try to create it. Get connected with classical voice instructor to become a legitimate classical vocalist. Blues/Jazz Songs with clear speech level and distinct consonants come under jazz genre while blues singing has rough and rootsy edges with a unique accent. Tips: Experiment with different vocal sounds like scatting and pitch slides. Listen to great jazz vocalists for understanding the stylistic differences and you can also learn a lot from singing along with great saxophone and horn jazz soloists. Hip Hop The rhythmic rhyming singing accompanied with rapping and beat boxing is termed as hip hop style of singing. The genre has grown steadily and gained popularity over the years. The apparent origins are funk, disco, reggae, and blues. Tips: Carefully listen to funk, disco, reggae, soul, gospel and old-school hip hop songs. Hip Hop is different than rapping. Never be afraid of experimenting or wordplay. Make your own unique signature singing styles. Despite the different music genres, one thing connects them all that is love that the audience has for the voice and great vocalists no matter what style. Practice makes perfect. Listen carefully and learning some piano skills will also help you to develop faster because learning about scales and chords is important for your development. If you're interested in taking vocal lessons on Zoom or In Person in Burbank, Glendale or North Hollywood, we have some of the best vocal lessons in Los Angeles. Our vocal instructors are picked by interviewing hundreds of vocal instructors and we have really high standards on both their teaching ability as well as their personality. If you'd like to talk to one of our instructors or set up a first lesson we have a guarantee that if you don't absolutely love your first lesson you don't have to pay for it. Please contact us at (818)902-1233 or on our website at https://www.losangelesmusicteachers.com/online-voice-lessons-in-burbank-ca.html
 Why Singers Should Take Piano Or Guitar Lessons In Person And Online Singers, you are musicians. Often times we are lost in the solo world of performance and emotive expression through sound, which is awesome. But we are complete musicians and expected to be, and definitely respected much more so, when we act as such. Solo performers are at somewhat a disadvantage when they show up at rehearsals with other kinds of musicians, a band, an orchestra, back up singers, or a pianist. We need to keep time so that people can play with us. We need to be able to follow a conductor during a staged performance. We need to be able to count. And that is where piano or guitar lessons will do you some good. Learning to really read music, for real; rests, quarter notes, time signatures, key signatures, key changes, dynamics, tempo markings, minor, major, harmony, theory and songwriting etc... And number one, being able to learn your part spot on, by yourself correctly, even when it is hard. May we suggest you sign up for some piano or guitar lessons? We have been teaching and working in the profession for over 20 years. We love to teach the piano and guitar at Los Angeles Music Teachers with a passion because it works a different part of your brain than a voice lesson. It always feels like completing a complicated math test after a good lesson and that is great for us. I am sure our piano/guitar students feel that way as well. Also, what is fantastic about piano and guitar is that you can really track your improvement by completing levels of music so you know you are getting better. Singing is more complicated. You have to be born with a certain amount of talent beyond your control. Lessons are important and help so much in singing, but it is different than piano playing. (You do need a certain amount of natural talent to be a concert pianist/guitarist of course- I am not referring to that). So consider putting learning the piano/guitar on your list of things to do to further your singing level. We can not tell you as a singer how many times it came in handy for me to be able to pluck out my parts, or play the harmonies with my part so we could practice singing against them. Piano/guitar especially helped me out of college because we are able to teach voice lessons. If you're interested in taking piano, guitar or singing lessons on Zoom or In Person in Burbank, Glendale or North Hollywood, we have some of the best piano, guitar and singing lessons in Los Angeles. Our instructors are picked by interviewing hundreds of drum instructors and we have really high standards on both their teaching ability as well as their personality. If you'd like to talk to one of our instructors or set up a first lesson we have a guarantee that if you don't absolutely love your first lesson you don't have to pay for it. Please contact us at (818)902-1233 or on our website at https://www.losangelesmusicteachers.com/contact-us-for-info.html
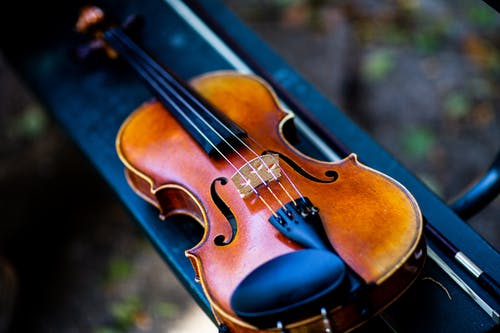 As much as every budding violinist would love to pick up their instrument and begin playing beautiful music, the work required to get there is much more mudane. Every breathtaking performance requires strategic and focused warm up exercises beforehand. These routines help develop and maintain your basic violin skills as well as gear for more advanced techniques too. For beginners, it may be difficult to know even where to start; after all, everything seems to need work. However, using the beginning of each practice session for a warm up will optimize each days result and pave the way for strong playing for months and years to come. Although warm up excursuses will vary from person to person based on the advice of your violin teacher, there are certain exercises that can benefit everyone. Here are five beginner violin tips that will help you grasp the fundamentals. 1. Long Open Strings Playing long open strings does several things: it lets your practice consistent intonation from each stroke, it allows you to become familiar with your bows weight and speed across the strings and lastly, it helps ensure that your bow remains in the proper location on the strings in relation to the bridge. Look into a mirror and place the bow on the string in the proper point and pull the bow across the string, listening for a clear, clean and consistent note. As you play, continually check in the mirror for your bows contact point. Repeat at least five up and down bows before moving on to the next string. 2. Finger Placement Correct finger placement is essential for playing the right notes on the violin, and to learn this correctly, you must practice! One of the tried and true beginner violin tips is to play simple scales in first position. This trains your finger to understand where they belong on the fingerboard in relation to other fingers, and it trains your ear to hear each note as it should be played. To practice, pick any scale, and play each note slowly, separately and precisely. Always play with a tuner so that you can tweak your fingers placement for a proper intonation. 3. Fourth Finger Practice Placing your fourth finger on a string creates the same note as the subsequent higher open string. Some beginner violinists use the open string to play the note because it is much easier and you know that the note will be correct. However, as you advance, there will be times where you cannot access the open string to play the note, or it is much less efficient to do so. Therefore, you need to strengthen your pinky finger! Start by playing the open string, then mimic the note using your pinky on the lower string about five times for each string. Listen carefully - does the fourth finger note match that of the open string? Don’t get discouraged if its difficult to even stretch your pinky at first - it will take time for it to gain strength and flexibility 4. Slurs A slur allows you to play two or more notes in a single bow stroke. To do this, start by placing the end of your bow close to the frog on the string. As you slowly but steadily bring your bow across the strings, place and then remove your first finger in the proper place while keeping your bow straight. Also, make sure that you place your finger on and off the strings at regular intervals - using a metronome will help. Start with two notes per stroke. 5. String Crossing The final of the beginner violin tips is the ability to make a clean change from string to string while playing. Keep your elbow at a right angle to form a square - include the bow and trace an imaginary line from your shoulder to prove where the bow hair touches the string. Rock the bow to each string while practicing your long bow strokes. Make sure that your arm and bow remains in the same plane and use the natural weight of your arm on each string. Because these warm up exercises set the tone for your practice session and for your learning overall, always perform them with focus and intent. They don’t need to take long, a dedicated five or 10 minutes should be fine. If you are unsure of what to practice or how to practice, ask your violin instructor for some violin tips - they have the knowledge and experience to guide you in the right direction If you're interested in taking Violin lessons on Zoom or In Person in Burbank, Glendale or North Hollywood, we have some of the best Violin lessons in Los Angeles. Our violin instructors are picked by interviewing hundreds of violin instructors and we have really high standards on both their teaching ability as well as their personality. If you'd like to talk to one of our instructors or set up a first lesson we have a guarantee that if you don't absolutely love your first lesson you don't have to pay for it. Please contact us at (818)902-1233 or on our website at https://www.losangelesmusicteachers.com/online-violin-lessons-in-burbank-ca.html
Top 10 Guitar Styles To Learn Online
1/2/2023
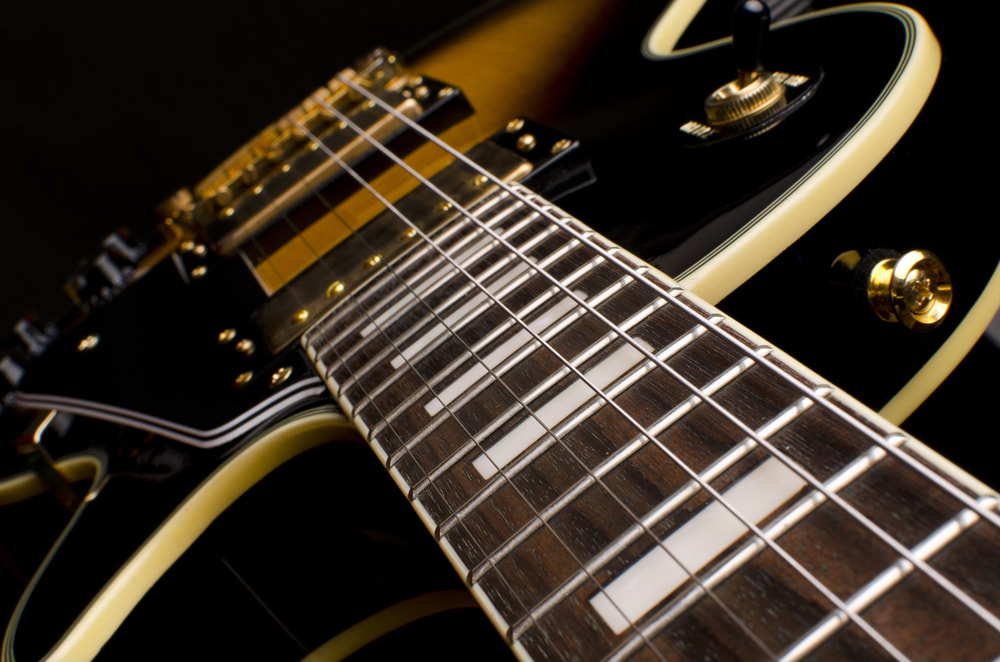 Top 10 guitar styles to learn online with Los Angeles music teachers Several cultures have managed to influence the way the guitar is played in times gone by. Today, there are various ways of playing the guitar. Learners need to understand the various playing styles available so as to be able to choose a suitable guitar style. It is highly recommended to avoid monotonous tendencies by learning various styles of play. Undoubtedly, you stand to gain more impressive recognitions among friends and colleagues when you learn to play in varying guitar styles. Interestingly, the guitar space is so diversified to the extent that players can colorfully create their own styles by simply learning more musical scales and techniques. Here are some of the top styles to learn on guitar to help you improve your own playing skill. Rock The electric guitar is mainly used to create the rock music style it features a typical 4/4 beat that is influenced by country, rhythm, and blues, and blues music. Rhythm Learners will need to understand how to support a vocalist with the right beat when playing the rhythm guitar. Percussive Of all top styles to learn on guitar, the percussive could be the most challenging as it requires lots of practice to master. Aside from playing on the strings, players will need to learn how to produce percussive sounds by hitting the body of the guitar with their nails, finger edge or palm. Lead Virtually any type of guitar can be used to play a solo and practice several other techniques for lead improvisations. Jazz Typically characterized by improvisations and polyrhythms, swing and blue notes, this is an independent art form of music that can be purely instrumental. When playing on a jazz guitar, it important for learners to understand its complicated chord structures. Folk Anyone can pick up a folk guitar to play in a piece of folk music as it doesn’t require any form of professionalism. All you need to do is to flow along with the story that is sung about common people. Flamenco Flamenco features a vigorous Spanish style of play that involves fast and dynamic movements. Playing the flamenco guitar can provide the groove to the dancer by establishing percussive hits through a distinct picking pattern. Slide Learning to play the slide guitar will also require you to learn how to change pitch with the slide instrument. Bluegrass Originating from the southern United States, this unique style of country music features a happy spirited, fast tempo that is supported with a resonating guitar on the bass line. Blues Often performed over a repetitive harmonic pattern, blues is a melancholic style of music that features a simple chord progression presented in a slow sad manner. During musical performances, the guitarist often serves as the main point of focus. If you're interested in taking Guitar lessons on Zoom or In Person in Burbank, Glendale or North Hollywood, we have some of the best guitar lessons in Los Angeles. Our guitar instructors are picked by interviewing hundreds of guitar instructors and we have really high standards on both their teaching ability as well as their personality. If you'd like to talk to one of our instructors or set up a first lesson we have a guarantee that if you don't absolutely love your first lesson you don't have to pay for it. Please contact us at (818)902-1233 or on our website at https://www.losangelesmusicteachers.com/online-guitar-lessons-in-burbank-ca.html
11 Great Guitar Warmups
12/29/2022
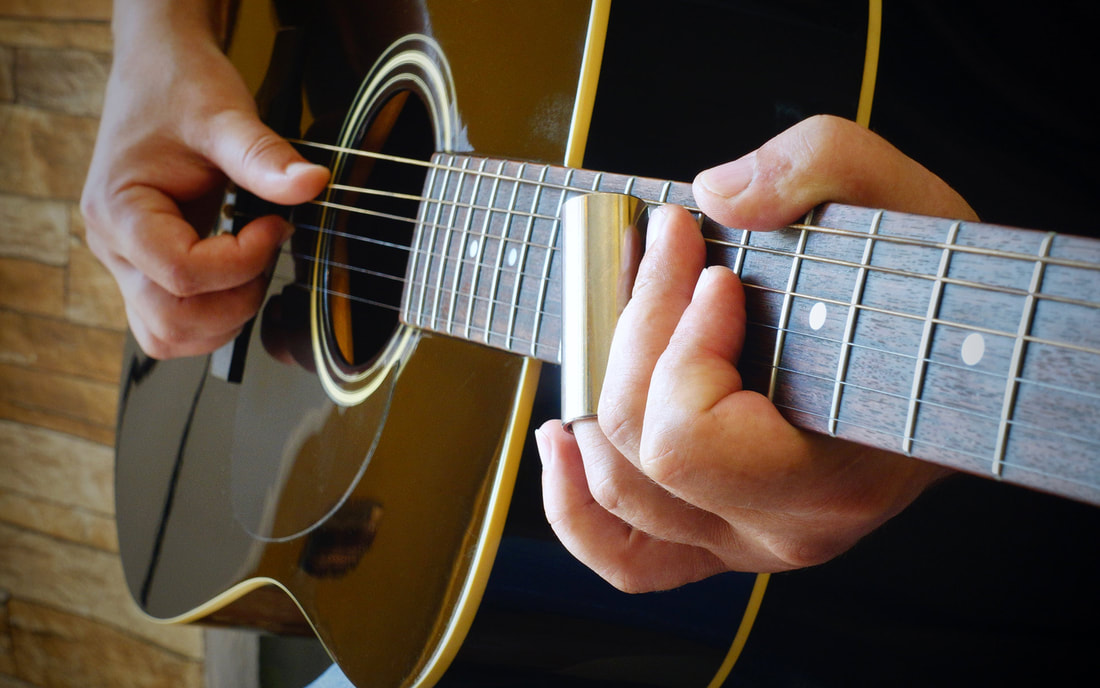
Every professional guitarist starts a session the same way: by warming up.
Whether you’re playing a gig or recital, planning a monstrous guitar practice session, or preparing to impress your friends at home with your killer chops, a precursory limbering up session is mandatory. A thorough warm-up will help bring your playing to peak level and prevent hand injuries. Here are 11 ways to get your hands and fingers ready for action, both off and on the guitar. GET 'EM HOT Here’s an excellent way to get the blood circulating in your fingers and hands and make everything nice and loose. Simply head to the nearest sink and crank up the hot water. It doesn’t have to be that hot—you don’t want to scald yourself—but it should be warm enough to get your hands loose. While running your hands under the water, stretch out your fingers. Don’t apply any external pressure to your hands or fingers; simply stretch them out just as you do when you’re playing. Now before “prune hands” take effect, let’s start working on the warm-up exercises. FOUR-FINGER EXERCISES The four examples that follow are designed to loosen up all four of your fret-hand fingers as well as your picking hand. Before you get started with the specifics of each example, there are a couple of general rules to follow for all the exercises here. First, always start at a slow tempo to ensure that you’re playing the music correctly, and then gradually increase your tempo as you progress. Remember: it’s always better to play something slowly and correctly rather than quickly and sloppily. Second, alternate picking (down-up-down-up, etc.) is essential for all of the single-note exercises in this workout. This technique may seem difficult at first, but you’ll develop much more speed and accuracy in the long run. FIGURE 1 is a relatively simple starter—a pseudo-chromatic line in 5th position. We’ll use this example as our “base” pattern for the three examples that follow. Pay strict attention to the fingering, making sure to use all four fret-hand fingers (including the pinkie) for each string grouping. Once you’ve got this base pattern down, move on to its more extensive—and more challenging—offshoots. FIGURE 1 
FIGURE 2 is a “double-back” pattern reminiscent of a Charlie Parker–style bebop line. Notice how it develops independence between your first two (index and middle) fingers and your last two (ring and pinkie) fingers. To extend the exercises in FIGURE 1 or FIGURE 2, simply shift the entire pattern down one half step (one fret) at a time. FIGURE 2 
FIGURE 3 kicks things up another notch by applying the original base pattern to sequential strings (E A D G). (From a harmonic standpoint, this one probably won’t win any Prettiest Ballad awards, but remember that the goal here is to warm up your hands and fingers.)
FIGURE 3 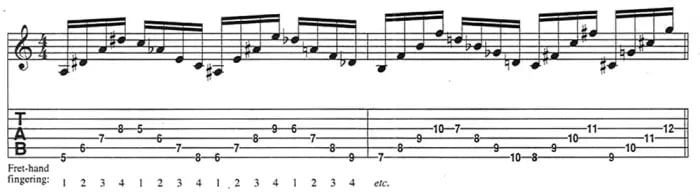
Once you’ve completed the initial four notes, simply invert the pattern, playing in a descending fashion. This completes the motif. To get the fullest impact possible, try this one on all three sets of these four adjacent strings.
FIGURE 4 adds notes between those that compose the base pattern. An octave is added between the first two notes, a minor 6th between the second two. This example is a great dexterity builder and, again, you should move it up and down the fretboard. FIGURE 4 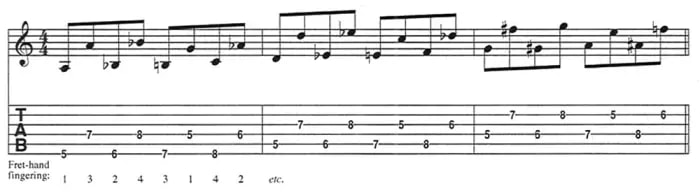
Feeling loose yet?
CHORDAL WARM-UPS Have you ever seen a show in which the lead guitarist does nothing but solo? Me neither. So obviously at some point you’ve got to be a rhythm guitarist. Since rhythm playing varies so from genre to genre, I’ve included a nice cross-section of different chord voicing that will get both of your hands active. Even if you don’t jive with the style of a certain exercise here, try it anyway. It may open some new paths in your musical evolution. FIGURE 5 is a descending open-chord sequence in the key of C, shown here as an arpeggiated exercise (though strumming your way through is also a viable option). For the sake of variety, try transposing this chord sequence to other keys as well. For instance, this same chord sequence in the key of G major would be G–D/F#–Em–D–C–D–G. FIGURE 5 
FIGURE 6 is a great power-chord workout that doubles as a dandy barre-chord workout. Try it with the power chords first, and then extend them to full barre chords simply by adding the notes in parentheses.
FIGURE 6 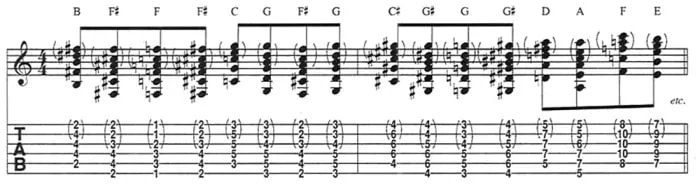
FIGURE 7—a James Brown–style funk rhythm using E9 and E13 chord shapes—is a great workout for your pick hand. Work through the rhythm slowly until you perfect it, and then gradually bump up your tempo. For some tonal variety, try moving the exercise to different areas of the fretboard. For instance, if you wish to play this as a typical blues sequence, such as a I–IV–V progression, you can play the IV chord—in this case, A9—with the root on the 12th fret. The V chord, B9, is located on the 14th (or 2nd) fret.
FIGURE 7 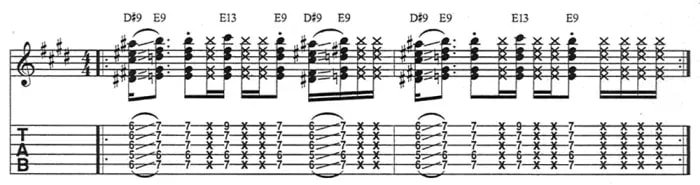
STRING SKIPPERS
Now that your pick hand is moving, let’s kick it into high gear, this time with two devilish string-skipping exercises, each written here as a three-notes-per-string pattern in A major (A B C# D E F# G#). FIGURE 8 is simple enough in nature. Start on the low E string with the first three notes of the scale and then skip to the D string for the next three notes. At that point, backtrack to the A string, which you skipped, and continue the pattern in the same fashion. Use alternate picking throughout, even when skipping strings. That is, start by picking the first three notes (on the low E string) in a down-up-down sequence, and then pick the first three notes on the D string in an up-down-up sequence. (Repeat this picking pattern for the skip from the A string to the G string and so forth.) Taking this approach makes for a challenging sequence, but you’ll be rewarded in the long run. FIGURE 8 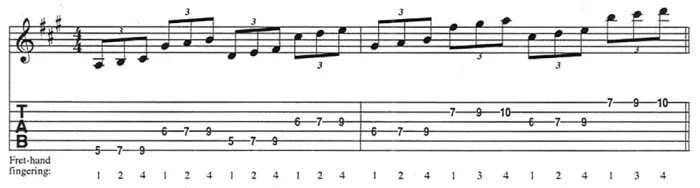
FIGURE 9 is a pivot-picking, or pedal-tone, exercise. The concept here is to return to the root of the scale between the other scale tones. This technique is used often in classical music, both in ascending and descending fashions. Each of these string-skipping figures is pattern based, so try using various scales or modes to maximize your warm-up.
FIGURE 9 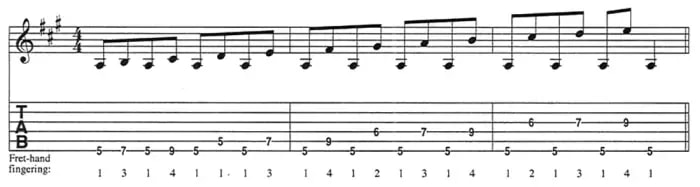
THE FINAL STRETCH
FIGURE 10 uses some stacked power chords (or sus2 chords) to great effect. These chord shapes are a staple of quite a few rock classics. Thumb placement is key here. For instance, since the first chord covers a four-fret distance (the 5th fret to the 9th fret), your thumb should be centered on the back of the neck at the 7th fret. This allows you to reach back to the 5th fret and forward to the 9th without shifting your hand position. FIGURE 10 
The same can be said for FIGURE 11, which covers a whopping five-fret span. This exercise is based in A minor, and as a bonus it makes for a pretty crazy soloing line if you so choose.
FIGURE 11 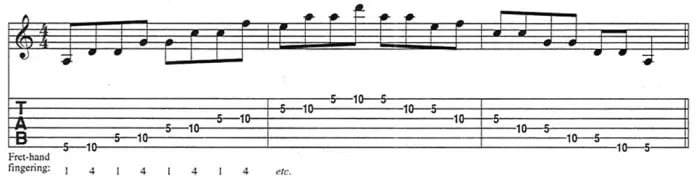
That concludes our warm-up exercises. Note that we aren’t suggesting you should perform each of these guitar exercises before you play, but working through at least two or three will benefit your playing, whether you’re hitting the stage,the studio or the rehearsal room.
f you're interested in taking Guitar lessons on Zoom or In Person in Burbank, Glendale or North Hollywood, we have some of the best Guitar lessons in Los Angeles. Our guitar instructors are picked by interviewing hundreds of guitar instructors and we have really high standards on both their teaching ability as well as their personality. If you'd like to talk to one of our instructors or set up a first lesson we have a guarantee that if you don't absolutely love your first lesson you don't have to pay for it. Please contact us at (818)902-1233 or on our website at https://www.losangelesmusicteachers.com/online-guitar-lessons-in-burbank-ca.html 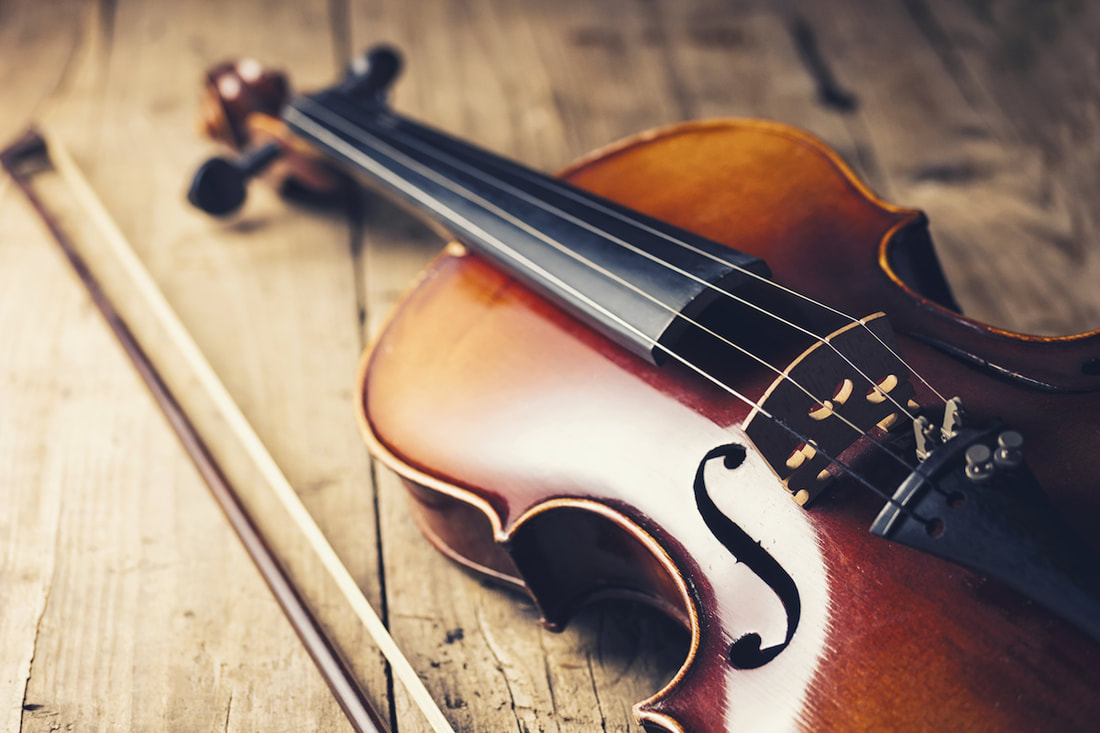
What is the difference between violin, viola, and cello?
When you are learning a string instrument in Los Angeles, it is important to know the main string instruments of an orchestra. Despite the fact that all are made from the same material and combination of parts, there are less similarities than differences. Following are the main differences of these, whether you are curious or your child is trying to choose an instrument for her elective: Size -Violin Viola and Cello Size-wise, violin is the smallest and cello is the largest. Although viola is bigger than violin, it is only a slight difference and hard to tell to an inexperienced person. No matter the size of the instrument, your child can learn anything he or she wants! This is because all instruments come in small sizes. I have seen the smallest girls play bass and tallest guys play violin just as successfully! Range and Strings of each String Instrument Tuning-wise, violas and cellos are the same (A,D,G,C) and violins don’t have the C and have the E above the A. The strings go from shorter and thinner to thicker and longer based on instrument size. The violin range goes from G3 to A7. The viola range is C3-E6, as well as possessing a deeper tone. The cello range is C2-C6. Position The main difference between viola and violin vs. cello is how to hold it. Cello is played sitting down and in between the knees, with the end pin on the floor balancing the instrument. Violin and viola are positioned under the chin. The bow hold is also different between violin and viola vs. cello. Orchestra role The traditional melodic instrument in the orchestra is the violin, and the violinist closest to the conductor on the outside is called the concertmaster. This is the most important role in the orchestra, communicating directly with the conductor and helping lead the orchestra. Violas are mainly harmonic instruments, with cellos supporting the upper strings and interchanging between bass lines, harmony and melody. Advantage competitively Cello and violin are the most popular instruments. Viola is the hidden gem in the sense that you have an edge if you play it really well. Additionally, violin and viola are easier to play interchangeably so consider adding viola to your list of skills if you are a violinist. It’s never too late to learn another instrument and Los Angeles Music Teachers is here to help you do that, whether it’s your first or an additional instrument.
If you have any questions you are welcome to call us for advice on best practices for renting or buying a string instrument like violin or cello. Our teachers will also help answer any questions and guide you as you take lessons. If you're interested in signing up for lessons on Zoom or In Person in Burbank, Glendale or North Hollywood, please contact us at (818)902-1233 or on our website at https://www.losangelesmusicteachers.com/online-violin-lessons-in-burbank-ca.html
|
Archives
March 2024
Categories
All
|
 RSS Feed
|
Music Lessons Available on All Instruments:
Piano Lessons
Guitar Lessons Voice Lessons Drum Lessons Violin Lessons Cello Lessons Saxophone Lessons Jazz Improvisation Lessons Flute Lessons Clarinet Lessons Singing Lessons Acoustic & Elec Bass Songwriting & Production |
Contact Us Now
|


Website by Never Alone Business Services