
 Photo credit: Pexels.com They say that April showers bring May flowers. Unfortunately, those springtime rains also mean that your kids can't go outside to play. Keeping your energetic little ones amused indoors can be a challenge. Luckily, there are ways you can entertain children inside while also honing their personal development. The below guide provides inspiration for moms and dads who want kids to keep busy while also learning a thing or two at home. Experience new cultures by learning another language. Kids learn foreign languages more easily than adults, so it's great to get them started early. According to Cornell University, learning a second language also offers cognitive advantages. Your little ones can easily hone their skills at home with online courses. To keep your kids interested, combine language learning with cultural lessons. There's no better way to finish Italian classes than with a big plate of pasta. Discover your family's own cultural heritage with genealogy. Genealogy is another way to combine language learning and culture. Learn about your family's cultural heritage and celebrate it. Junior Genealogist provides tips on how to make this educational moment fun for kids. You can interview elderly family members together, for example, or gather family photos to create a family tree. If you don't know much about your heritage, you can even order a genealogy testing kit online to find out more about your roots. Hone social skills, reactivity, and problem-solving with gaming While you want to minimize your child's screen time, playing video games isn't all bad. According to The American Psychological Association, gaming has social benefits. It can also improve problem-solving skills and reactivity. If your child is going to play multiplayer games requiring live interaction, make sure your internet is up to the task. Sufficient bandwidth is especially important if parents are trying to work from home at the same time. You can also enhance their experience with a gaming chair or new set of headphones. Improve math skills and expend energy with music and dance. If your kids are feeling cooped up inside and simply can't sit still, it's time to get moving. Turn on some music and dance it out. You can play foreign-language songs and encourage your little ones to sing to hone their newfound language skills. Music is also a great way to subtly give your child a math lesson. As Kindermusik explains, kids can learn basic geometry through visual dances, like circle dances. Music is also a great way to learn numbers as kids can count to the beat, and music can help build literacy skills as well. Fortunately, Los Angeles Music Teachers offers a wide range of online music lessons for your kids! Use arts and crafts to enhance fine motor skills. Once your kids have expended some of their energy with a vigorous dance session, you can sit them down to enjoy some arts and crafts. Again, this is an activity that can provide a discrete learning opportunity. Tasks like drawing, coloring, and painting improve bilateral coordination, for example. Meanwhile, an activity like beading enhances fine motor skills. Crafting also teaches kids patience and the merits of a job well done. They have to put in the time and effort to make something beautiful. Encourage imagination with an indoor treasure hunt. If you want to give your kids a treat on a particularly dreary rainy day, organize an indoor treasure hunt. Encourage them to use their imagination. They might pretend that they're pirates or knights on a quest. Imaginative play is critical for healthy childhood development. If you need ideas for your treasure hunt, The Spruce has a great guide with crafty riddle clues that are sure to get kids thinking. This spring, show your kids that staying indoors doesn't have to be a drag. The above guide will help you keep them amused until the weather is nicer. Looking for online or at-home music lessons for your kids? The qualified and experienced teachers at Los Angeles Music Teachers offer music lessons for a variety of instruments. Call 818-902-1233 to schedule your first lesson today!
 Top 10 Things Beginners Will Learn in Their First Guitar Lessons Are you thinking of learning how to play the guitar? When learning any new musical instrument, you need to lay down a good foundation, or otherwise suffer from developing bad habits which will slow you down and you won't be able to progress easily. When it comes to learning how to play guitar, you might need help. YouTube videos are helpful to get some quick tips and understanding. You might even be able to learn a couple of songs, but ultimately you're going to have questions and that's where a good instructor will be able to help you over the usual hurdles. Many beginners give up learning to play guitar after some time because it is frustrating. Learning a new skill is never easy, you will have to work hard to master it. However, with a few simple lessons the beginning, you can learn how to play the guitar without any hassle. In this article, we have listed the things that every guitar player must learn. Know As Much as You Can About how the Guitar is Constructed The first thing you must learn is the guitar anatomy. It is crucial for you to know what the components are and what they do. There is no need to hurry, you should take your time to get familiar with everything, from head to bridge. There's lots of free lessons on Youtube that can help you with this. There are different parts of a guitar; you must understand how every part works. This is to make learning how to play guitar easy. If you don’t know which string is the A as opposed to the E string, it will be challenging to learn how to play guitar. So, to successfully learn how to play guitar, you must get to know every part of the guitar. Holding the Guitar Correctly In order to play the guitar easily, you must hold it properly. Though many people think there is no rocket science, it can be difficult for someone who has never held a guitar before. To be able to produce the best quality sound, you must hold it correctly. Your left hand must be on the neck of the guitar while the other hand must be over the sound hole. In case you are left-handed, there are two solutions. You can flip the guitar without restringing or you can reverse the strings. This means you will have to position your right hand on the neck. You can try playing guitar in both ways and choose the one that you are comfortable with. Tuning the Guitar Tuning the guitar is a crucial step in ensuring the best sound quality. If you don’t know how to tune the guitar, you will have a challenging time learning how to play it. Your guitar can fall out of tune because of regular playing, environment, and temperature. Playing a tuned-out guitar will produce an off-key sound. Since the strings do not fall out of tune at the same rate, you must know which string to tune. So, it is crucial to know how to tune your guitar. It is suggested to get a tuner; you can even use free online guitar tuners. If you don’t have a tuner or a phone, you can use the 5th fret technique. Restring the Guitar The strings of your guitar will lose their shine when you play it regularly. It means that you need to change the strings. Knowing how to replace the strings is a great skill for a guitarist. So, how do you when to restring your guitar. You will know when the strings will be discolored, or the sound will be off or flat. By restringing your guitar, you can make sure the sound produced is of excellent quality. Not all the strings are made equal, you can ask the professional at the local shop to help you choose the right string for you. Holding a Pick Most guitar players us a pick when playing or strumming the guitar, although it can also be played with the fingers and fingernails. A pick is a small plastic that is used for strumming the strings. Though you will not be using it every time you play the guitar, learning how to hold a pick is a vital skill. You must hold the pick in between the tip of your thumb and first finger. Once you get to know how to play, you can figure out your own style. There are several types of picks available on the market, from thick to thin. In the beginning, it is advised to start with a thinner pick. Since it is made of plastic and is small, it is recommended to get many picks. It will not cost you a lot as they are inexpensive. Reading Chords and Tabs Many people think reading tabs and chords is difficult. This is a misconception; it is very simple. When learning how to play the guitar, it is recommended to start with simple songs. To make it easy to play chords, you can start with songs such as Bad Moon Rising. Moreover, it is better to start learning with a cover. This will help you get familiar with reading the chords and help in practicing transitioning between chords. Playing Open Chords In open chords, not all the strings are pressed down. One of the first skills the guitarist will learn is playing open chords. You must start with a basic open chord such as G and strum the string to ensure you hear a clear chord. After you have successfully learned a single open chord, you can move on to the second open chord. This will help you practice transitioning between the chords. It is suggested to keep on creating the library of chords until you can transition between key chords without any trouble. Playing in Rhythm After learning a chord, many beginners, call over their friends to impress them with their newly learned guitar skills. It is then, they understand they don’t know how to play in rhythm. This is something every guitarist goes through. It is crucial to practice strumming the chords in rhythm. For this, you must use a metronome to strum in rhythm. Once you master strumming one chord in rhythm, you can try with two chords. Playing Power Chords Power chords are used in rock music; it is two note chords. Power chords are dyads consisting of fifth notes and root. They are not minor or major because they don’t have the third. When playing power chords, you will only need two or three fingers on the frets. They are easy and fun to play. Since many songs are composed on power chords, there are many songs for you to cover. Playing Guitar Songs You can choose a song that is your favorite and learn to play it on guitar. This is an exciting and thrilling for new guitarists as it will be the first song they learn. Therefore, you need to be patient when learning new skills. You can’t learn to play guitar overnight, you have to practice regularly to master the guitar skill. If you're interested in taking lessons on Zoom or In Person in Burbank, Glendale or North Hollywood, please contact us at (818)902-1233 or on our website at https://www.losangelesmusicteachers.com/online-guitar-lessons-in-burbank-ca.html
 Lesson on How to Unstick a G-sharp Key on a Saxophone G# is a chronic problem for all saxophone players. Anyone who has ever played the saxophone has encountered this common problem. Over the last 45 years I’ve tried all of the powders that actually end up compounding the problem and also sliding a dollar bill through as you put a little pressure to clean the 2 surfaces is only a temporary fix at best. The best fix which I learned from my repairman in LA, Ivan Lukyanets is to use Lemon Pledge. It is totally clean, no harmful chemicals and leaves no residue. Procedure: Use a Q-Tip and put a little of the Pledge on it and rub it on both the cup and really get it into the pad groove, and you’ll see the Q-tip get dirty as you clean thoroughly. You may need to use a couple of Q-tips. Finally just take a new Q-tip and do a final cleaning to get all of the residue of the Pledge off. Easy as that, and keeps it clean usually for a couple of months. If you’re drinking any kind of drink other than water while playing the saxophone you’re likely to get a lot more stickiness problems from other keys as well like the low C# and Eb key, so cutting that out will also relieve the problem a bit. You could also have your repairman strengthen the spring slightly in case it’s too light. If you're interested in taking lessons on Zoom or In Person in Burbank, Glendale or North Hollywood, please contact us at (818)902-1233 or on our website at https://www.losangelesmusicteachers.com/online-saxophone-lessons-in-burbank-ca.html
 Thinking about Taking Voice Lessons But Need to Know More?If you have ever been thinking about taking voice lessons in person or online, but you just aren’t sure, here's a few FAC's to answer some things that you might be wondering about. A lot of people like to sing in a choir, in the car, or even in the shower. But is taking voice lessons right for you? The thought seems a little scary – particularly if you’re not used to singing in front of others, let alone a trained, professional instructor! Here is some information that can help you to decide if taking voice lessons is the right thing for you.
1. When should I start voice lessons? “The sooner the better!” If we start with proper technique at a young age, we can get a solid foundation of healthy singing that will last a lifetime. It's best for getting a firm foundation, understanding how important breathing and understanding how to use your vocal cords without straining them. At a very young age, we learn by copying! Don’t you remember a time when you copy the singers on the radio just because you like a particular song? As a matter of fact, vocal cords are like muscles, we train them to have muscle memory. Just as we train the greatest athletes at a young age, we can do the same with singers. As the voice is developing, we can start the same initial training that athletes do, but for the voice which can protect you from injuries to your vocal cords. 2. Know your goals The first thing you need to ask yourself is: what are my goals? Establishing your goals with singing is what will help you and your voice teacher set a path for your lessons. If your goals include sight reading better for your community choir, great. If they include one day singing on the Broadway stage, great. Knowing your goals with singing will help you to stay motivated and moving forward. Your goals should be realistic and achievable though. Voice lessons will improve the sound that you already have, but they aren’t going to guarantee you a fame-worthy singing voice. Everyone can learn to sing better, and a voice teacher can help you learn how to use your voice to the best of its ability. If the goal is to access your full potential as singers with an emphasis on easy and natural sounding tone, you’re in the right direction. 3. What to expect from taking voice lessons online? Voice lessons are about more than just singing. Vocal training engages the entire body and you will be instructed on correct posture, breathing and vowel shaping. Good singing lessons involve:
Vocal changes take time and effort. One or two voice lessons will not be enough time for a teacher to have a real impact on how you sing. Expect to give it a few months before you hear changes. The more you pay attention to the adjustments your teacher suggests, the faster you will get results. Keep in mind that any adjustments to vocal technique are most effective when you apply them every time you sing – with the radio, in the shower, in choir class, and anywhere in between. 4. How long should each lesson be? Basically, singing lessons should be as long and as frequent as you can afford them in term of time and finances! However, we’re not suggesting you should have a singing lesson every day – that’s a bit much! But a lesson at least once a week is beneficial for 99% of our students. Voice lessons are usually broken into 30, 45, and 60-minute sessions. It would be best to start with 30 minutes and then discuss with the teacher how and if you would benefit from trying a longer lesson. Normally we like to see our adult students for a 60 minute lesson every week so we can work in-depth on their voice and take a look at a song at the same time. This gives us as the teacher, and you as the student, an idea of how well you’re practicing and progressing. But if 60 minutes a week is not financially viable for you, it’s better to have a 30 minute lesson every week. When you’re training your voice, frequency is much better than duration – you don’t want to form any unhealthy or bad habits! Some people take voice lessons just because they find it fun and consider it a hobby! In that case, we recommend going with whatever feels right to you, either 30 minutes or an hour. There really isn’t a right or wrong. There is plenty you can learn in either time frame. Young kids don’t have as much vocal stamina, so 30 minutes at a time is best until around age 10. If your child is under 10, but you’d like them to have more lesson time, try two 30-minute lessons a week on different days. 5. How much will it cost and is it worth it? Here at Los Angeles Music Teachers the Prices are all the same. For online or in person lessons its $35 for 30 minutes, $45 for 45 minutes, and $60 for 1 hour lessons. If we are traveling to your house then we will be adding a $10 Traveling fee. Whatever the price is, you must remember it is an investment! You are investing in learning a useful skill that can elevate you life in many ways. And that's something that is priceless! If you're interested in taking lessons on Zoom or In Person in Burbank, Glendale or North Hollywood, please contact us at (818)902-1233 or on our website at https://www.losangelesmusicteachers.com/online-voice-lessons-in-burbank-ca.html Drum Lesson on Standard 8th Note Groove No drum beat is more iconic or important to learn than the standard 8th note groove. In fact, it provides the basic foundation for most of the music that we listen to. You’ll have heard it countless times in pop, rock, blues, metal and a variety of other musical styles. 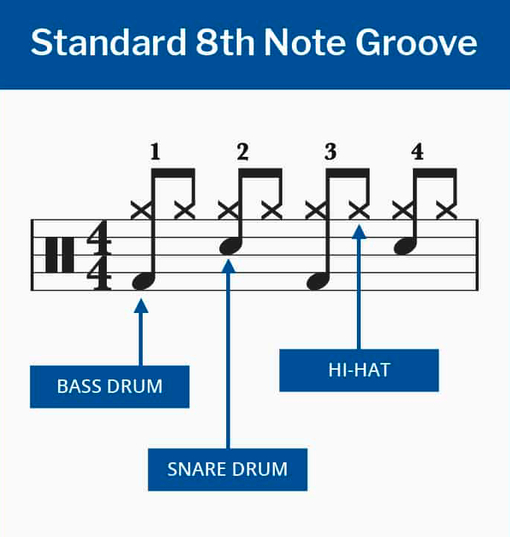 In a standard bar of popular music, we have 4 beats in each measure of time in music. That’s why our first job as drummers is to count the band in when starting a song. We've all heard the drummer count the band in "Ready .... 1 ...2... 3 ...4" That's because music is written in one and two bar phrases. On beats 1 and 3, you play the low-pitched bass drum. On beats 2 and 4, you play the high-pitched snare drum. Keeping great time is your most important job as a drummer, and the bass and snare are the key instruments that will make you into a first-class timekeeper. Great drummers move from bass to snare in the same way that a pendulum moves from side to side. This creates a feeling of motion that encourages listeners to dance, rock out, and get lost in the music! Don’t forget the hi-hats. The final part of this groove is the 8th notes which drummers typically play on the hi-hat cymbal. You can think of these 8th notes as the essential glue that holds the groove together. Drummers play the hi-hat on all 4 beats as well as the spaces in-between. So how does that work? If you were to count the hi-hats out loud, you would count them as “1 and 2 and 3 and 4 and”. This gives you 8 notes in total, hence why this known as the standard 8th note groove. Our drum instructors can teach you all the basics of becoming the drummer that you want to be. If you're interested in taking drum lessons on Zoom or In Person in Burbank, Glendale or North Hollywood, please contact us at (818)902-1233 or on our website at https://www.losangelesmusicteachers.com/online-music-lessons-burbank-ca.html
How To Read Music - Beginner Drums
4/5/2021
Time Signature Here is how to read drum notes. When to play a note is where the second layer of symbols comes in. And the most important symbol of this layer is this: 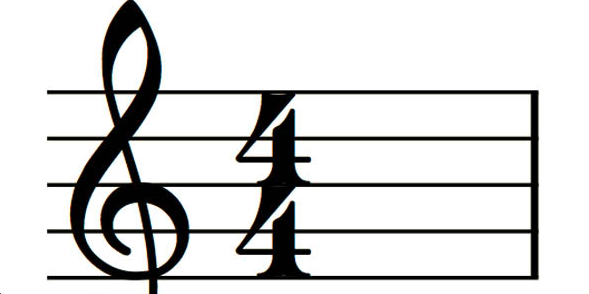 It will be placed at the very beginning of each piece of drum sheet music and you can safely ignore the number at the bottom for now. Rather, focus on the number at the top which tells you how many notes can fit into a bar (i.e. a part of your sheet; more on that in a second…). So? 4 notes, right? Right! But what about this “bar” thing? Bars Well, 4 notes for an entire piece of music wouldn’t be cool. It would give about 0.1 to 4 seconds of music (if you made it awfully slow). But fitting in, say, 400 instead of 4 notes wouldn’t be helpful either, because unless you’re an advanced musician, you need to count notes to be able to follow along. And you’d certainly lose track when trying to count to 400 and to play drums at the same time. That’s why sheet music writers came up with the idea of bars (or “measures”) which are signified by a vertical line like this:  This way you can fit 400 notes into a piece of sheet music – giving you minutes and minutes of music – while only having to count to 4, because now the sequence of 400 notes would be broken into 100 bars containing 4 notes each. Drum Music Notes So you have your piece of drum sheet music in front of you and you’re counting “1, 2, 3, 4”? Cool! But what to actually play while counting? This is what notes tell you. The most important ones are listed below and in order to read drum sheet music you need to be able to distinguish them by the way they appear in the “note” section (circle filled or unfilled; with or without vertical line; with or without tail). But: don’t try to learn them by heart now; rather, come back later once you encounter problems in your actual reading of drum sheet music. 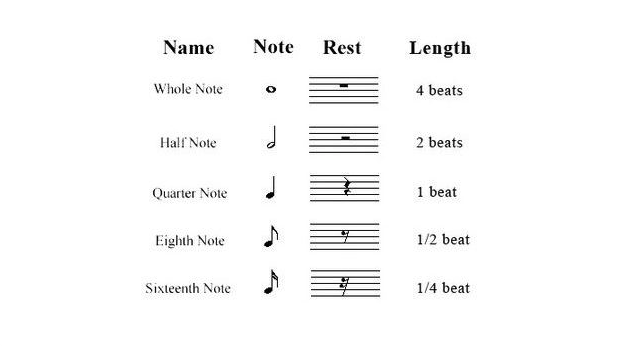 For now, let’s focus on the “length” column and imagine we were counting “1, 2, 3, 4” again. You’d then count and hit your drums as follows:
“Whole” and “half” notes are good for understanding the concept, but they actually almost never appear in drumming. So let’s look go over the remaining three note values one by one: Quarter Notes A quarter note takes up one beat, so you’d hit on count “1” and be done with it by the time you count “2”. Let’s assume for a second that what follows would be another quarter note, and another, and another. These 4 quarter notes would fill up a whole bar and be counted as follows: 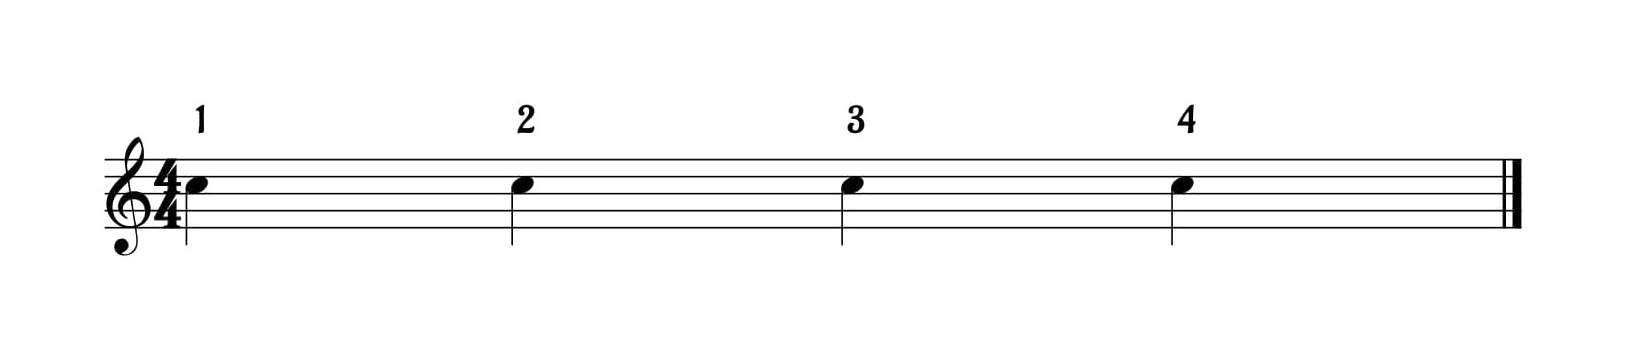 “1, 2, 3, 4” and a hit on each of those counts – that’s all there is to it. Eighth Notes An eighth note, by contrast, only lasts half a beat, so half of each of your counts. You’d hit on “1” and the eighth note would end exactly mid-way between counts “1” and “2”. But how to determine the exact middle between two counts? Well, by way of a more finely-grained counting system. Instead of “1, 2, 3, 4”, we’d now count “1, and, 2, and, 3, and, 4, and”. And hitting on count “1”, we’d now that the eighth lasts exactly until our first “and”. So let’s again assume that a whole bar would be filled with eighth notes. This would give us a sequence of 8 eighth notes and look like this: 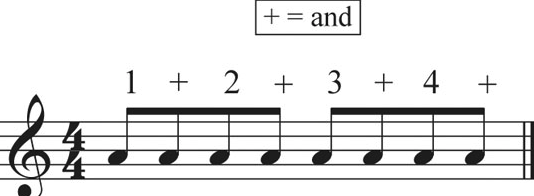 How do you play that? Right: you hit on counts “1, and, 2, and, 3, and, 4, and” Sixteenth Notes Ready for the finale? Sixteenth notes are shorter yet. They only last for one fourth of a beat. So we need a yet more finely-grained counting system: “1, e, and, a, 2, e, and, a, 3, e, and, a, 4, e, and, a”. Hitting on count “1”, you’d know that one sixteenth note would exactly last until count “e”. And how many sixteenth notes will fill up a whole bar? 16! And in a piece of drum sheet music this would look and be counted this way:  If you're interested in taking lessons on Zoom or In Person in Burbank, Glendale or North Hollywood, please contact us at (818)902-1233 or on our website at https://www.losangelesmusicteachers.com/online-music-lessons-burbank-ca.html
 The saxophone, when properly played, is extremely flexible and is capable of a wide range of expression. While the instrument is still sometimes unfairly maligned, a few simple steps can ensure that young saxophonists play with beautiful sounds that blend in any ensemble.
Quality Equipment First, quality equipment is essential. While performers should never be led to believe that a sound can be bought, a great mouthpiece, reed, and ligature set-up can make the performer’s job much easier. Form an Embouchure The saxophone embouchure is still often misunderstood. A collapsed chin, puffed out cheeks, and the like will never lead to the best sound. Likewise, the saxophone embouchure should not be overly tense or restricted. Instead, follow a simple step-by-step process for best results. First, for a great embouchure, rest the weight of the head (through the top teeth) on top of the mouthpiece. The neckstrap should be pulled up to a position where this can be achieved with the head in a natural, “looking-straight-ahead” position. For those students who find the vibrations traveling through the teeth from the mouthpiece off-putting (and for any who want to protect their mouthpieces from sharp teeth), a plastic or rubber mouthpiece patch is vital. Next, the lower lip should be rested on the lower teeth, not pulled over them. The reed should rest on the puffiest portion of the lower lip. Indeed, before the embouchure is sealed, the corners of the lips should be pulled in towards the center, further puffing up the lower lip. Finally, the embouchure should be sealed, with the lower jaw pointed down, and with plenty of space between the back teeth. There should be no upward pressure from the lower jaw. Proper Air Support Next, the matter of air should be considered. The saxophone is a wind instrument, and an inefficient one at that! It requires a steady stream of charged air, no matter the dynamic being performed. Often, young players are told from the beginning of their performance careers to “Back off!” Unfortunately, this often leads to anemic playing that is unstable in the extremes of register and dynamic. Instead, young players should be allowed to play out a bit more (with controlled sounds, of course), until they have had time to develop. Then, it will be much easier to perform even at the lowest dynamic and in any register with a quality, in-tune sound. Mouthpiece Exercise A simple tool can be utilized to help insure proper embouchure tension and airstream support. While not foolproof, playing reference pitches on the mouthpiece alone can get any student much closer to proper playing techniques. For the soprano saxophone, a concert C#6 (two octaves above middle C) should naturally come out when the mouthpiece alone is played. Similarly, the alto mouthpiece should produce a concert A5, the tenor a G5, and the baritone a D5. If any given mouthpiece is being played higher (or if the student seems to be constricting so much that no pitch comes out), that may point to too much tension in the embouchure. Inversely, a too-low pitch is a byproduct of too loose of an embouchure, too slow of an airstream, or a combination of the two. Listening Once the basics of tone production are comfortable for the student, they should be encouraged to listen to as many great tonal examples as possible. In this day of YouTube, there are a wealth of both wonderful and terrible role models at the students’ beck and call, so some professional guidance is in order. With these simple pointers, students of any age will be much more likely to be able to consistently play with a beautiful saxophone sound. Then they and all those around them will be able to enjoy what truly is the most voice-like of wind instruments! If you're interested in taking lessons on Zoom or In Person in Burbank, Glendale or North Hollywood, please contact us at (818)902-1233 or on our website at https://www.losangelesmusicteachers.com/online-saxophone-lessons-in-burbank-ca.html Let’s first look at where each drum or cymbal sits on the staff. 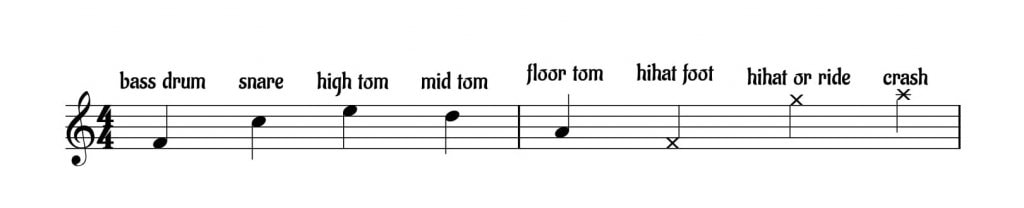 There are various version of this “drum key”, but once you get the concept you can read them all. So please notice that:
 For instance: You play the bass drum and hi-hat foot with your feet so they are furthest down in the staff. By contrast, the cymbals are situated up above your drums (and much higher than your pedals), so they are placed highest in the staff. If you are interested in taking singing lessons on Zoom or In Person, please contact us at (818) 902-1233 or on our website at https://www.losangelesmusicteachers.com/online-drum-lessons-in-burbank-ca.html
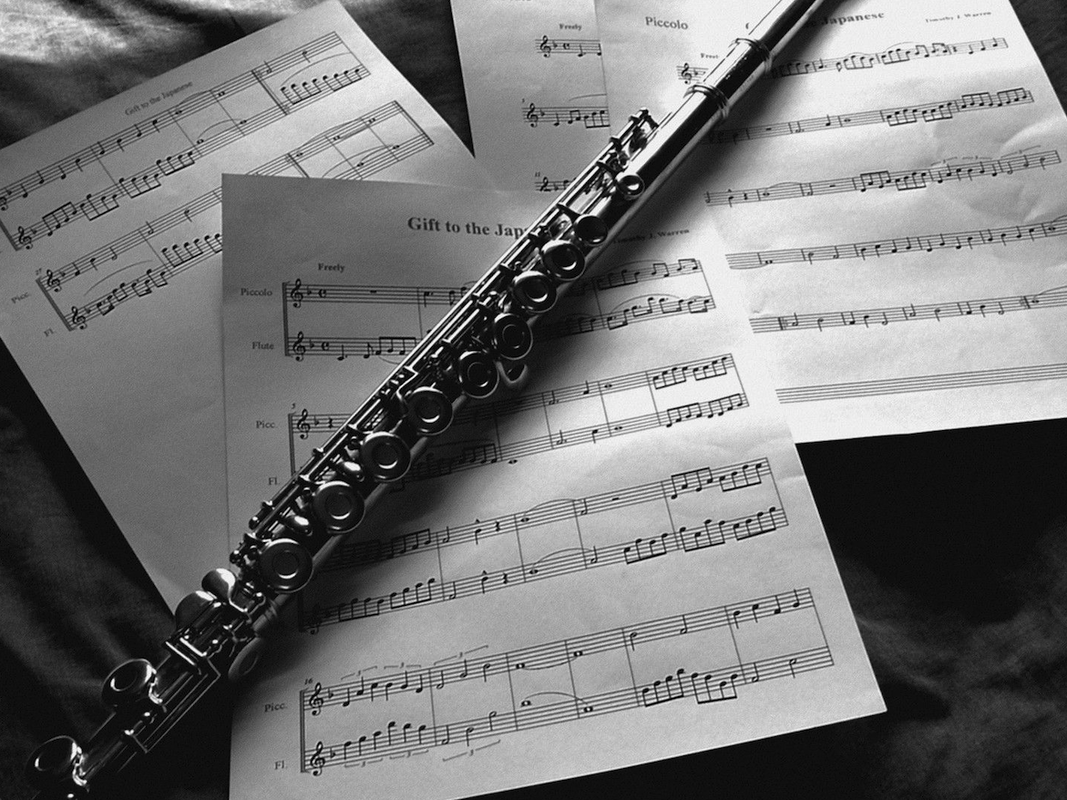 In your first lesson on flute, a beginner may find that holding the flute and getting the hands comfortable balancing it and keeping the fingers in the proper position is one of the most challenging things for a beginner. In order to get the fingers in place and to hold a flute properly, we have to talk about the proper posture, hand position, and angle for the instrument. By mastering these techniques, you’ll be able to play the flute in no time. Besides getting a sound out of the head joint, learning how to hold a flute is the most important concepts you’ll be taught when you start flute lessons. Once you can hold a flute, you can begin to enjoy the beauty of playing this timeless instrument.
The Flute is a member of the woodwind family, the flute is one of the oldest modern instruments in western civilization. Flutes are common in orchestras, marching bands, jazz, swing, and other popular genres of music. As with any instrument though, playing the flute starts with understanding how to hold a flute. To learn how to hold a flute, your flute instructor will focus on four key points. The following techniques will be emphasized:
1. Proper Posture Proper posture is important for playing any musical instrument, especially woodwinds. When you’re learning to play the flute, your posture will help you with your breathing and enable you to create clear, strong, resonant tones. Because of the importance of posture, this is one of the first points to address when learning how to hold a flute. Whether standing or sitting, make sure your spine is held straight and upright. Position your head squarely over your shoulders so you’re not hunched forward or leaning back. However, don’t hold your body too rigidly. Make sure you remain comfortable enough to take full, deep breaths and move your hands as you play. Being too stiff can impede your playing. 2. Left Hand Position After you’ve learned the best posture for playing the flute, it’s time to learn hand positions. You’ll start with the left hand, which controls the keys closest to the head joint near the mouthpiece (also known as the embouchure). Rest your left thumb on the first key of the bottom of the flute body, then curve your fingers around the other side. Your left index finger, middle finger, and ring finger, and rest on the 2nd, 4th, and 5th keys of the flute. Allow your pinky finger to gently touch the side key. You’ll hold the weight of the instrument in your left hand by supporting the flute on the palm between your thumb and index finger. 3. Right Hand Position With your right hand fingers, you’ll hold the end of the flute near the foot joint. Tuck your thumb under the instrument to support its weight, making sure that your right palm faces away from you. As with your posture, you’ll want to hold the flute firmly yet always give yourself the comfort and flexibility to play with ease. Focus on making a loose “C” shape with your right hand. Near the foot joint, you will see three bottom keys on the body of the flute. Your right index finger, right middle finger, and right ring finger will rest on these keys individually while your right little finger plays the first key on the foot joint. 4. Holding the Flute Parallel Finally, as you learn how to hold a flute, it’s important to make sure you hold the instrument parallel to the floor. This creates optimal air flow as you play, allowing you to produce bright, clear tones without squeaking. Letting your flute “droop” is a common mistake made by new players. Always make sure the instrument is held horizontally, directly parallel to the floor, instead of playing at an angle. Focus on making a 45 degree angle with your elbows to help you maintain the proper position. Learn How to Hold a Flute at Los Angeles Music Teachers. Whether you’ve been playing the flute for years or you’re a total beginner, Los Angeles Music Teachers has flute lessons for players of all ages and skill levels. Learn everything you need to know about this beautiful instrument with private lessons from Los Angeles Music Teachers. If you're interested in taking lessons on Zoom or In Person in Burbank, Glendale or North Hollywood, please contact us at (818) 902-1233 or on our website at https://www.losangelesmusicteachers.com/request-info.html |
Archives
July 2024
Categories
All
|
 RSS Feed
|
Music Lessons Available on All Instruments:
Piano Lessons
Guitar Lessons Voice Lessons Drum Lessons Violin Lessons Cello Lessons Saxophone Lessons Jazz Improvisation Lessons Flute Lessons Clarinet Lessons Singing Lessons Acoustic & Elec Bass Songwriting & Production |
Contact Us Now
|


Website by Never Alone Business Services