
What Are Drum Rudiments?
4/18/2023

Drum Rudiments are one of the most important aspects of drumming. They are the building blocks to every drum beat, pattern, fill, and solo. Whatever your skill level is on the drums, practicing your rudiments is a must. Even if you are an advanced drummer, it’s always good to go over some of the more technical rudiments. There are 40 drum rudiments; some more complicated then the other. Out of those 40, there are about 5 essential rudiments that are a must for practicing.
Many of you may be unfamiliar with the term Rudiments; however, do not worry. Drum rudiments aren’t a concept you aren’t aware of, maybe just a term you haven’t heard before. A drum rudiment is basically a sticking pattern. Every sticking pattern you play on the drum set is derived from different drum rudiments. Most are very common patterns that you are well aware of like the single stroke roll, double stroke roll, and flam stroke. Some are more complex and difficult to play. The next time you play the drums, you should look and see what rudiments you are actually playing. Drum rudiments are the essentials of drumming; they should be practiced by drummers to increase their stick control, speed and independence. You may have heard of the 40 Essential Drum Rudiments before; this is the list of rudiments that are played. They say if you master the 40 essential rudiments you are on your way to becoming a professional drummer. This is very true; if you can identify and play each one of these rudiments you will have built up enough knowledge and stick control to be a very skilled drummer. However, this takes a lot of work. Here is the list of rudiments
Drum Rudiment Practice Practicing these drum rudiments are very important. The best way to practice these is to take a pair of drum sticks, a metronome, and a practice pad and start playing. Make sure you are playing with a metronome to keep yourself on time. If you do not know where to start, here is a list of the top 5 rudiments you should start with: the single stroke roll, the double stroke roll, the flam stroke, the paradiddle, and the double paradiddle. These are the top 5 rudiments you should start with, as each one will teach you speed, control, independence and endurance on your sticks. Most of the drum rudiments are variations of each other, meaning it is not too hard to learn all 40 rudiments. For example, if you can play a flam stroke, and a paradiddle pattern, you should have no trouble playing the flam paradiddle. In any case take the time to go over each one if you can. Drum rudiments are more than just sticking patterns you practice on a practice pad. They are designed to be played in common drumming applications. What this means is they are designed to be played in drum beats, fills, and solos. If you're interested in taking Drum lessons on Zoom or In Person in Burbank, Glendale or North Hollywood, we have some of the best drum lessons in Los Angeles. Our drum instructors are picked by interviewing hundreds of drum instructors and we have really high standards on both their teaching ability as well as their personality. If you'd like to talk to one of our instructors or set up a first lesson we have a guarantee that if you don't absolutely love your first lesson you don't have to pay for it. Please contact us at (818)902-1233 or on our website at https://www.losangelesmusicteachers.com/online-drum-lessons-in-burbank-ca.html Vocal Warm Up Lesson for Beginners!
4/17/2023

1. YAWN-SIGH TECHNIQUE - For this quick vocal exercise, simply yawn (take in air) with your mouth closed. Then, exhale through your nose as if you are sighing. This will help relax your voice and improve its range.
2. HUMMING WARM-UPS - Humming is one of the best vocal warm-ups because it doesn’t put a lot of strain on your vocal cords. Place the tip of your tongue behind your bottom front teeth and hum up and down the major scale while keeping your mouth closed. Each note should sound like (hmmm) including the (h) sound is less taxing on your voice. 3. VOCAL STRAW EXERCISE - To perform the vocal straw exercise (also known as straw phonation), take a straw and hum through it. Start at the bottom of your range and slide up to the top slowly and evenly. Then, hum your favorite song through the straw. You can also place the straw in a partially full glass of liquid and blow controlled bubbles in the glass. 4. LIP BUZZ VOCAL WARM-UP - As far as vocal warm-ups go, lip buzz (or lip trill, as it is sometimes called) is very simple. The goal is to make a motorboat sound by making your lips vibrate as you blow air through your mouth and nose. You can incorporate pitch slides as well. 5. TONGUE TRILL EXERCISE - The tongue trill vocal exercise is difficult for some singers. It involves curling your tongue and rolling your R’s as you go through your range from low to high. 6. JAW LOOSENING EXERCISES - When singing, you want to drop your jaw lower than when you are just talking. With your finger, trace back along your jawline from your chin to your ear. That curved space between your jaw and your ear is where you want to drop your jaw. Pretend you are yawning with your mouth closed and feel where your jaw drops. Avoid just dropping your chin. 7. TWO-OCTAVE PITCH GLIDE WARM-UP - For this easy vocal warm-up, make an (eeee or ohhhh) sound and gradually glide through the chromatic notes of a two-octave range. Glide up and then back down. This will transition from your chest voice to your head voice. 8. VOCAL SIRENS EXERCISE - Much like the pitch glide, the siren exercise takes an (oooo) sound and gradually goes from the lowest note of your range to the highest and back down, like a siren for an emergency vehicle. The sound is continuous and covers the tones between the notes. 9. VOCAL SLIDES TECHNIQUE - This technique is also known as a portamento, which is Italian for (the act of carrying) Much like the siren exercise, you slide from one note to the next in your range, but you don’t sing the in-between notes. If you're interested in taking vocal lessons on Zoom or In Person in Burbank, Glendale or North Hollywood, we have some of the best vocal lessons in Los Angeles. Our vocal instructors are picked by interviewing hundreds of vocal instructors and we have really high standards on both their teaching ability as well as their personality. If you'd like to talk to one of our instructors or set up a first lesson we have a guarantee that if you don't absolutely love your first lesson you don't have to pay for it. Please contact us at (818)902-1233 or on our website at https://www.losangelesmusicteachers.com/online-voice-lessons-in-burbank-ca.html 
BREATHING TECHNIQUES FOR BETTER SINGING
Now that you've mastered a few vocal warm-ups and exercises, always remember to maintain good posture and use proper breathing techniques. Two common breathing techniques are singing from your diaphragm and exhaling on a hiss. Keep reading to learn how you can perform these to improve your singing. 1. SING FROM YOUR DIAPHRAGM When singing, it is vitally important to use proper breathing techniques to avoid hurting your voice. It is most common to breathe from the chest during everyday activities, including speaking, but singing requires breathing from the diaphragm. Proper breathing gives your voice more power, more control and a fuller, more expressive tone. Sing from your diaphragm to avoid straining your voice. Your body should be relaxed and balanced, with your weight slightly forward. WHAT IS YOUR DIAPHRAGM? The diaphragm is a muscle between your chest and your belly that governs how much air you inhale and exhale when you breathe. “Singing from your diaphragm” is a phrase for this important breathing technique, which describes the proper way to breathe in and out while singing. The sound of your voice doesn’t actually come from your diaphragm, of course — sound is generated by vibrations of your vocal cords. The vibrations are caused by air being pushed out of your lungs. Your diaphragm is what controls the pushing and is responsible for putting power behind your voice. 2. EXHALE ON A HISSA hissing breath exercise is a great way to start when learning how to warm up your voice before singing. This technique forces vocalists to sing from their diaphragms and improves breath control. To master the exhale on a hiss breathing technique, it’s important to:
Now that you've warmed up your voice and know how to breathe from your diaphragm and exhale on a hiss, you’re ready to sing. If you're interested in taking vocal lessons on Zoom or In Person in Burbank, Glendale or North Hollywood, we have some of the best vocal lessons in Los Angeles. Our vocal instructors are picked by interviewing hundreds of vocal instructors and we have really high standards on both their teaching ability as well as their personality. If you'd like to talk to one of our instructors or set up a first lesson we have a guarantee that if you don't absolutely love your first lesson you don't have to pay for it. Please contact us at (818)902-1233 or on our website at https://www.losangelesmusicteachers.com/online-voice-lessons-in-burbank-ca.html 
If you're interested in taking Singing lessons on Zoom or In Person in Burbank, Glendale or North Hollywood, we have some of the best Voice lessons in Los Angeles. Our Vocal instructors are picked by interviewing hundreds of teachers and we have really high standards on both their teaching ability as well as their personality. If you'd like to talk to one of our instructors or set up a first lesson we have a guarantee that if you don't absolutely love your first lesson you don't have to pay for it.
Vocal Range I’m sure we’re all familiar with words like bass, tenor, alto and soprano, but how do we actually find out our voice type when we start singing? Discovering our voice type is in fact a really simple exercise, and certainly one which is worth spending a bit of time on as a beginner. Knowing and understanding vocal range gives us an important guide on the notes and songs we are able to sing safely and effectively. It's important to remember that vocal range really isn’t related to singing ability: many experienced singers can have a narrow vocal range, and are still able to produce a beautiful, rich sound. As vocal range is mainly determined by the shape and structure of each individual's vocal folds, it's difficult to train to reach notes outside our range. However, we can strengthen the notes at the edge of our range, and much of vocal training focuses on improving the quality of the notes at the top and bottom of our register, giving us a wider range to sing with a clear and natural sound. Here are some simple steps for finding your vocal range and voice type: 1. Warm up Before doing any type of singing, it’s vitally important to do a vocal warm up, particularly when singing near the edges of our vocal range. This is in order to avoid straining or damaging the voice. Simple techniques to warm up the vocal choirs include: humming scales, sirening, and singing scales using different vowel sounds. 2. Find your lowest note Using a piano, find Middle C (also known as C4) and sing along as you play the note. Travel down the white keys to the lower notes and sing along to each note until you reach your lowest note. Any note within the octave of Middle C is designated a number 4, any note in the octave below is designated a number 3, and so on. Your lowest note will be the last note you can sing comfortably and sustain without croaking or breathing the note. Write down the note (for example G3). Once you’re sure you’ve found your lowest note, don’t attempt to try singing any lower as this might strain your voice. 3. Find your highest note Much like finding your lowest note, travel up the piano from Middle C until you find the highest note in your normal voice and write the note down. Continue up the scale in your falsetto voice until you find the last note you can sing and sustain comfortably and again write the note down - this note it is the top of your vocal range. It’s very important not to push your voice and attempt to sing past this note. 4. Compare your lowest and highest note Once you know your lowest and highest note, check these against the voice types below:- - Soprano: C4 – C6 Mezzo Soprano: A3 – A5 Alto: F3 – F5 Tenor: C3 – C5 Baritone: G2 – G4 Bass: E2 – E5 You've now found your vocal range and voice type. However, it’s important to bear in mind that many singers within the categories above can often sing higher or lower than the ranges displayed, so don't worry if your range doesn't match exactly. The top and bottom note are not the only things to determine voice type: factors such as tessitura (the most comfortable part of the range to sing) and timbre (texture and quality of the voice) also inform voices types. As you gain more experience as a singer you will develop a better awareness of the parts you are able to sing most comfortably comfortably and naturally.
If you're interested in taking singing lessons on Zoom or In Person in Burbank, Glendale or North Hollywood, please contact us at (818)902-1233 or on our website at https://www.losangelesmusicteachers.com/online-voice-lessons-in-burbank-ca.html
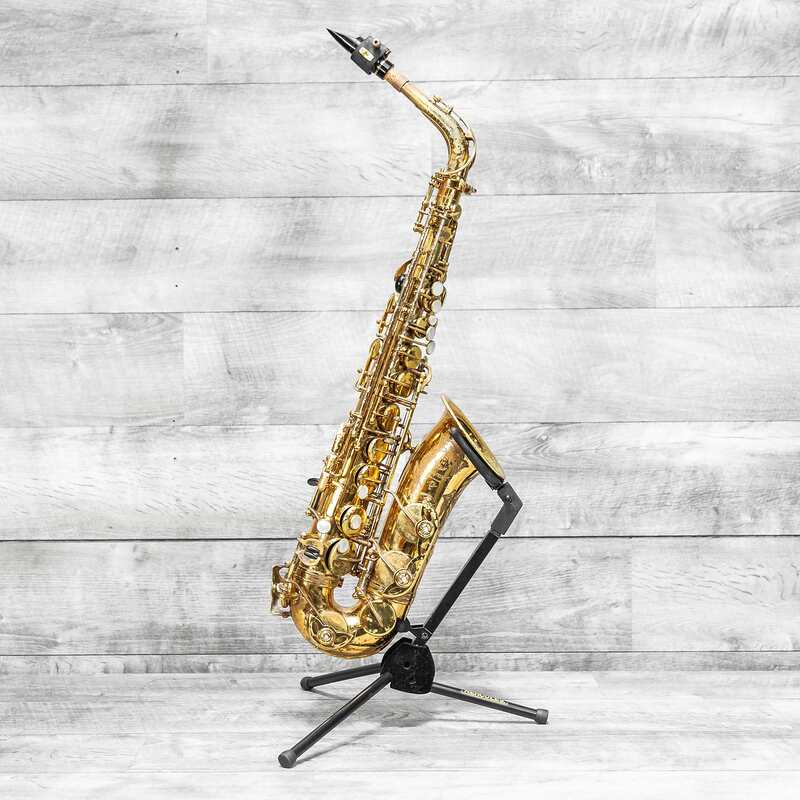 This is from a Quora music question that I answered some years back. The answer is highly subjective, but I do believe that the saxophone is one of the closest musical instruments to the human voice. The voice is arguably (entirely dependent on the musicality and ability) the most appealing to the soul. The trumpet in the hands of a very skilled musician is highly appealing to the soul based on his own capacity to make the trumpet his voice and to be able to express emotion through the instrument. Having said that, it’s the same for the saxophone player, he’s only as good as his ability to express emotions with the saxophone. In my experience, having played with a lot of trumpet players, I think that most trumpet and saxophone players would agree that the saxophone is probably a little bit easier instrument to express emotion, because of the ease of being able to manipulate the sound i.e. bend notes and add colors that are similar to the human voice. So based on that fact, I would say that the saxophone is a little more appealing to the soul, but the caveat is that there are plenty of trumpet players who appeal to MY soul more than a lot of saxophone players because they have learned how to express their emotions through their instrument more effectively.
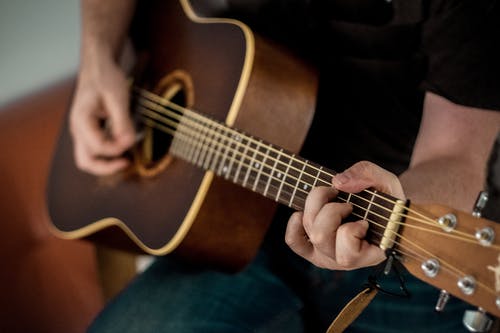
 There are lots of fun to enjoy in music and learning to play the guitar is no exception. Unarguably, practicing this stringed instrument can be quite interesting but it can also be tough. To some degree, there are some guitar issues to be encountered of which pain is one of them. Nevertheless, it is good to know that there is a way out of this. Here is how to prevent your fingers from hurting while playing the guitar. Practice with a decent guitar When practicing to play the guitar, it is important for learners to know how to properly set up the instrument with low action. If you don’t know how to do this, go along with the instrument to a real music store to ask for assistance. A decent guitar is one that is properly set up to produce the right sounds with little efforts. Strung up your guitar with the right strings Using the right set of strings is obviously one of the easiest ways to get started. While the electric guitar requires .08 set of strings, acoustic guitars work best with .010 strings. As a learner, you may not know which set of strings is appropriate for use on your instrument. However, you can get the right settings done by visiting a real music store to get the professional assistance you need to string up your guitar. To achieve the best, learners should ensure to make it easy on themselves. However, there is no need to shy away from pain – besides, no pain… no gain. Engage in music lessons with a professional guide Having someone (preferably an expert) guide you through music lessons can be highly profitable when it comes to learning the guitar. Learning to play well will require you to adopt certain techniques recommended by experts to ensure an effective play session. Interestingly, you can get all the fundamentals covered at this time. You can effectively learn how to prevent your fingers from hurting while playing the guitar when you adopt an organized and focused practice session with a professional guitarist. Simply put, you need someone who can guide you and guide you well. Practice softly For the safety of your fingertips, soft practices are recommended. To do this, you don’t need to squeeze down when fingering a chord. All you need to do is to lay your fingers on the strings then do some back and forth movements but don’t press down. This can basically help to improve your solo, riff, and scale practices. Play for shorter periods You can improve your fingering skills by avoiding long-term practices and playing less long stretches within your time allotment. Learn with fun To avoid hurting your fingers while playing, there is no need to practice as if you are in a competition. Take some time to relax and ensure to have some fun while you practice. If you're interested in taking Guitar lessons on Zoom or In Person in Burbank, Glendale or North Hollywood, we have some of the best Guitar lessons in Los Angeles. Our guitar instructors are picked by interviewing hundreds of guitar instructors and we have really high standards on both their teaching ability as well as their personality. If you'd like to talk to one of our instructors or set up a first lesson we have a guarantee that if you don't absolutely love your first lesson you don't have to pay for it. Please contact us at (818)902-1233 or on our website at https://www.losangelesmusicteachers.com/online-guitar-lessons-in-burbank-ca.html
What Is An Octave 0n A Piano?
4/5/2023
An Octave is one of the most fundamental principles that relates to how music is written, composed, and perceived.
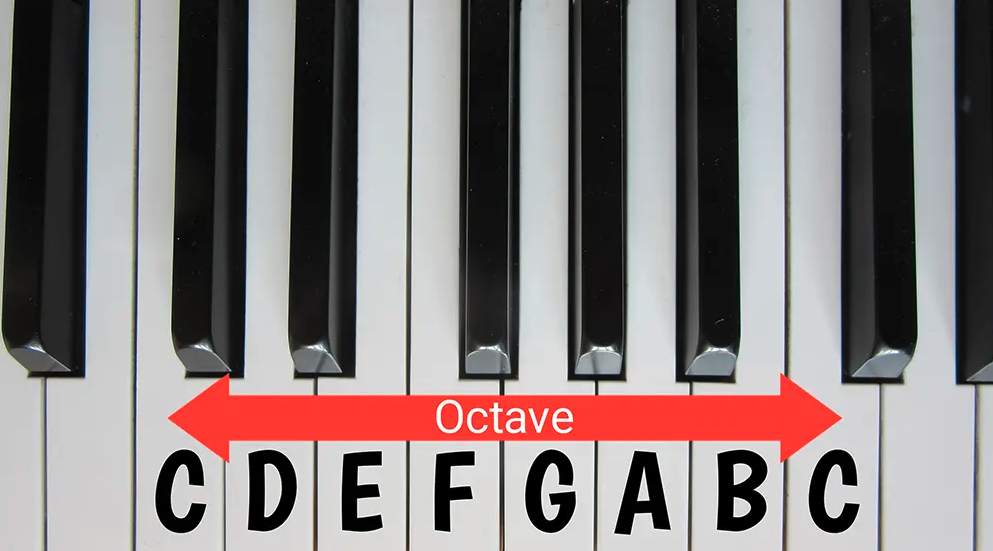
All music you hear on the radio or on TV uses octave relationships in the melodies and harmonies that it is composed of, and the concept of dividing the octave into 5ths, 4ths, 3rds and finally whole and half steps has been around for centuries. It's the basic of what we call the tonal system of western music. In this lesson, we will cover the basics of what you should know about how the Octave is used in music. However, to best talk about octaves, we should cover what pitches and intervals are first. What is Pitch? When we play a note on an instrument or sing a note, that produces a sound. We can define that sound by a few different criteria, like how loud it is, how long it is, and what the pitch is. Pitch is just another word for the frequency of a note, or how “low” or “high” the note is. All frequencies, have "overtones". The very first overtone above the fundamental (which is the basic note) is an Octave. The piano keyboard is also laid out in Octaves, i.e. if you look at the basic piano you will see a pattern of two black keys and 3 black keys. That pattern continues up and down the keyboard. That pattern is what is easily visual on the piano and divides up the various 8 octaves of the piano. If we hear a note that sounds like a baby’s cry, that would be a high-pitched note. On the other hand, a rumbling sound like thunder or train wheels would have a low pitch. A note sounds higher or lower than another if it has a higher pitch, or frequency, than the other note. What is an Interval? Now that we know what pitch is, we can discuss intervals. An interval occurs when two notes – notes with different pitches – are played at the same time, and the interval is the distance in pitch between the two notes. If two notes produce a really big interval when played together, then their pitches are really far apart, and if the interval between the notes is small, then they’re close together. There are many different names for all of the intervals. The smallest interval (shown on the right side of the picture above) is called a “semitone”, or “half step”. If you put two semitones together, you get a “tone”, or “whole step”. Other intervals are given numbers as names, such as a “third”, “sixth”, “eleventh”, and so on. This brings us to the octave. What is an Octave? An Octave is a very unique interval. It is the interval between two notes, in which one of the notes has a pitch that is exactly double the pitch of the other note. Pitch, as we said before, is another word for frequency, and we can define a note by giving its frequency as a number. So, say for example that we have a note with a frequency of 220 Hz. We can call it A (in fact, the note with that frequency is an A). If we want to produce another note that will create an octave interval with the A, we have to either double that number – 440 Hz – or cut that number in half – 110 Hz. Therefore, if we have two notes, one with a pitch of 220 Hz and the other with a pitch of 440 Hz, then those two notes create an octave: You can also have notes that are two or three octaves away from each other. For example, the note with a 110 Hz pitch and the note with a 440 Hz pitch are two octaves away, because you have to double 110 twice to get 440. We can then determine the octaves above 440 by doubling (880, 1720, etc.), and the octave below 110 by cutting it in half (55). Octaves are sometimes heard as basically the “same” note – like if a man and a woman are told to sing a “C”, they will most likely sing C’s an octave apart. However, it still sounds like they’re singing the same note, because they sound so similar. Summing Up To sum up, the octave is one of the most common and easily-identified intervals in music. Each instance of the same note (but different pitch) on a piano or guitar occurs as an octave, and each octave doubles the frequency of the one before it.
If you're interested in taking Piano lessons on Zoom or In Person in Burbank, Glendale or North Hollywood, we have some of the best piano lessons in Los Angeles. Our piano instructors are picked by interviewing hundreds of drum instructors and we have really high standards on both their teaching ability as well as their personality. If you'd like to talk to one of our instructors or set up a first lesson we have a guarantee that if you don't absolutely love your first lesson you don't have to pay for it. Please contact us at (818)902-1233 or on our website at https://www.losangelesmusicteachers.com/online-piano-lessons-in-burbank-ca.html
Is It Hard To Learn Cello?
4/4/2023
“Is cello hard to learn?”
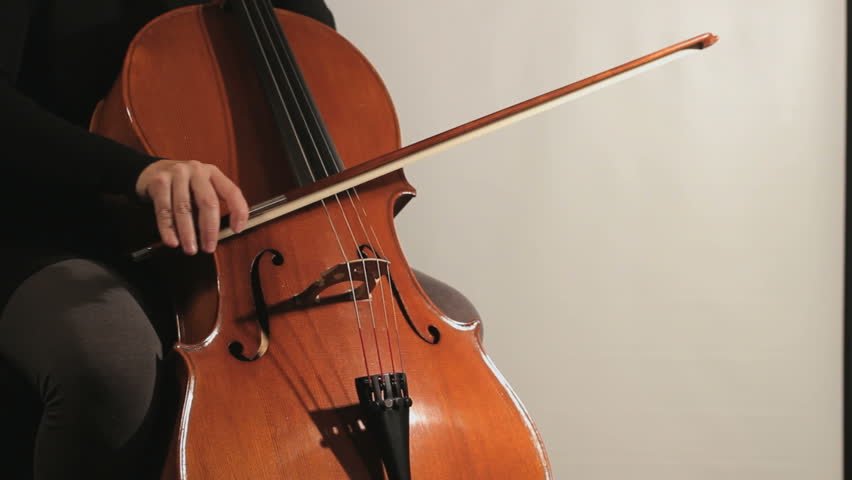
The process of learning the cello is not difficult, but it’s important to keep in mind that the cello is not an instrument of instant gratification. It does require focused, daily practice time and a good teacher to guide you along the way. How far you progress with cello is a direct result of the amount of quality time you put into practicing the instrument. Even someone who puts in just 30 minutes a day will notice a significant improvement after a few weeks, regardless of their age. A student who continues to take cello lessons and practice beyond their first year has the potential to develop into a talented amateur, and a young student with the right dedication could continue their studies all the way through to a rewarding professional career. Is Cello Hard to Learn? When learning how to play the cello, very little is spoon-fed to you by the instrument. Keyboard and fretted instruments (such as the guitar) are a little easier to learn the basics. Simply putting your finger on the right key or fret will allow you to produce the note you want to hear. With the cello, you need to have a teacher guiding you through the early stages to ensure you’re learning in a healthy way. This will lead to a lifetime of enjoying the instrument. If you have the right teacher, anyone can learn the fundamentals of playing cello. As with most instruments, the cello will come more easily to someone with experience reading notes and rhythms. Most of cello music is written down, rather than transferred aurally from teacher to student. But with a little patience, students of all ages can learn the musical language without prior knowledge or exposure. Does Age Matter When Taking Online Lessons? Young students make great beginner cellists. Often with youth comes unbridled enthusiasm for learning a cool new instrument and a mental elasticity that helps them absorb new information like a sponge. These advantages can carry a student a long way. The excitement encourages them to practice more on their own and their ability to retain information helps them progress quickly in their studies. One difficulty that young students face though, is the challenge of critically analyzing their playing. As a result, they need an outside observer to help them identify things that cause them trouble, whether it is posture, intonation, tone quality, etc. Young beginners are also generally less coordinated than their adult counterparts and will remain that way until well after puberty. Adult beginners have their own set of advantages. Firstly, they’re better in control of their bodies which helps them make changes to technique and posture more quickly. They also have a strong ability to critically analyze their own actions, and better sense of how they want to sound. As a result of their ability to critically analyze their own playing, adult learners can sometimes go straight to the criticizing part. This can lead to discouragement when they don’t immediately sound the way they want. However, the student is probably playing at a level appropriate to how long they have been studying. Practice Makes Perfect Practicing in between lessons is another necessity that makes learning the cello much easier. Without daily practice times, you will find your teacher going over the same concepts week after week during your lessons. Make a commitment to find a small chunk of time each day to practice playing the cello and you’ll set yourself up for success. If you only have five minutes, play some open strings for tone quality. Have a little more time? Add in some scale practice. If you have even more time, pick apart the challenging sections of your newest solo piece. There is always something you can practice, but focus on the most important concepts with the time that you have. Start Learning Cello With Online Lessons You no longer have to wonder if the cello is hard to learn. With a teacher guiding your technique, regular practice times, and a willingness to learn, you too can become an excellent cellist. You won’t have to worry about twisting your left arm into an uncomfortable position like violinists, or pushing air through several yards of tubing using only your lungs like a brass player. Instead, you’ll get to enjoy the comfort of the relaxed seated position for the cello. Overall, the cello is an incredible instrument with a wonderful depth of sound and breadth of repertoire. To get started now, register for your first cello lesson Online right here at Los Angeles Music Teachers with one of our many talented instructors. You will see our buttons below.
If you're interested in taking Cello lessons on Zoom or In Person in Burbank, Glendale or North Hollywood, we have some of the best Cello lessons in Los Angeles. Our Cello instructors are picked by interviewing hundreds of Cello instructors and we have really high standards on both their teaching ability as well as their personality. If you'd like to talk to one of our instructors or set up a first lesson we have a guarantee that if you don't absolutely love your first lesson you don't have to pay for it. Please contact us at (818)902-1233 or on our website at https://www.losangelesmusicteachers.com/online-cello-lessons-in-burbank-ca.html
Differences Between Nylon and Steel String Guitars
Acoustic guitars are available with either steel strings or nylon strings. Guitars with nylon strings are often referred to as classical guitars. Here are some of the main differences between the two different types of guitar. Genre When deciding what type of acoustic guitar to get, the most important factor is what type of music you want to play. The nylon strings on classical guitars contribute to a warmer, mellower sound, which is well-suited for classical, flamenco, and folk music. An acoustic guitar with steel strings would be more well-suited for playing country, rock, bluegrass, or just about any other type of music. If you plan on playing with a pick, a classical guitar may not be the best choice for you. Most classical guitarists stick to fingerstyle playing and strumming, and most nylon-string guitars do not come with pickguards. Without a pickguard, your instrument can be quickly damaged by playing with a pick, so we discourage using anything other than your fingers when playing a classical guitar. Differences Classical guitars have smaller bodies and wider necks than standard acoustic guitars. They typically have slotted headstocks with poles that the strings are wrapped around. A full-size steel string guitar will have a larger body and strings which are held in place on the guitar's bridge with the help of bridge pins (nylon strings are tied on to the guitar's bridge). You will see a lot of steel-string guitars with pickguards in place to protect the instrument from damage that is caused by using a pick. This is not the case with classical guitars since nylon strings are not usually played with a pick. Which is better for beginners, Steel Strings or Nylon Strings? If you are a beginner, you may be wondering which type of guitar is easier to learn on. Nylon strings may seem like they would cause less pain for your fingers if you are just starting out. The truth is, your fingers will take some time to become adjusted to playing a guitar regardless of what type of strings you are playing on. If your guitar is properly set up, the type of guitar you have should not effect your ability to learn on it. Above all else, choose a guitar type that is best suited for the type of music you want to play and practice diligently until you get the hang of your new instrument. If you're interested in taking Guitar lessons on Zoom or In Person in Burbank, Glendale or North Hollywood, we have some of the best guitar lessons in Los Angeles. Our guitar instructors are picked by interviewing hundreds of guitar instructors and we have really high standards on both their teaching ability as well as their personality. If you'd like to talk to one of our instructors or set up a first lesson we have a guarantee that if you don't absolutely love your first lesson you don't have to pay for it. Please contact us at (818)902-1233 or on our website at https://www.losangelesmusicteachers.com/online-guitar-lessons-in-burbank-ca.html |
Archives
July 2024
Categories
All
|
 RSS Feed
|
Music Lessons Available on All Instruments:
Piano Lessons
Guitar Lessons Voice Lessons Drum Lessons Violin Lessons Cello Lessons Saxophone Lessons Jazz Improvisation Lessons Flute Lessons Clarinet Lessons Singing Lessons Acoustic & Elec Bass Songwriting & Production |
Contact Us Now
|


Website by Never Alone Business Services