
11 Great Guitar Warmups
12/29/2022
Every professional guitarist starts a session the same way: by warming up.
Whether you’re playing a gig or recital, planning a monstrous guitar practice session, or preparing to impress your friends at home with your killer chops, a precursory limbering up session is mandatory. A thorough warm-up will help bring your playing to peak level and prevent hand injuries. Here are 11 ways to get your hands and fingers ready for action, both off and on the guitar. GET 'EM HOT Here’s an excellent way to get the blood circulating in your fingers and hands and make everything nice and loose. Simply head to the nearest sink and crank up the hot water. It doesn’t have to be that hot—you don’t want to scald yourself—but it should be warm enough to get your hands loose. While running your hands under the water, stretch out your fingers. Don’t apply any external pressure to your hands or fingers; simply stretch them out just as you do when you’re playing. Now before “prune hands” take effect, let’s start working on the warm-up exercises. FOUR-FINGER EXERCISES The four examples that follow are designed to loosen up all four of your fret-hand fingers as well as your picking hand. Before you get started with the specifics of each example, there are a couple of general rules to follow for all the exercises here. First, always start at a slow tempo to ensure that you’re playing the music correctly, and then gradually increase your tempo as you progress. Remember: it’s always better to play something slowly and correctly rather than quickly and sloppily. Second, alternate picking (down-up-down-up, etc.) is essential for all of the single-note exercises in this workout. This technique may seem difficult at first, but you’ll develop much more speed and accuracy in the long run. FIGURE 1 is a relatively simple starter—a pseudo-chromatic line in 5th position. We’ll use this example as our “base” pattern for the three examples that follow. Pay strict attention to the fingering, making sure to use all four fret-hand fingers (including the pinkie) for each string grouping. Once you’ve got this base pattern down, move on to its more extensive—and more challenging—offshoots. FIGURE 1 
FIGURE 2 is a “double-back” pattern reminiscent of a Charlie Parker–style bebop line. Notice how it develops independence between your first two (index and middle) fingers and your last two (ring and pinkie) fingers. To extend the exercises in FIGURE 1 or FIGURE 2, simply shift the entire pattern down one half step (one fret) at a time. FIGURE 2 
FIGURE 3 kicks things up another notch by applying the original base pattern to sequential strings (E A D G). (From a harmonic standpoint, this one probably won’t win any Prettiest Ballad awards, but remember that the goal here is to warm up your hands and fingers.)
FIGURE 3 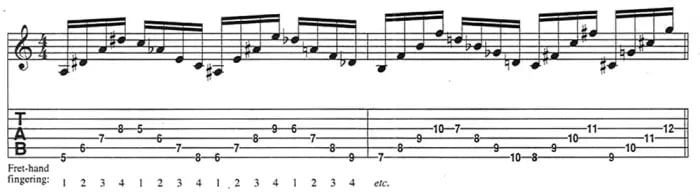
Once you’ve completed the initial four notes, simply invert the pattern, playing in a descending fashion. This completes the motif. To get the fullest impact possible, try this one on all three sets of these four adjacent strings.
FIGURE 4 adds notes between those that compose the base pattern. An octave is added between the first two notes, a minor 6th between the second two. This example is a great dexterity builder and, again, you should move it up and down the fretboard. FIGURE 4 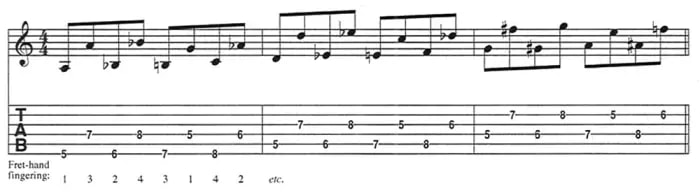
Feeling loose yet?
CHORDAL WARM-UPS Have you ever seen a show in which the lead guitarist does nothing but solo? Me neither. So obviously at some point you’ve got to be a rhythm guitarist. Since rhythm playing varies so from genre to genre, I’ve included a nice cross-section of different chord voicing that will get both of your hands active. Even if you don’t jive with the style of a certain exercise here, try it anyway. It may open some new paths in your musical evolution. FIGURE 5 is a descending open-chord sequence in the key of C, shown here as an arpeggiated exercise (though strumming your way through is also a viable option). For the sake of variety, try transposing this chord sequence to other keys as well. For instance, this same chord sequence in the key of G major would be G–D/F#–Em–D–C–D–G. FIGURE 5 
FIGURE 6 is a great power-chord workout that doubles as a dandy barre-chord workout. Try it with the power chords first, and then extend them to full barre chords simply by adding the notes in parentheses.
FIGURE 6 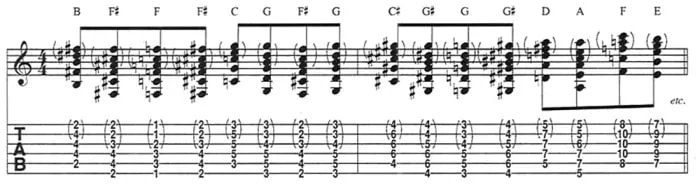
FIGURE 7—a James Brown–style funk rhythm using E9 and E13 chord shapes—is a great workout for your pick hand. Work through the rhythm slowly until you perfect it, and then gradually bump up your tempo. For some tonal variety, try moving the exercise to different areas of the fretboard. For instance, if you wish to play this as a typical blues sequence, such as a I–IV–V progression, you can play the IV chord—in this case, A9—with the root on the 12th fret. The V chord, B9, is located on the 14th (or 2nd) fret.
FIGURE 7 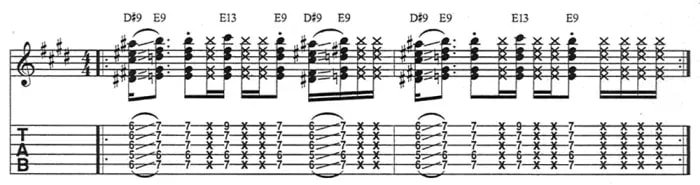
STRING SKIPPERS
Now that your pick hand is moving, let’s kick it into high gear, this time with two devilish string-skipping exercises, each written here as a three-notes-per-string pattern in A major (A B C# D E F# G#). FIGURE 8 is simple enough in nature. Start on the low E string with the first three notes of the scale and then skip to the D string for the next three notes. At that point, backtrack to the A string, which you skipped, and continue the pattern in the same fashion. Use alternate picking throughout, even when skipping strings. That is, start by picking the first three notes (on the low E string) in a down-up-down sequence, and then pick the first three notes on the D string in an up-down-up sequence. (Repeat this picking pattern for the skip from the A string to the G string and so forth.) Taking this approach makes for a challenging sequence, but you’ll be rewarded in the long run. FIGURE 8 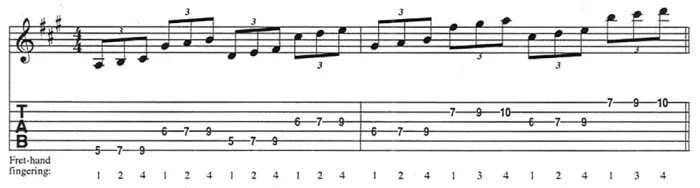
FIGURE 9 is a pivot-picking, or pedal-tone, exercise. The concept here is to return to the root of the scale between the other scale tones. This technique is used often in classical music, both in ascending and descending fashions. Each of these string-skipping figures is pattern based, so try using various scales or modes to maximize your warm-up.
FIGURE 9 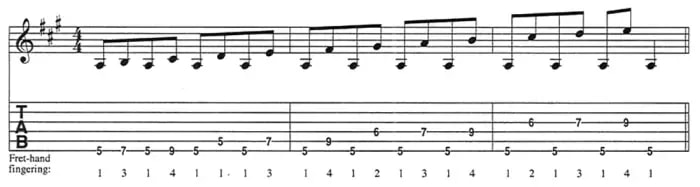
THE FINAL STRETCH
FIGURE 10 uses some stacked power chords (or sus2 chords) to great effect. These chord shapes are a staple of quite a few rock classics. Thumb placement is key here. For instance, since the first chord covers a four-fret distance (the 5th fret to the 9th fret), your thumb should be centered on the back of the neck at the 7th fret. This allows you to reach back to the 5th fret and forward to the 9th without shifting your hand position. FIGURE 10 
The same can be said for FIGURE 11, which covers a whopping five-fret span. This exercise is based in A minor, and as a bonus it makes for a pretty crazy soloing line if you so choose.
FIGURE 11 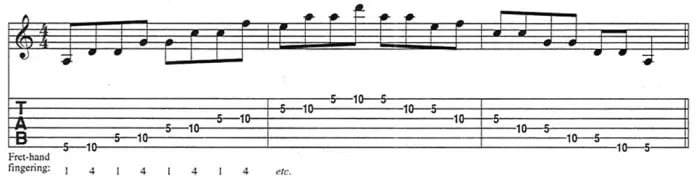
That concludes our warm-up exercises. Note that we aren’t suggesting you should perform each of these guitar exercises before you play, but working through at least two or three will benefit your playing, whether you’re hitting the stage,the studio or the rehearsal room.
f you're interested in taking Guitar lessons on Zoom or In Person in Burbank, Glendale or North Hollywood, we have some of the best Guitar lessons in Los Angeles. Our guitar instructors are picked by interviewing hundreds of guitar instructors and we have really high standards on both their teaching ability as well as their personality. If you'd like to talk to one of our instructors or set up a first lesson we have a guarantee that if you don't absolutely love your first lesson you don't have to pay for it. Please contact us at (818)902-1233 or on our website at https://www.losangelesmusicteachers.com/online-guitar-lessons-in-burbank-ca.html 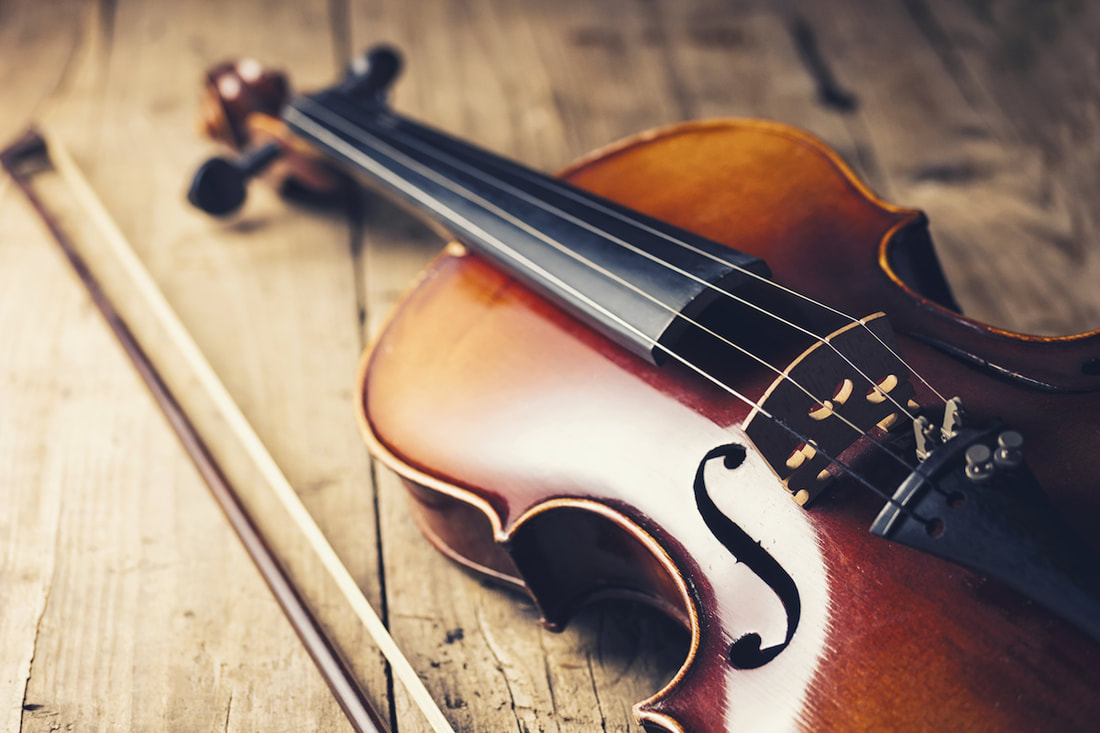
What is the difference between violin, viola, and cello?
When you are learning a string instrument in Los Angeles, it is important to know the main string instruments of an orchestra. Despite the fact that all are made from the same material and combination of parts, there are less similarities than differences. Following are the main differences of these, whether you are curious or your child is trying to choose an instrument for her elective: Size -Violin Viola and Cello Size-wise, violin is the smallest and cello is the largest. Although viola is bigger than violin, it is only a slight difference and hard to tell to an inexperienced person. No matter the size of the instrument, your child can learn anything he or she wants! This is because all instruments come in small sizes. I have seen the smallest girls play bass and tallest guys play violin just as successfully! Range and Strings of each String Instrument Tuning-wise, violas and cellos are the same (A,D,G,C) and violins don’t have the C and have the E above the A. The strings go from shorter and thinner to thicker and longer based on instrument size. The violin range goes from G3 to A7. The viola range is C3-E6, as well as possessing a deeper tone. The cello range is C2-C6. Position The main difference between viola and violin vs. cello is how to hold it. Cello is played sitting down and in between the knees, with the end pin on the floor balancing the instrument. Violin and viola are positioned under the chin. The bow hold is also different between violin and viola vs. cello. Orchestra role The traditional melodic instrument in the orchestra is the violin, and the violinist closest to the conductor on the outside is called the concertmaster. This is the most important role in the orchestra, communicating directly with the conductor and helping lead the orchestra. Violas are mainly harmonic instruments, with cellos supporting the upper strings and interchanging between bass lines, harmony and melody. Advantage competitively Cello and violin are the most popular instruments. Viola is the hidden gem in the sense that you have an edge if you play it really well. Additionally, violin and viola are easier to play interchangeably so consider adding viola to your list of skills if you are a violinist. It’s never too late to learn another instrument and Los Angeles Music Teachers is here to help you do that, whether it’s your first or an additional instrument.
If you have any questions you are welcome to call us for advice on best practices for renting or buying a string instrument like violin or cello. Our teachers will also help answer any questions and guide you as you take lessons. If you're interested in signing up for lessons on Zoom or In Person in Burbank, Glendale or North Hollywood, please contact us at (818)902-1233 or on our website at https://www.losangelesmusicteachers.com/online-violin-lessons-in-burbank-ca.html
Lesson in Drumming With 8th Note Rock Beats
12/23/2022
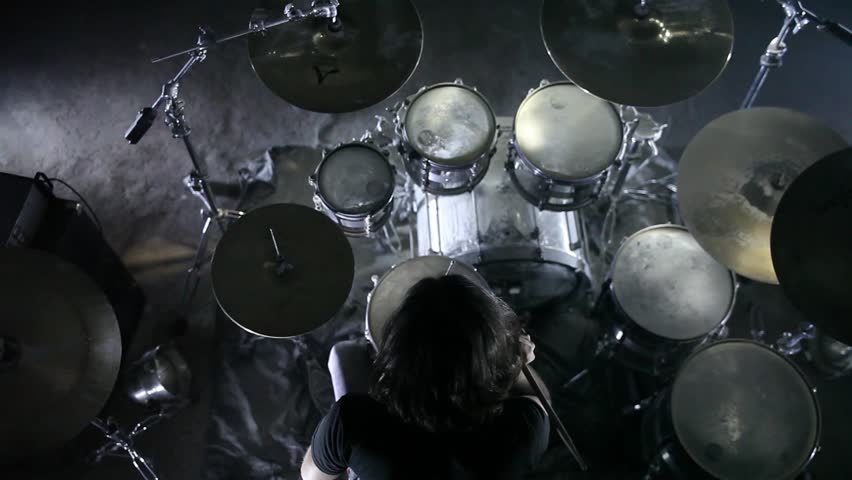
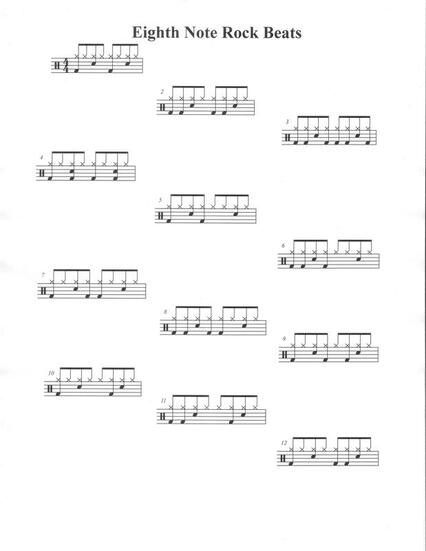
Drumming With Eighth Note Rock Beats and How to Read
It is easy to argue that the most important skill a rock drummer must have is to play grooves. There is also no argument that the most common grooves in rock are eighth note based. Therefore, if you want to be a rock drummer, and you’re just getting started, learn this lesson sheet. Here’s what the notation means. The top line, with the “X” noteheads represents the hi hat or ride cymbal, played with your right hand (we’re assuming you are right handed). The second space from the top represents the snare drum, played with your left hand. Finally, the bottom space on the staff represents the bass drum, played with your right foot on the bass drum pedal. Any of the examples on the sheet can be counted correctly by saying “one and two and three and four and” sequentially while you play each of the eight notes in each example. In other words, when you play the first note in example #1, say “one,” and then say “and” when you play the second note and then say “two” when you play the third note and so on and so forth. “Muscle through” these patterns very slowly at first by just literally doing what the notation says to do. For example, with beat #1, which is the beat in the upper most left hand corner of the sheet as pictured, if you simply do the following, you will be playing the beat: 1) play the hi hat with your right hand and the bass drum with your right foot simultaneously. (say “one” out loud while you do this) 2) play the hi hat with your right hand. (say “and”) 3) play the hi hat with your right hand and the snare drum with your left hand simultaneously. (say “two”) 4) play the hi hat with your right hand. (say “and”) 5) repeat the previous steps but substitute the words “three” “and” “four” “and” for each step in sequence. (“one” becomes “three”; “and” remains “and”; “two” becomes “four”; and “and” remains “and”) 6) repeat the above over and over, and space the notes evenly, and you’ll be playing the beat. start very slowly and practice the pattern until it becomes easy to play. then you can gradually speed up. 7) use this same process for all the beats on the page the music sheet You will need to go deeper than this, but for a complete beginner, this is a really good way to get started. Try this and if you have any questions about how to work through it, feel free to to ask us with the links below. Or if you're ready to take drum lessons contact us about finding a drum instructor near you!
If you're interested in taking Drum lessons on Zoom or In Person in Burbank, Glendale or North Hollywood, we have some of the best drum lessons in Los Angeles. Our drum instructors are picked by interviewing hundreds of drum teachers and we have really high standards on both their teaching ability as well as their personality. If you'd like to talk to one of our instructors or set up a first lesson we have a guarantee that if you don't absolutely love your first lesson you don't have to pay for it. Please contact us at (818)902-1233 or on our website at https://www.losangelesmusicteachers.com/online-drum-lessons-in-burbank-ca.html
What Piano Is Right For Me?
12/22/2022
If you're reading this article, that means you are thinking about piano lessons and looking to make a big purchase and buy a Piano. It's no easy decision because you have to be mindful of costs and the amount of space it will take up in your house. so you would have to take your time when researching which piano is perfect for you. I have done some research to help you on your journey. Below you will find a list of pianos with some detail to help you start looking for the right piano for you!
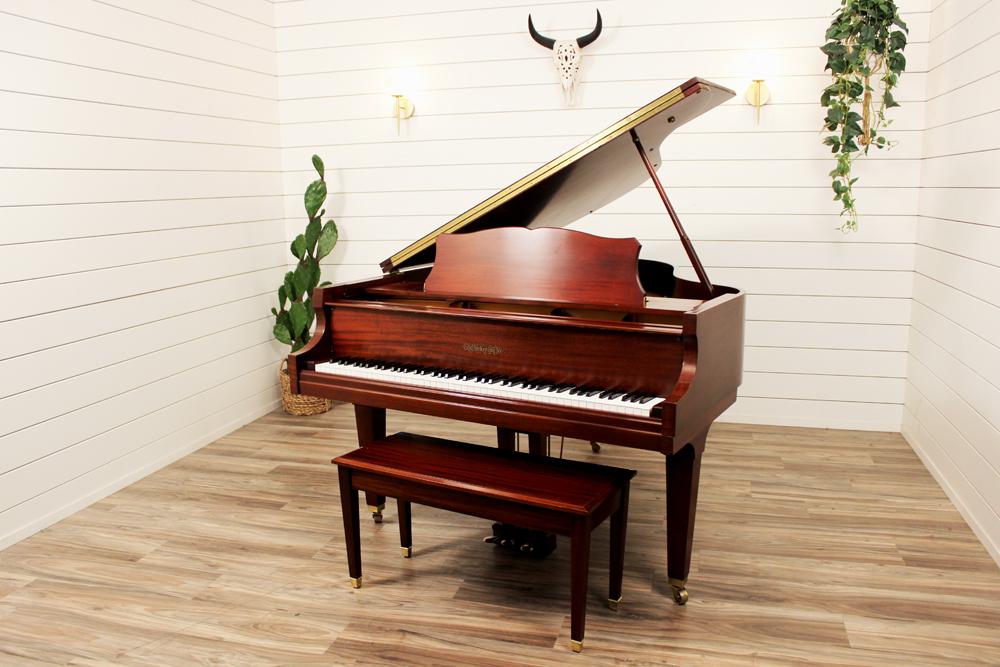
Grand Pianos:
The reasons for the preference which most people show for a Grand to an Upright piano are probably aesthetic and psychological. A Grand looks better in a room, and the pianist is more favorably impressed by the “view” when he sits down to play a Grand, compared with an Upright, which usually stands with its back to a wall. Another advantage is that the top, when raised, deflects the sound to player and room. Unfortunately, this preference brought about the production of miniature Grand pianos which are inferior in tone and touch to a good Upright and are described in the trade as “Baby Grand Pianos”. The action in such models was cut down in size and price, and the strings are too short; in fact, the minimum size for a Grand seems to be 4 ft.10 in. if the instrument is to be considered as a serious rival to a good Upright. Sizes and Types: The standard width of a grand piano is also about 5'. The length varies from 4½' to 9½'. The total floor space allowance for the smallest grand should be at least 5' wide by 6½' long, including bench space. Grand pianos are measure by the length from the very front of the keyboard to the farthest end of the piano along the spine, with the lid closed. The smallest Steinway is 5 ft. 1 in. (The size stated is always the over-all length of an instrument.) There are several types of grand pianos, based on piano length. Click on image for example of size and specifications:
Tonal Quality
The soundboard and strings of a grand piano are positioned horizontally inside the piano case. When you press down a key, the hammer of the key hits the strings from below to produce the sound. The movement of the hammer falls back with the help of gravity, which makes the sound of repetitive notes crisp and allows the pianist better control of the keys. The size of the soundboard and the length of strings influence the tonal quality of a piano. Larger soundboard and longer strings produce greater volume and resonance of tone. Since the tonal quality and the volume of the piano depend mainly on the size of the soundboard and the length of the strings, you want to start from the largest vertical or grand piano you can afford. You also need to consider the space you have. The sound of a Small Grand can get lost in a large open room where a Medium Grand in a small room can be too loud.
Types & Sizes of Vertical Pianos
A craze for very small size also afflicted Upright pianos. With the result that miniature models appeared which could only be classed as toys. The height was reduced by lowering the position of the action in relation to the keyboard, so that the lever was pulled up by the key instead of being lifted in the normal way. This type of piano sold as a “Spinet”. When compared with the small Grand pianos condemned in the previous paragraph, these miniature Uprights sink to about the same depth of tonal and acoustic banality. I can appreciate the demand for small pianos for small rooms, and in small orchestras where space is limited and the player must be able to see the leader, but I cannot see the sense of mutilating the tone and touch of a piano merely to reduce the height by a further three or four inches. Sizes and Types The standard width of an upright piano is about 5' and the depth is between 2 - 2½'. The total floor space allowance should be about 5' wide by 5' deep, including bench space. The height of the piano makes no difference in the floor space needed but it makes a major difference in the quality of sound the piano produces. The height of a vertical piano is measured from the floor to the top of the piano. There are four types of vertical pianos, based on piano height: Spinet, Console, Studio, and Upright. The size is measured from the floor to the top of the lid. The spinet piano measures less than 36" tall. The console measures 40 to 44" tall. The studio or "professional upright" measures 45 to 50" tall. The largest of the vertical pianos is the upright, which measures over 50" tall.
Spinet Pianos
The spinet piano is the smallest of the vertical pianos. The spinet piano has what is called a dropped action. The piano action is the part of the piano that transfers the force of striking the key to the hammer striking the string. In appearance the spinet and console pianos are very similar. Some technicians charge more to work on spinet pianos because they feel they are more difficult to repair. There are more working parts in a spinet piano than a console but a qualified piano technician should be able to service the spinet piano at no additional charge. Console Pianos The console is the most popular of the vertical pianos. The action of a console piano sits directly on top of the keys and as with all vertical pianos the hammers sit in an upright position. Once the hammer strikes the string and the key is released a spring pulls the hammer back to its original position, ready to strike the string again. The action of a vertical piano is usually not as "quick" as the action of a grand piano. Studio Pianos The additional height of the studio piano gives it a richness and tonal quality comparable to those of many grand pianos. The location and feel of the action is also different in a studio piano. Many of the newer studio pianos mimic the feel of a grand piano. Upright Pianos The tallest of the vertical pianos is the upright. Today this term is usually used to refer to the older, tall pianos - Grandma's piano. There were many wonderful upright pianos made in America in the 1920 - 1940's. If properly preserved these old pianos are some of the most esthetically beautiful and durable instruments ever made. The key is "properly preserved". If not properly maintained an old upright's only value is as a large piece of furniture, beautiful to look at but nerve racking to listen to.
We Hope that this is a starter point for you to find the right piano for you.
Click here to edIf you're interested in taking lessons on Zoom or In Person in Burbank, Glendale or North Hollywood, please contact us at (818)902-1233 or on our website at https://www.losangelesmusicteachers.com/online-music-lessons-burbank-ca.html
Piano Lesson - What Are Octaves?
12/19/2022
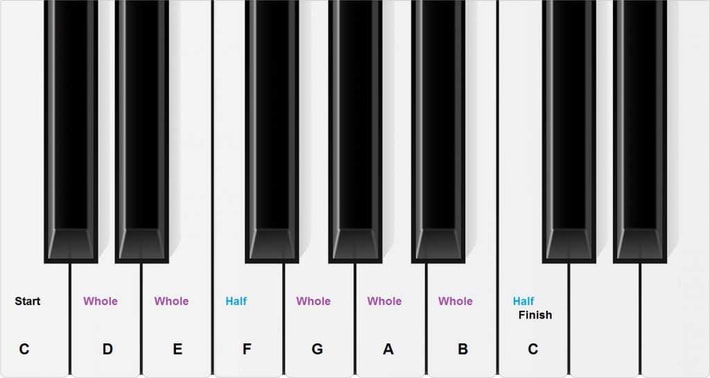
In this piano lesson, we are going to discuss one of the most basic concepts in music. What is an octave and what does it mean, and what does it look like on a piano?
Over the several hundreds of years the piano has taken to develop, the number of keys has changed dramatically, from as little as 32 keys when the piano was first developed, to up to 96 keys on a modern Bosendorfer Imperial. But why is this important to you when buying a piano today? Is it important to know how many octaves your piano has? Acoustic pianos usually all have the same amount, but when you're buying your first beginner piano for your kid you may only want a 61 key Keyboard instead of the full 88 key electric piano. There is no need for 88 keys until you or your child is more advanced. Those last 12 or so upper keys and 12 lower keys are rarely used except in classical music. Generally, a piano has 7 and 1/4 octaves. A standard modern upright, grand or digital piano has seven and a quarter octaves; seven full octaves, and three extra treble notes; B-flat, B and C. That's a total of 88 keys. There are variations, mainly in digital instruments, which we'll discuss in this article. What is an octave? An octave is defined as a series of eight; the term is derived from the Latin word "octo," meaning "eight." The same reason an octopus is called as such; because it has eight legs. See the image above to see how it looks on the piano keyboard. You can easily identify the 7 octaves on any piano by looking for the pattern of 2 black keys followed by 3 black keys. That is where every octave starts and ends. The note C is to the left of the first group of 2 black keys and then it ends on the next C. That is a full octave. Every beginning piano lesson starts with that discovery. The word "octave" can refer to two different things in music; an interval and a scale. An octave scale is a series of notes, iterating through the seven notes of any particular scale until you arrive on the note you started on, but one octave higher. G, A, B, C, D, E, F#, G. You'll notice that we start on G, we iterate through all the notes of the G Major scale, and we finish on G. However, it's not the same G that we started on; it's the next G up on the piano. We refer to this as being an octave higher; essentially it's the next occurrence of the note you start on. This also ties into the octave as an interval; in the same way that a fifth is five notes apart, and a fourth is four notes apart, an octave is eight notes apart. On a modern piano, the very bottom note is A. There are seven more As on the piano, making for a total of 7 A octaves. Older pianos finished here and just had seven octaves; modern pianos have an extra three notes; a B-flat, a B and a C, to make seven octaves plus three notes.
If you're interested in taking Piano lessons on Zoom or In Person in Burbank, Glendale or North Hollywood, we have some of the best piano lessons in Los Angeles. Our piano instructors are picked by interviewing hundreds of drum instructors and we have really high standards on both their teaching ability as well as their personality. If you'd like to talk to one of our instructors or set up a first lesson we have a guarantee that if you don't absolutely love your first lesson you don't have to pay for it. Please contact us at (818)902-1233 or on our website at https://www.losangelesmusicteachers.com/online-piano-lessons-in-burbank-ca.html
How To Relax Your Voice After Singing
12/13/2022

After vocal warm-ups and singing, it is essential that you also cool down your voice. You can use the same vocal exercises you used during your warm-up, starting with the most intense and working down to the least intense. Simply using the humming vocal exercise will also allow your voice to cool down and relax. Following these tips will keep your voice strong and allow you to perform at your best.
Vocal warm-ups are a critical part of any singer’s practice and performance routine. These quick and easy vocal warm-ups will refine your technique, build your vocal power and control, and help expand your vocal range. At Los Angeles Music Teachers, our trained vocal instructors teach students all aspects of singing, including warm-ups and other vocal techniques that thousands of professional singers use every day to keep their voices in shape and sounding their best. If you're interested in taking vocal lessons on Zoom or In Person in Burbank, Glendale or North Hollywood, we have some of the best vocal lessons in Los Angeles. Our vocal instructors are picked by interviewing hundreds of vocal instructors and we have really high standards on both their teaching ability as well as their personality. If you'd like to talk to one of our instructors or set up a first lesson we have a guarantee that if you don't absolutely love your first lesson you don't have to pay for it. Please contact us at (818)902-1233 or on our website at https://www.losangelesmusicteachers.com/online-voice-lessons-in-burbank-ca.html 5 Great Guitar Scales You Should Know
12/7/2022
We're going to cover one of the first parts of learning how to play lead guitar. I'm going to show you the 5 essential guitar scales. These scales are the ones you'll find yourself using the most in your lead guitar playing. For all of these scales, we are going to be using A as our tonal center.
The Major Scale The major scale is a 7 note scale made up of a pattern of whole-steps and half-steps. When we look at our fretboard a whole-step is 2 frets, and a half-step is 1 fret. 
The pattern for the major scale is whole-step, whole-step, half-step, whole-step, whole-step, whole-step, half-step.

So when we apply that formula, starting on an A, we get the following notes.

Now that you understand how the major scale is made, we're going to take a look at the most common shape you'll use.

Tip: Look for patterns within scale shapes to help you memorize them.
The Major Pentatonic Scale The major pentatonic scale is very closely related to the major scale. For this scale, we'll follow the exact same pattern as the major scale, except we'll leave out the 4th and 7th notes. This gives us a simple 5 note scale. Here's the most common major pentatonic shape. 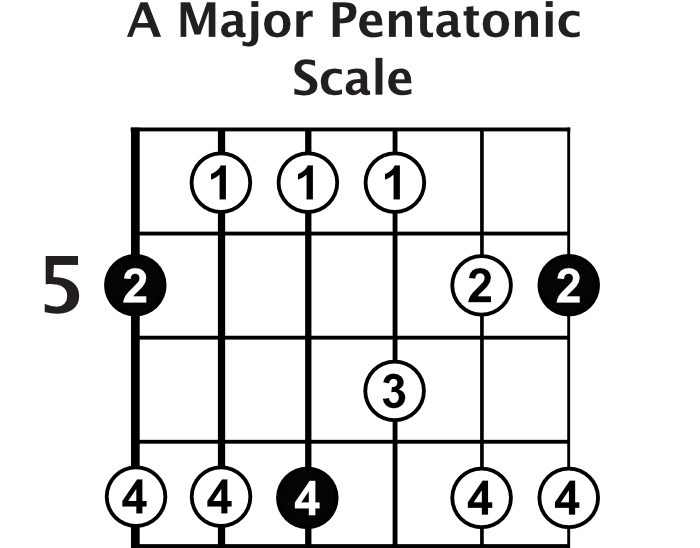
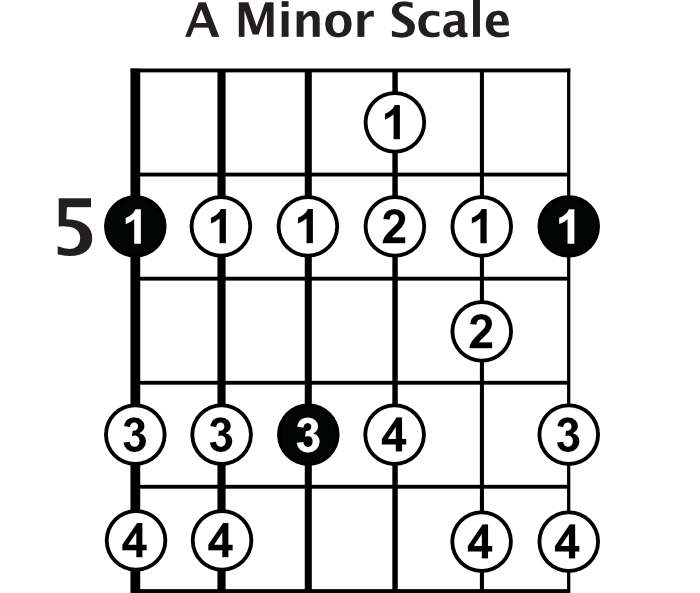
The Natural Minor Scale
The third scale we're going to take a look at is the natural minor scale. There are a few different ways to approach this scale, but we're going to focus on relating it back to the major scale. The way we do this, is by simply taking the notes in our major scale, and lowering the 3rd, 6th, and 7th degrees down a half-step. Once we do this, we're left with our minor scale. 
This is the most common shape you'll use for the minor scale.
The Minor Pentatonic Scale
Just like the major pentatonic scale, the minor pentatonic scale is very closely related to another scale. In this case, the natural minor scale. To make a minor pentatonic scale, we'll remove the 2nd and 6th scale degrees from our natural minor scale. 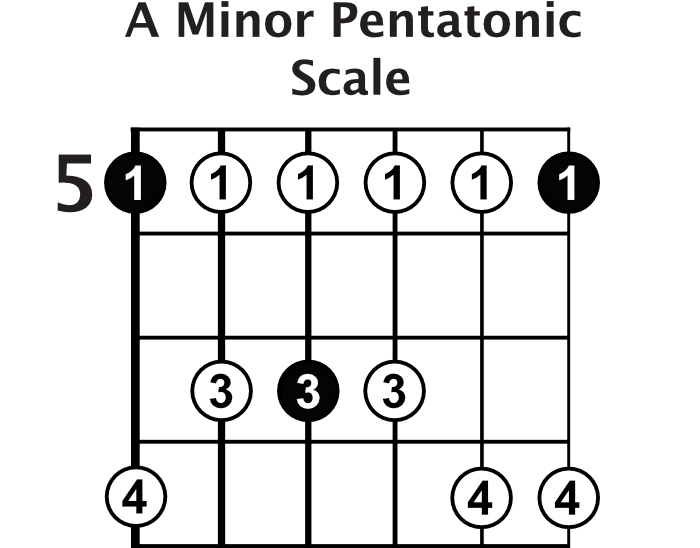
The Blues Scale
The final essential scale is the blues scale. If you know your minor pentatonic scale, then this one is really easy. All you have to do is add one note. This note is called the flat 5 (or sharp 4) note. 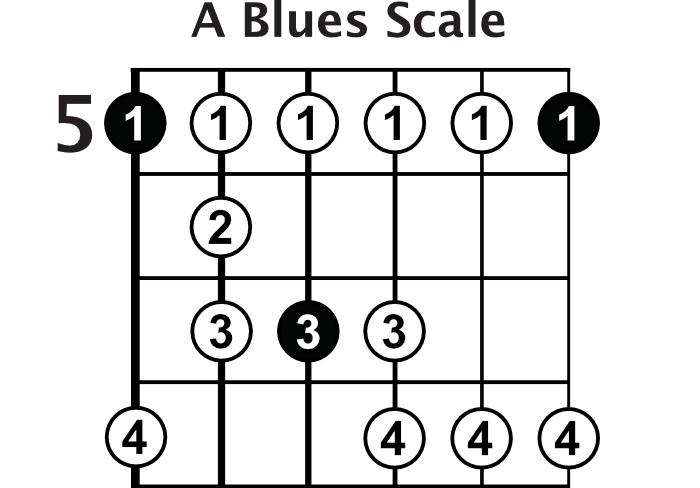
The last step is to apply these scales to some relevant music. I've created a jam track for you that you can download. You'll see it right below the video on this page. Do your best to get some of these shapes under your fingers and work on playing them along to the jam track I've provided or a metronome.
If you're interested in taking Guitar lessons on Zoom or In Person in Burbank, Glendale or North Hollywood, we have some of the best Guitar lessons in Los Angeles. Our guitar instructors are picked by interviewing hundreds of guitar instructors and we have really high standards on both their teaching ability as well as their personality. If you'd like to talk to one of our instructors or set up a first lesson we have a guarantee that if you don't absolutely love your first lesson you don't have to pay for it. Please contact us at (818)902-1233 or on our website at https://www.losangelesmusicteachers.com/online-guitar-lessons-in-burbank-ca.html
|
Archives
July 2024
Categories
All
|
 RSS Feed
|
Music Lessons Available on All Instruments:
Piano Lessons
Guitar Lessons Voice Lessons Drum Lessons Violin Lessons Cello Lessons Saxophone Lessons Jazz Improvisation Lessons Flute Lessons Clarinet Lessons Singing Lessons Acoustic & Elec Bass Songwriting & Production |
Contact Us Now
|


Website by Never Alone Business Services