The Grand Staff and Clefs
2/28/2023
The Grand Staff This is what is known as the grand staff. It includes the treble clef and bass clef. Pianists read from the grand staff. 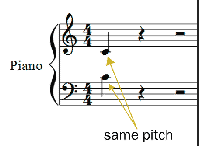 Note that the two notes shown above are the exact same pitch. Each is called "middle C." Clefs in Relation to Middle C Middle C is the note exactly between the bass and treble clefs, as noted in the image above. It is known by many other names, but for these tutorials I will be calling it "middle C". Middle C is located in a different spot for each clef, but it remains the exact same pitch. To show how each clef is related, here are images of each clef with middle C. Yes, this means that the clefs overlap each other. Treble Clef The treble clef is also known as the "G clef." The easiest way to remember this is seeing that the clef circles the note G (second line from the bottom). 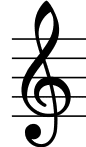 The image below shows where middle C is located on this clef. 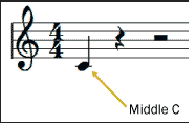 Bass Clef This clef is also known as the "F clef." One way to remember this is that the line between the two dots is F (second line from the top). 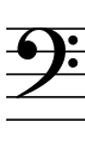 Middle C is located on the first ledger line above the staff of the bass clef. 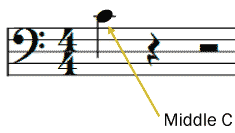 Tenor Clef 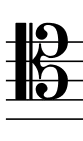 For the tenor clef, middle C is located on the second line from the top of the staff. 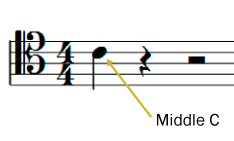 Alto Clef On the alto clef, middle C is located on the middle line of the staff. The tenor and alto clefs are referred to as the "C clefs." Notice that middle C is located at the middle line of each of those clefs. Why all of the clefs? Each instrument has a range of notes that it can play. If every instrument read from the treble clef, for example, there would be a lot of ledger lines for lower instruments, which would make the music very difficult to read. Different clefs are assigned to different instruments based on the notes each instrument is able to play. If you're interested in taking lessons on Zoom or In Person in Burbank, Glendale or North Hollywood, please contact us at (818)902-1233 or on our website at https://www.losangelesmusicteachers.com/online-music-lessons-burbank-ca.html
Best tips for Online Music Lessons
2/14/2023
 How To Get Started Teaching Music Lessons OnlineRight now there are a lot of lessons being moved online because of the corona virus. So we put together a list of tips and best practices to help you make the most out of online music teaching.
Sound Quality All of the platforms that are readily available to us are not designed for instruments, they are designed for voice. This means that tone and dynamics are very difficult to hear. The best workaround that I have found is to ask the student to record a video of their playing on their phone or computer ahead of time, upload the video to YouTube as an unlisted video (not private) and send it through as a link. Even the most basic of phones will likely produce better audio quality than you will find in a video call. The pre-recorded video can then be used and referenced in the lesson as you work on repertoire or exercises. The added benefit of this is that it brings a certain degree of focus, preparedness and organization to a teaching session. In my experience the most impactful element that affects sound quality is the speed of connection to the internet. While you can ensure that you have a fast connection, you will not be able to control that of all your students. To get the best connection possible you can turn the wifi off on all other devices connected to the same router and at best have an ethernet cable run from your computer directly to the modem so that you are not relying on wifi at all. A microphone will boost your sound quality too but not as much as a good internet connection from all parties. Teaching with live video can be very off-putting with regards to sound but you also get used to it. I have found over the years that I can somewhat decipher what I am hearing and pick up some nuances that might sound garbled to others. Facetime, Skype, or Zoom?My recommendation : Zoom There are many video platforms that can be used but perhaps the most common ones will be Facetime, Skype, and Zoom. Facetime and Skype will be excellent tools for one-to-one teaching scenarios and many people are already familiar with how to use the programs, which is a big plus. Skype has the added advantage of being able to send files and text messages while also on the call, which can be very useful for sharing scores, links, and pdfs. Facetime tends to be a bit more stable in my experience as a platform and can have better audio. Zoom is a popular platform that is free to use for sessions up to 45 minutes in duration. For longer sessions you will need to purchase a subscription. Zoom is very useful for teaching because of the extra functions that it provides and I would recommend investing some time to learn this platform. For this reason I will focus on using the Zoom platform in this article, but many concepts can be applied to other platforms. Zoom features for music teachingBy the way, I have no affiliation with this company. Share your screen The share screen function will allow you and your student to read off the same PDF score. As you are sharing your screen this means that you can open the score in a program (like Preview on a Mac) where you can annotate the score and point out sections with your cursor. Anything that you can see on the screen can be seen on the students screen. Just remember that people tend to be on smallish screens so you might need to zoom in on the score if you want to refer to small details. Record the Lesson It is very easy to record a Zoom lesson. Simply hit record whenever you like and a little red dot will appear on the feed showing that the session is being recorded. You have the possibility to pause the recording at any time – perhaps if you want to engage in casual conversation or there is a technical issue – and continue when you are ready. When you end the session Zoom will take a few minutes to render a movie file that you can playback, upload to youtube or send to the student. “Turn on Original Sound” Zoom does have a setting that let’s you get around the dreaded sound quality that we normally experience and it is called original sound. This means that the software stops trying to be smart and detect when you are speaking and just transmits the raw audio feed of the microphone. This is GREAT but it comes with a couple of problems. This is currently only available to the host, which means the teacher can better demonstrate sound but not the student. It causes echo. The sound quality gets better and in part this is because the signal gets a little more complex. The buffering needed to carry this signal puts you slightly out of synch with your student you will get an echo. The solution for this is to use headphones. Multiple Students The biggest advantage of Zoom is that you can have multiple people in a “room”. This means that you can work with more than one person at a time and have a shared discussion. When there is more than two people in a room, you can choose to toggle your screen mode from featuring the person who is talking (or making sound) to a grid of video feeds where you can see everyone. Shareable Links In order for people to join your session you will need to give them a link that looks something like this “Join Zoom Meeting https://zoom.us/j/422347″ When you have a zoom account you will have a default “personal meeting room” link and also the ability to create new rooms with distinct names and links. This means that you could create a room called “Tracy’s Teaching Room” and send out the link to all your students. When a student clicks on a link the first time they will be promoted to download the zoom app to their device. Once this has been installed for the first time it will simply launch the meeting room directly from the link. The apps are free and easy to set up, even for the technology averse. If someone comes to a room early, before you initiate the session on your side, they will just see a screen saying that the host has not started yet. If they come in while you are in there with another student they will still get access but you can mute them until it is time to work with them. Multiple Cameras One benefit for music teachers is that you can set up multiple webcams to use for your teaching session. I am a guitarist, so it can be very useful to have one camera set up for a shot of my right hand whereas the main camera is the typical view from the front. To toggle between cameras all you need to do is select what camera you are using from the video icon. Muting As the host in Zoom, you can mute participants. This is incredibly useful if you are in a group of people and you don’t want to hear the various sounds coming from all the microphones. You can “mute all” or mute one at a time. Participants can also mute and unmute themselves. Dealing with Dropouts If the internet cuts out for you or the student the room is still there and it won’t disappear for everyone. This is inevitable at some point so it is nice to know that you or the student can simply fix the problem (usually plugging the computer into power) and re-join a few minutes later. Best Practices and SuggestionsPreparing Materials Save yourself a lot of time by making sure that you both have the same materials to refer to. If you have different scores you might spend a lot of time trying to communicate exactly what part of the music you are referring to. It is possible to hold up sheet music to the camera but it is not particularly convenient. Talking differently One of the more subtle changes that you will have to make is regarding how you talk and listen. In our regular teaching you might find yourself interjecting simply to encourage or acknowledge something. Online, this will potentially stop the flow of conversation with the inevitable “oh, sorry you go ahead – no you go ahead”. By speaking and then giving a clear amount of time to listen to the response or playing you will make the interaction more effective and less frustrating. Getting Different Camera Angles If you only have one camera available, which will be the case for most of you, you can still get multiple points of view by physically moving or adjusting the current camera. Take a few moments playing around with what angles might be useful in a teaching situation. How close do you need to be to see details and what details are visible at what positions. One thing to remember is that you don’t always need to have your face visible. Of course it is nice to see people’s faces but if you need to see a cello bow hold, perhaps you can adjust accordingly. If you are on a phone or laptop you will have some ability to maneuver the camera either by tilting or holding the device in your hand. Handholding can be very disorienting for the viewer so don’t do it too often, but it can be useful for getting very specific points of view. If you are using an inbuilt camera on a laptop, don’t be afraid to tilt the screen to get the right angle. Lighting The vast majority of cameras will be on automatic settings and adjust for light as they think is necessary. The only real problem that arises for our purposes is if you have a strong light in the background. If you have strong backlighting – perhaps a sunny window behind you or a strong lamp – then the camera might think it is necessary to adjust for that light source. The result will be that your face will be very dark. To fix this, aim to have the strongest light source in front of you, or potentially maneuver your torso to cover a specific back light. As soon as you do this you will notice that your camera adjusts on its own. If you want to look your best, you will want to aim for a large lighting source – like a window -and a soft lighting source – like a window with transparent white curtains. A small and bright light source will give you harsh highlights and shadow. A simple layout that works is putting a soft lamp next to your computer screen that lights your face from the front, turn on the overhead room light for a bit of ambient light, and potentially have some light in the background for depth. Of course, lighting can get very sophisticated and you can spend some time experimenting to find a setup that works for your space. 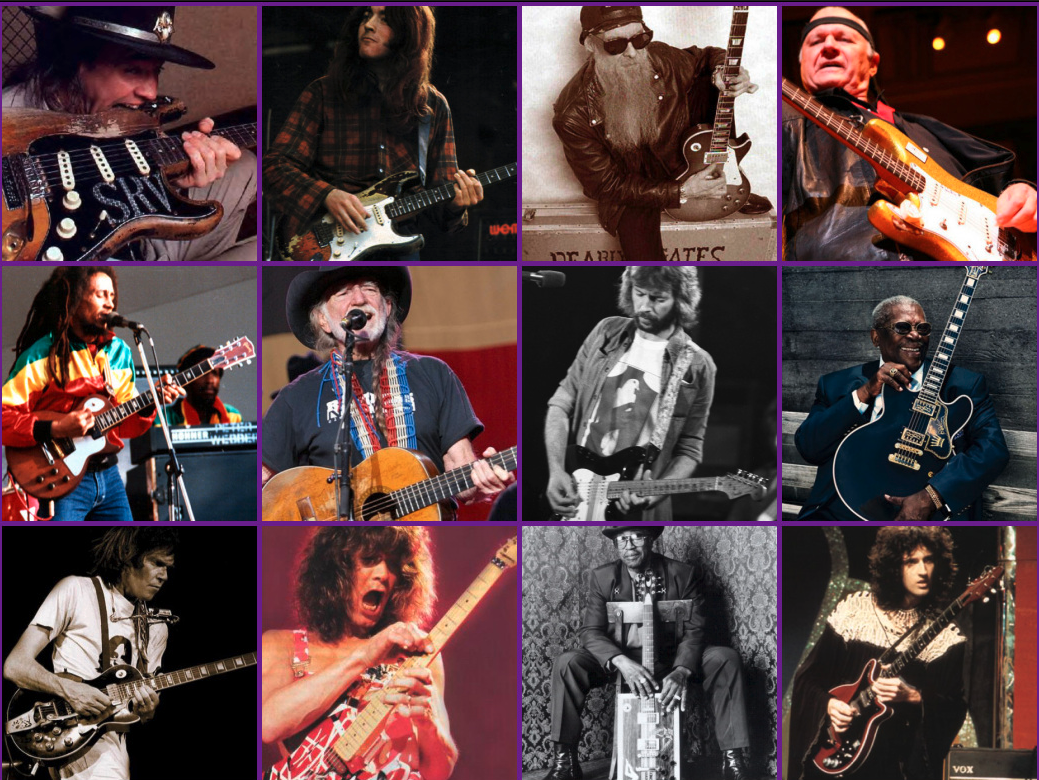 In the world of the electric guitarist, there are great players and then there are legends. What sets them apart from being mere mortals? Read on for ten of the best and why. Who knows, maybe you have a budding electric guitar prodigy in your family that will be inspired to become the next big deal. With guitar lessons for kids readily available, there’s only one way to find out! See how the big names below have made an impact on the world of music through their guitars. 1. Les Paul Les Paul gave his name to one of the most iconic guitars in the world; he was also a nifty guitar player in his own right. 2. Eddie Van Halen With a unique sound and an amazing two-handed playing technique, Eddie Van Halen changed the sound of rock for generations and inspired more people to take up playing than any other electric guitar player. Being a ‘tone chaser’, he would experiment with guitar parts to make the perfect instrument. 3. Jimmy Page One of the first heavy metal bands, Led Zeppelin owes its distinct sound to Jimmy Page. Very few people fail to recognize the opening notes to Stairway to Heaven or the iconic riff to Whole Lotta Love! Jimmy Page was one of the most iconic guitar players in the world. 4. Jimi Hendrix No list would be complete without James Marshall Hendrix. Hailed as the world’s greatest guitarist, an outplayed Clapton walked off stage when Jimi joined Cream for a jam, saying to Jimi’s manager “You never told me he was that good!” 5. Eric Clapton When you have fans that spray graffiti on walls proclaiming ‘Clapton is God’, then you must be an amazing guitarist. A blues player, Clapton combines amazing solos and instantly recognizable riffs to be one of the most accomplished artists. 6. Joe Satriani Inspired by Hendrix, Joe Satriani is mainly an instrumentalist who occasionally sings. He has an amazing technical ability, and has taught many other famous guitar players. Among his students is Steve Vai, who couldn’t even string a guitar when he met Joe. 7. Slash Guns & Roses would not be where it is today without Slash. Slash’s style epitomizes the iconic rock guitarist and spawned many trying to follow in his steps across the world. Songs such as Paradise City and Welcome to the Jungle will have you reaching for your air guitar in no time. 8. Steve Vai A master of the space age sound, Steve Vai pushes the boundaries of what you can do with an electric guitar. With a unique style and technical ability, there aren’t many who come close to him. Steve played with Whitesnake and sold out crowds in the early 90’s. 9. Peter Green The founder of Fleetwood Mac, Peter Green is one of the most accomplished musicians around. A beautifully soulful blues player, he wrote many memorable tracks including Albatross and Black Magic Woman. When blues greats such as B.B. King say, “He has the sweetest tone I ever heard; he was the only one who gave me the cold sweats” you know he must be good. 10. B.B. KingA legendary blues player, and influence of many, B.B. King was the master of the clean, soulful blues. If you have never heard of King, then you’ve never heard the blues. Although many deserve to be on this list, these are the crème of the crop. Music has been forever changed by the influence of these legends. If you're interested in taking lessons on Zoom or In Person in Burbank, Glendale or North Hollywood, please contact us at (818)902-1233 or on our website at https://www.losangelesmusicteachers.com/online-guitar-lessons-in-burbank-ca.html
Music Lesson on What is an Octave?
2/6/2023
 An Octave is one of the most fundamental principles that relates to how music is written, composed, and perceived. All music you hear on the radio or on TV uses octave relationships in the melodies and harmonies that it is composed of, and the concept of dividing the octave into 5ths, 4ths, 3rds and finally whole and half steps has been around for centuries. It's the basic of what we call the tonal system of western music. In this lesson, we will cover the basics of what you should know about how the Octave is used in music. However, to best talk about octaves, we should cover what pitches and intervals are first. What is Pitch? When we play a note on an instrument or sing a note, that produces a sound. We can define that sound by a few different criteria, like how loud it is, how long it is, and what the pitch is. Pitch is just another word for the frequency of a note, or how “low” or “high” the note is. All frequencies, have "overtones". The very first overtone above the fundamental (which is the basic note) is an Octave. The piano keyboard is also laid out in Octaves, i.e. if you look at the basic piano you will see a pattern of two black keys and 3 black keys. That pattern continues up and down the keyboard. That pattern is what is easily visual on the piano and divides up the various 8 octaves of the piano. If we hear a note that sounds like a baby’s cry, that would be a high-pitched note. On the other hand, a rumbling sound like thunder or train wheels would have a low pitch. A note sounds higher or lower than another if it has a higher pitch, or frequency, than the other note. What is an Interval? Now that we know what pitch is, we can discuss intervals. An interval occurs when two notes – notes with different pitches – are played at the same time, and the interval is the distance in pitch between the two notes. If two notes produce a really big interval when played together, then their pitches are really far apart, and if the interval between the notes is small, then they’re close together. There are many different names for all of the intervals. The smallest interval (shown on the right side of the picture above) is called a “semitone”, or “half step”. If you put two semitones together, you get a “tone”, or “whole step”. Other intervals are given numbers as names, such as a “third”, “sixth”, “eleventh”, and so on. This brings us to the octave. What is an Octave? An Octave is a very unique interval. It is the interval between two notes, in which one of the notes has a pitch that is exactly double the pitch of the other note. Pitch, as we said before, is another word for frequency, and we can define a note by giving its frequency as a number. So, say for example that we have a note with a frequency of 220 Hz. We can call it A (in fact, the note with that frequency is an A). If we want to produce another note that will create an octave interval with the A, we have to either double that number – 440 Hz – or cut that number in half – 110 Hz. Therefore, if we have two notes, one with a pitch of 220 Hz and the other with a pitch of 440 Hz, then those two notes create an octave: You can also have notes that are two or three octaves away from each other. For example, the note with a 110 Hz pitch and the note with a 440 Hz pitch are two octaves away, because you have to double 110 twice to get 440. We can then determine the octaves above 440 by doubling (880, 1720, etc.), and the octave below 110 by cutting it in half (55). Octaves are sometimes heard as basically the “same” note – like if a man and a woman are told to sing a “C”, they will most likely sing C’s an octave apart. However, it still sounds like they’re singing the same note, because they sound so similar. Summing Up To sum up, the octave is one of the most common and easily-identified intervals in music. Each instance of the same note (but different pitch) on a piano or guitar occurs as an octave, and each octave doubles the frequency of the one before it. If you're interested in taking lessons on Zoom or In Person in Burbank, Glendale or North Hollywood, please contact us at (818)902-1233 or on our website at https://www.losangelesmusicteachers.com/online-piano-lessons-in-burbank-ca.html
How to Hold a Violin Bow
2/1/2023
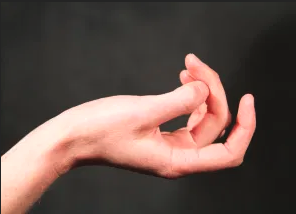 Sample 1: Turn your hand over so the palm faces up. Let your thumb curl inward. 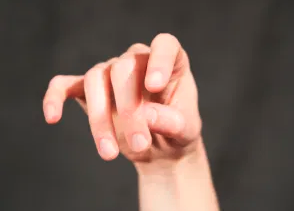 Sample 2: Turn your hand back over, but keep your thumb curling inward. That’s your natural hold.  Sample 3: Place your bent right thumb so that half of its tip rests on the lip of the frog and half of it rests on the bow stick. 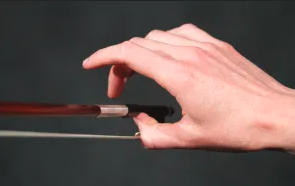 Sample 4: Allow the part of the thumb above the nail to lean against the hair. The Problem
You have difficulty getting a natural-feeling bow hold, one that produces the desired tone colors, strokes, and dynamics. The Solution As the foundation of your bow technique—literally how you and your bow connect—your bow hold can either support your technique or hinder it. Given the variety of bow holds demonstrated by talented artists throughout history, some argue that what you do with your bow is more important than how you hold it. However, these variations exist because of anatomical differences between players, the musical tastes of the times, and misinterpretations, and not because it doesn’t matter. A good bow hold feels so natural you hardly notice it and rarely think about it. It balances the elements of both flexibility and strength, facilitating complete command over the bow as a tool to produce a variety of tone colors, strokes, and dynamics. A troubled bow hold, on the other hand, has limitations in terms of flexibility and strength. 1. Rest your right arm at your side. Notice how your fingers curl slightly. Keeping this relaxation in your fingers, and your wrist floppy, bend your elbow and bring your hand up to shoulder height. Notice the spread of your top four fingers. Even if your thumb is already curling in toward the other fingers, turn your hand over so the palm faces up and let your thumb curl inward, most likely to touch the middle finger at the joint closest to the middle finger’s tip (Sample 1). 2. Now turn your hand back over, but keep your thumb curling inward (Sample 2). That’s your natural bow hold. 3. Now add the bow. Hold the bow stick in the left hand, hair facing you. Place your bent right thumb so that half of its tip rests on the lip of the frog and half of it rests on the bow stick (Sample 3). 4. The thumb should be slightly angled rather than vertical to the stick. Allow the part of the thumb above the nail to lean against the hair (Sample 4). This provides support and security. The thumb will likely rest here except when playing near the tip of the bow. 5. Keeping this position, rest the upper half of the bow on your left shoulder, hair down, bow stick parallel to the floor. Balance the bow between your shoulder and the right thumb tip. Keep your thumb bent down to the hair or the bow might roll away from you. Without upsetting the balance, lightly lower your fingers to the stick as the fingers fall naturally—the first three over, the pinkie tip on top. Your forearm will likely rotate inward. That should be a light, relaxed bow hold. If you're interested in taking lessons on Zoom or In Person in Burbank, Glendale or North Hollywood, please contact us at (818)902-1233 or on our website at https://www.losangelesmusicteachers.com/online-violin-lessons-in-burbank-ca.html |
Archives
July 2024
Categories
All
|
 RSS Feed
|
Music Lessons Available on All Instruments:
Piano Lessons
Guitar Lessons Voice Lessons Drum Lessons Violin Lessons Cello Lessons Saxophone Lessons Jazz Improvisation Lessons Flute Lessons Clarinet Lessons Singing Lessons Acoustic & Elec Bass Songwriting & Production |
Contact Us Now
|


Website by Never Alone Business Services