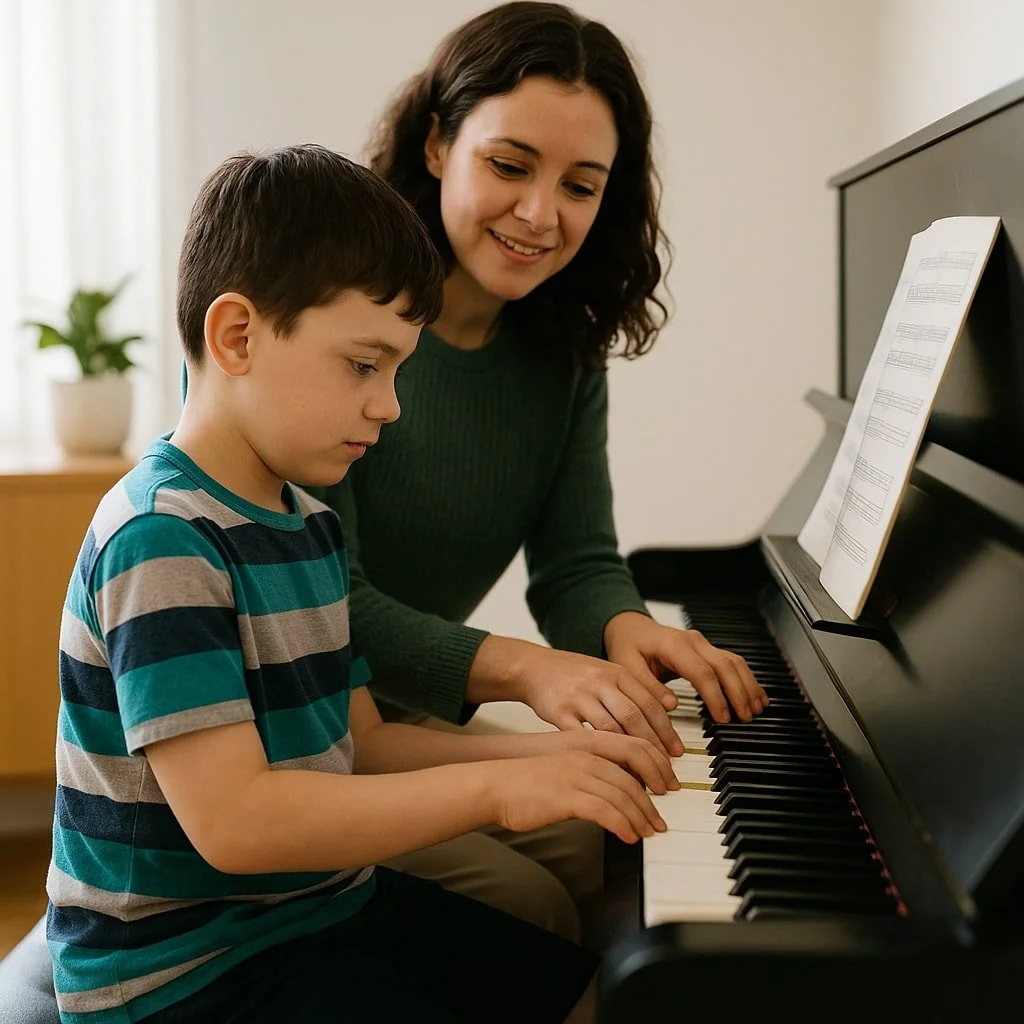
Best Way To Find Your Voice Range
1/27/2023
If you're interested in taking Singing lessons on Zoom or In Person in Burbank, Glendale or North Hollywood, we have some of the best Voice lessons in Los Angeles. Our Vocal instructors are picked by interviewing hundreds of teachers and we have really high standards on both their teaching ability as well as their personality. If you'd like to talk to one of our instructors or set up a first lesson we have a guarantee that if you don't absolutely love your first lesson you don't have to pay for it. Vocal Range I’m sure we’re all familiar with words like bass, tenor, alto and soprano, but how do we actually find out our voice type when we start singing? Discovering our voice type is in fact a really simple exercise, and certainly one which is worth spending a bit of time on as a beginner. Knowing and understanding vocal range gives us an important guide on the notes and songs we are able to sing safely and effectively. It's important to remember that vocal range really isn’t related to singing ability: many experienced singers can have a narrow vocal range, and are still able to produce a beautiful, rich sound. As vocal range is mainly determined by the shape and structure of each individual's vocal folds, it's difficult to train to reach notes outside our range. However, we can strengthen the notes at the edge of our range, and much of vocal training focuses on improving the quality of the notes at the top and bottom of our register, giving us a wider range to sing with a clear and natural sound. Here are some simple steps for finding your vocal range and voice type: 1. Warm Up Before doing any type of singing, it’s vitally important to do a vocal warm up, particularly when singing near the edges of our vocal range. This is in order to avoid straining or damaging the voice. Simple techniques to warm up the vocal choirs include: humming scales, sirening, and singing scales using different vowel sounds. 2. Find Your Lowest Note Using a piano, find Middle C (also known as C4) and sing along as you play the note. Travel down the white keys to the lower notes and sing along to each note until you reach your lowest note. Any note within the octave of Middle C is designated a number 4, any note in the octave below is designated a number 3, and so on. Your lowest note will be the last note you can sing comfortably and sustain without croaking or breathing the note. Write down the note (for example G3). Once you’re sure you’ve found your lowest note, don’t attempt to try singing any lower as this might strain your voice. 3. Find Your Highest Note Much like finding your lowest note, travel up the piano from Middle C until you find the highest note in your normal voice and write the note down. Continue up the scale in your falsetto voice until you find the last note you can sing and sustain comfortably and again write the note down - this note it is the top of your vocal range. It’s very important not to push your voice and attempt to sing past this note. 4. Compare Your Lowest And Highest Note Once you know your lowest and highest note, check these against the voice types below:- - Soprano: C4 – C6 Mezzo Soprano: A3 – A5 Alto: F3 – F5 Tenor: C3 – C5 Baritone: G2 – G4 Bass: E2 – E5 You've now found your vocal range and voice type. However, it’s important to bear in mind that many singers within the categories above can often sing higher or lower than the ranges displayed, so don't worry if your range doesn't match exactly. The top and bottom note are not the only things to determine voice type: factors such as tessitura (the most comfortable part of the range to sing) and timbre (texture and quality of the voice) also inform voices types. As you gain more experience as a singer you will develop a better awareness of the parts you are able to sing most comfortably comfortably and naturally. If you're interested in taking vocal lessons on Zoom or In Person in Burbank, Glendale or North Hollywood, we have some of the best vocal lessons in Los Angeles. Our vocal instructors are picked by interviewing hundreds of vocal instructors and we have really high standards on both their teaching ability as well as their personality. If you'd like to talk to one of our instructors or set up a first lesson we have a guarantee that if you don't absolutely love your first lesson you don't have to pay for it. Please contact us at (818)902-1233 or on our website at https://www.losangelesmusicteachers.com/online-voice-lessons-in-burbank-ca.html
There are lots of fun to enjoy in music and learning to play the guitar is no exception. Unarguably, practicing this stringed instrument can be quite interesting but it can also be tough. To some degree, there are some guitar issues to be encountered of which pain is one of them. Nevertheless, it is good to know that there is a way out of this. Here is how to prevent your fingers from hurting while playing the guitar. Practice with a decent guitar When practicing to play the guitar, it is important for learners to know how to properly set up the instrument with low action. If you don’t know how to do this, go along with the instrument to a real music store to ask for assistance. A decent guitar is one that is properly set up to produce the right sounds with little efforts. Strung up your guitar with the right strings Using the right set of strings is obviously one of the easiest ways to get started. While the electric guitar requires .08 set of strings, acoustic guitars work best with .010 strings. As a learner, you may not know which set of strings is appropriate for use on your instrument. However, you can get the right settings done by visiting a real music store to get the professional assistance you need to string up your guitar. To achieve the best, learners should ensure to make it easy on themselves. However, there is no need to shy away from pain – besides, no pain… no gain. Engage in music lessons with a professional guide Having someone (preferably an expert) guide you through music lessons can be highly profitable when it comes to learning the guitar. Learning to play well will require you to adopt certain techniques recommended by experts to ensure an effective play session. Interestingly, you can get all the fundamentals covered at this time. You can effectively learn how to prevent your fingers from hurting while playing the guitar when you adopt an organized and focused practice session with a professional guitarist. Simply put, you need someone who can guide you and guide you well. Practice softly For the safety of your fingertips, soft practices are recommended. To do this, you don’t need to squeeze down when fingering a chord. All you need to do is to lay your fingers on the strings then do some back and forth movements but don’t press down. This can basically help to improve your solo, riff, and scale practices. Play for shorter periods You can improve your fingering skills by avoiding long-term practices and playing less long stretches within your time allotment. Learn with fun To avoid hurting your fingers while playing, there is no need to practice as if you are in a competition. Take some time to relax and ensure to have some fun while you practice. If you're interested in taking Guitar lessons on Zoom or In Person in Burbank, Glendale or North Hollywood, we have some of the best Guitar lessons in Los Angeles. Our guitar instructors are picked by interviewing hundreds of guitar instructors and we have really high standards on both their teaching ability as well as their personality. If you'd like to talk to one of our instructors or set up a first lesson we have a guarantee that if you don't absolutely love your first lesson you don't have to pay for it. Please contact us at (818)902-1233 or on our website at https://www.losangelesmusicteachers.com/online-guitar-lessons-in-burbank-ca.html
At the end of the day, singing is a physical process. It requires precision movements from your entire body. Because of this, singers need to take just as much care of their voices before they sing as when they’re singing. Have you ever been to the gym and had a great workout but felt really sore the following day? Or perhaps you’ve been on a run with a friend and gone to bed that night with a clicking knee? Stretching can prevent the athlete from unnecessary damage and pain. Stretching your voice is just as critical. Here are some of the best reasons why you should take the time to condition your voice with regular warmups. Warmups bring you right up to your best voice. You may have noticed that some days you can sing all night without a problem. Other days, you might wear out by the second or third song. You may even have noticed that some days you can hit that high note, but other days it’s a stretch to come near it. You may find that you’re able to sing lower notes in your range at the end of the day than you can in the morning. All of this can be worked through ahead of time by warming up your voice prior to a recording session or performance. And if you record at home, it’s much easier to notice how your vocal strength improves day by day by listening back to the recordings you make. By gradually putting your voice through its paces, you’re able to loosen it up and get your blood circulating through all the different parts that make up your voice box. This gives you access to all the different abilities you have as a vocalist. By warming up, you don’t have to wait around for a “good voice day” to happen. Warmups grow your skills as a singer. Think of warming up as exercising for your voice. What happens to your voice when you warm up is actually similar to what happens to athletes’ muscles when they stretch and exercise. Here’s a simplified explanation. Warmups prepare you for the intense vibrations that come along with singing. Controlled, steady vocal exercises will increase acid in the muscles surrounding your vocal folds, which helps those muscles do their jobs more effectively. One of these jobs includes interacting with a tendon in your throat. When that tendon is properly engaged, it’ll stretch, giving you more flexibility and control over your voice. When you properly and regularly exercise your voice, you build upon your abilities and become a much more effective singer. Warmups help you sing healthily without damaging your voice. Remember all that stuff above about the muscle and tendon? If there’s a high or loud note you can’t sing right away, forcing yourself to do it can strain your voice. You could literally pull a muscle or give yourself tendonitis. Ouch! Not worth it. Have you ever tried to push through a long set on a “bad voice day” and felt tired and sore at the end of the night? Perhaps your speaking voice was mostly gone? Vocal warmups before a show prepare your voice for the strenuous activity that is singing. It may seem counterintuitive. “How does singing before I sing make me less tired from singing?!” This is because warmups are a controlled, steady way of singing that doesn’t stress your voice out. Warmups prepare your voice for the vocal event that is singing. When you sing something challenging in a performance without adequately warming up, you run the risk of damaging your voice and really hurting yourself. When should you warm up? Ideally, you should warm up every day. And if you’re not already, you should start slow. Do some simple exercises for 20 minutes every morning. Don’t try to belt out that high C just yet — you’ll need to work yourself up to that. Remember, warmups help grow and unlock the skills that you already have. If you don’t have a regular warmup routine, it’s wise to consult a voice teacher and build one together so that you approach the exercises correctly. These exercises should also be done the day of any strenuous vocal activity. If you have a show in the evening, warm up in the morning, then again an hour or so before the show. If you’re a public speaker, you’ll want to warm up ahead of your presentation as well. Choose your favorite warmups and then make sure you’re practicing correctly. If you’re familiar with vocal warmups, this will serve as a great reminder of what you already know. If you’ve never warmed up a day in your life, I highly recommend getting in touch with a teacher to properly lead you through your exercises. Relax. Relaaaax. Inhale, exhale. Good, healthful singing starts from a relaxed body. Do what you need to do to loosen yourself up — within reason, of course! Some singers like to start their day with a hot shower and a lukewarm mug of licorice root tea. Feel all your tension melting away and your muscles becoming looser. Practice proper breathing. Proper breathing for singing is the way we breathe when we lay down. You want to imagine your chest is filling with air from the bottom of your lungs, up. Imagine a glass filling with water; the water fills the bottom first, then rises to the top. To exhale, reverse it — empty your lungs from the top down. It will feel a bit unnatural at first, but you’ll become accustomed to breathing this way. This is how you breathe deeply. Release tension in your neck. The quickest way to damage your voice is to sing with tension. When you’re singing any note, you want to make sure your neck looks soft and relaxed. Sing in front of a mirror and watch your neck. Does it tense up? Can you see veins and ligaments protruding out at certain notes? Be mindful of where you’re feeling tension. Your neck should look the same when you’re singing as it does when you’re not singing. This is true for softly sung songs as well as big belters. Although, if you’re screaming to heavy metal every night, I’m not sure there’s much you can do about those veins. Stand up straight. There’s a correct way to stand when singing. Straight! Don’t allow your shoulders to hunch. Plant your feet firmly on the ground, shoulder-width apart. Now, imagine there’s a string that winds all along your spine and comes out the top of your head. Imagine yourself pulling that string and straightening out your spine, your neck, and lastly, your head. Your chin should not dip or rise, but be level with the floor. You’re ready to sing! Pace yourself, and enjoy your newly warmed-up voice. Vocal warmups should be challenging the same way that going to the gym is challenging. You should leave feeling better than when you came. One crucial difference, though, is that vocal warmups should not leave you feeling sore. A good exercise will have you feeling ready to sing anything! If you're interested in taking Voice lessons on Zoom or In Person in Burbank, Glendale or North Hollywood, we have some of the best Voice lessons in Los Angeles. Our Vocal instructors are picked by interviewing hundreds of voice instructors and we have really high standards on both their teaching ability as well as their personality. If you'd like to talk to one of our instructors or set up a first lesson we have a guarantee that if you don't absolutely love your first lesson you don't have to pay for it. Please contact us at (818)902-1233 or on our website at https://www.losangelesmusicteachers.com/online-guitar-lessons-in-burbank-ca.html
What Are Drum Rudiments?
1/24/2023
Drum Rudiments are one of the most important aspects of drumming. They are the building blocks to every drum beat, pattern, fill, and solo. Whatever your skill level is on the drums, practicing your rudiments is a must. Even if you are an advanced drummer, it’s always good to go over some of the more technical rudiments. There are 40 drum rudiments; some more complicated then the other. Out of those 40, there are about 5 essential rudiments that are a must for practicing.
Many of you may be unfamiliar with the term Rudiments; however, do not worry. Drum rudiments aren’t a concept you aren’t aware of, maybe just a term you haven’t heard before. A drum rudiment is basically a sticking pattern. Every sticking pattern you play on the drum set is derived from different drum rudiments. Most are very common patterns that you are well aware of like the single stroke roll, double stroke roll, and flam stroke. Some are more complex and difficult to play. The next time you play the drums, you should look and see what rudiments you are actually playing. Drum rudiments are the essentials of drumming; they should be practiced by drummers to increase their stick control, speed and independence. You may have heard of the 40 Essential Drum Rudiments before; this is the list of rudiments that are played. They say if you master the 40 essential rudiments you are on your way to becoming a professional drummer. This is very true; if you can identify and play each one of these rudiments you will have built up enough knowledge and stick control to be a very skilled drummer. However, this takes a lot of work. Here is the list of rudiments
Drum Rudiment Practice Practicing these drum rudiments are very important. The best way to practice these is to take a pair of drum sticks, a metronome, and a practice pad and start playing. Make sure you are playing with a metronome to keep yourself on time. If you do not know where to start, here is a list of the top 5 rudiments you should start with: the single stroke roll, the double stroke roll, the flam stroke, the paradiddle, and the double paradiddle. These are the top 5 rudiments you should start with, as each one will teach you speed, control, independence and endurance on your sticks. Most of the drum rudiments are variations of each other, meaning it is not too hard to learn all 40 rudiments. For example, if you can play a flam stroke, and a paradiddle pattern, you should have no trouble playing the flam paradiddle. In any case take the time to go over each one if you can. Drum rudiments are more than just sticking patterns you practice on a practice pad. They are designed to be played in common drumming applications. What this means is they are designed to be played in drum beats, fills, and solos. If you're interested in taking Drum lessons on Zoom or In Person in Burbank, Glendale or North Hollywood, we have some of the best drum lessons in Los Angeles. Our drum instructors are picked by interviewing hundreds of drum instructors and we have really high standards on both their teaching ability as well as their personality. If you'd like to talk to one of our instructors or set up a first lesson we have a guarantee that if you don't absolutely love your first lesson you don't have to pay for it. Please contact us at (818)902-1233 or on our website at https://www.losangelesmusicteachers.com/online-drum-lessons-in-burbank-ca.html Choosing A Private Music Teacher For Yourself Or Your Children Of course, music has been food for the soul since day one. No one can contest that. Music inspires people. You must have observed that successful musicians are often objects of hero worship. Musical artistes are nothing but idols. It is because of the power in music. Although many artists have natural talents in music, they still have to develop it through music lessons. Right now, there are musical institutes and music is studied in several colleges and universities. One good benefit of musical schools is learning how to play musical instruments. While you can acquire musical knowledge from YouTube or other similar platforms, you can’t compare any of them to hiring a highly experienced music teacher. One reason for this is that a teacher will tailor your lessons towards your unique deficiencies but what you’ll learn on the internet is general knowledge. Apart from going to a music school, you could also enroll for private lessons. If hiring a private music teacher seems like the best option for you or your children, remember that music teachers have different levels of experience and expertise. Besides, having a particular skill is different from being able to transfer the skill to another person. So, don’t just hire any music teacher that you come across first. Here are some important factors to consider. Interview several prospects before hiring one Scrutinize several prospective teachers before choosing one. Find out about their qualifications, experience, and areas of expertise. Teaching children requires different skills from teaching adults. So, if you’re hiring a teacher for your children, you should hire the one that has experience in teaching children. Let your child select the teacher that he or she is comfortable with. Also, you may also try to find out about the music teacher’s teaching techniques too. The learner should take trial lessons A good way to assess a musical teacher is to take his trial lesson. This will help you determine if the teaching technique is suitable for you. A technique that worked for your friend may not work for you. This is why you need to take trial lessons. If the lesson is for your kid, let him/her take the lesson, but you need to be there too. Evaluate each trial lesson Since you may have to take trial lessons from several teachers before you select one. You need to evaluate the lessons from both the learner’s perspective and the teacher’s angle. If your kid is the learner, ask him if he enjoyed the lesson. If not, find out why he didn’t enjoy it. Also ask him for the teacher whose trial lesson is the best. You also need to seek the teacher’s assessment of the learner. Was (s)he attentive? Was (s)he eager to learn? This will help you to make a balanced judgment. Conclusively, you can start your search on Google. A simple Google search will bring up the contacts of several music teachers within your location. The benefit is worth the search. If you're interested in taking lessons on Zoom or In Person in Burbank, Glendale or North Hollywood, please contact us at (818)902-1233 or on our website at https://www.losangelesmusicteachers.com/online-music-lessons-burbank-ca.html
Styles of Singing for Different Genre's
1/11/2023
Voice Lesson on styles of singing. People have been singing since the discovery of the voice and the beauty of melody. Of course, many things have changed over the hundreds of years people have been singing. Cultures across the globe have with their own scales and modes, and at the same time different type of singing styles emerged. Music genres are diverse and varied as the cultures themselves. Different genres present unique challenges for singers. Here is a list of the most common singing styles and how to sing them. Pop Pop is short for Popular. The pop music of the 40's was Frank Sinatra and Jazz music. In the 50's it was Elvis and Bo Diddly. Each decade was a different style of music right up until the pop music of today. With dance and rhythm at its heart, this style has dominated the music industry. Tips: Learn how to control your vibrato without getting stressed. Experiment with varied vocal sounds like short popping sounds. Focus on your stage movements and gestures and dance a little to set the right energy. Rock Rock is the grandchild of the blues. Rock and roll is heavier and a more danceable rhythm. It grew up t o become harsh, rougher and edgier. Tips: Experiment with different vocal flairs like a growling sound at the end but make sure you don’t overdo it. Practice singing a huge range of dynamics from whispers to high notes. Opera/ Classical This style is always considered as the most formal and restrictive of all genres of singing as it requires the greatest amount of discipline. It is sung with a terminal vibrato and emotional release. Lack of intimacy with the audience makes it the least conversational of all genres. It gives the audience the impression of admiring astonishing paintings from afar. Tips: Listening to the style of the great vocalists will help you to understand the stylistic demands of this difficult style. Don’t force or try to create it. Get connected with classical voice instructor to become a legitimate classical vocalist. Blues/Jazz Songs with clear speech level and distinct consonants come under jazz genre while blues singing has rough and rootsy edges with a unique accent. Tips: Experiment with different vocal sounds like scatting and pitch slides. Listen to great jazz vocalists for understanding the stylistic differences and you can also learn a lot from singing along with great saxophone and horn jazz soloists. Hip Hop The rhythmic rhyming singing accompanied with rapping and beat boxing is termed as hip hop style of singing. The genre has grown steadily and gained popularity over the years. The apparent origins are funk, disco, reggae, and blues. Tips: Carefully listen to funk, disco, reggae, soul, gospel and old-school hip hop songs. Hip Hop is different than rapping. Never be afraid of experimenting or wordplay. Make your own unique signature singing styles. Despite the different music genres, one thing connects them all that is love that the audience has for the voice and great vocalists no matter what style. Practice makes perfect. Listen carefully and learning some piano skills will also help you to develop faster because learning about scales and chords is important for your development. If you're interested in taking vocal lessons on Zoom or In Person in Burbank, Glendale or North Hollywood, we have some of the best vocal lessons in Los Angeles. Our vocal instructors are picked by interviewing hundreds of vocal instructors and we have really high standards on both their teaching ability as well as their personality. If you'd like to talk to one of our instructors or set up a first lesson we have a guarantee that if you don't absolutely love your first lesson you don't have to pay for it. Please contact us at (818)902-1233 or on our website at https://www.losangelesmusicteachers.com/online-voice-lessons-in-burbank-ca.html
What Is An Octave 0n A Piano?
1/6/2023
An Octave is one of the most fundamental principles that relates to how music is written, composed, and perceived. All music you hear on the radio or on TV uses octave relationships in the melodies and harmonies that it is composed of, and the concept of dividing the octave into 5ths, 4ths, 3rds and finally whole and half steps has been around for centuries. It's the basic of what we call the tonal system of western music. In this lesson, we will cover the basics of what you should know about how the Octave is used in music. However, to best talk about octaves, we should cover what pitches and intervals are first. What is Pitch? When we play a note on an instrument or sing a note, that produces a sound. We can define that sound by a few different criteria, like how loud it is, how long it is, and what the pitch is. Pitch is just another word for the frequency of a note, or how “low” or “high” the note is. All frequencies, have "overtones". The very first overtone above the fundamental (which is the basic note) is an Octave. The piano keyboard is also laid out in Octaves, i.e. if you look at the basic piano you will see a pattern of two black keys and 3 black keys. That pattern continues up and down the keyboard. That pattern is what is easily visual on the piano and divides up the various 8 octaves of the piano. If we hear a note that sounds like a baby’s cry, that would be a high-pitched note. On the other hand, a rumbling sound like thunder or train wheels would have a low pitch. A note sounds higher or lower than another if it has a higher pitch, or frequency, than the other note. What is an Interval? Now that we know what pitch is, we can discuss intervals. An interval occurs when two notes – notes with different pitches – are played at the same time, and the interval is the distance in pitch between the two notes. If two notes produce a really big interval when played together, then their pitches are really far apart, and if the interval between the notes is small, then they’re close together. There are many different names for all of the intervals. The smallest interval (shown on the right side of the picture above) is called a “semitone”, or “half step”. If you put two semitones together, you get a “tone”, or “whole step”. Other intervals are given numbers as names, such as a “third”, “sixth”, “eleventh”, and so on. This brings us to the octave. What is an Octave? An Octave is a very unique interval. It is the interval between two notes, in which one of the notes has a pitch that is exactly double the pitch of the other note. Pitch, as we said before, is another word for frequency, and we can define a note by giving its frequency as a number. So, say for example that we have a note with a frequency of 220 Hz. We can call it A (in fact, the note with that frequency is an A). If we want to produce another note that will create an octave interval with the A, we have to either double that number – 440 Hz – or cut that number in half – 110 Hz. Therefore, if we have two notes, one with a pitch of 220 Hz and the other with a pitch of 440 Hz, then those two notes create an octave: You can also have notes that are two or three octaves away from each other. For example, the note with a 110 Hz pitch and the note with a 440 Hz pitch are two octaves away, because you have to double 110 twice to get 440. We can then determine the octaves above 440 by doubling (880, 1720, etc.), and the octave below 110 by cutting it in half (55). Octaves are sometimes heard as basically the “same” note – like if a man and a woman are told to sing a “C”, they will most likely sing C’s an octave apart. However, it still sounds like they’re singing the same note, because they sound so similar. Summing Up To sum up, the octave is one of the most common and easily-identified intervals in music. Each instance of the same note (but different pitch) on a piano or guitar occurs as an octave, and each octave doubles the frequency of the one before it. If you're interested in taking Piano lessons on Zoom or In Person in Burbank, Glendale or North Hollywood, we have some of the best piano lessons in Los Angeles. Our piano instructors are picked by interviewing hundreds of drum instructors and we have really high standards on both their teaching ability as well as their personality. If you'd like to talk to one of our instructors or set up a first lesson we have a guarantee that if you don't absolutely love your first lesson you don't have to pay for it. Please contact us at (818)902-1233 or on our website at https://www.losangelesmusicteachers.com/online-piano-lessons-in-burbank-ca.html
Why Singers Should Take Piano Or Guitar Lessons In Person And Online Singers, you are musicians. Often times we are lost in the solo world of performance and emotive expression through sound, which is awesome. But we are complete musicians and expected to be, and definitely respected much more so, when we act as such. Solo performers are at somewhat a disadvantage when they show up at rehearsals with other kinds of musicians, a band, an orchestra, back up singers, or a pianist. We need to keep time so that people can play with us. We need to be able to follow a conductor during a staged performance. We need to be able to count. And that is where piano or guitar lessons will do you some good. Learning to really read music, for real; rests, quarter notes, time signatures, key signatures, key changes, dynamics, tempo markings, minor, major, harmony, theory and songwriting etc... And number one, being able to learn your part spot on, by yourself correctly, even when it is hard. May we suggest you sign up for some piano or guitar lessons? We have been teaching and working in the profession for over 20 years. We love to teach the piano and guitar at Los Angeles Music Teachers with a passion because it works a different part of your brain than a voice lesson. It always feels like completing a complicated math test after a good lesson and that is great for us. I am sure our piano/guitar students feel that way as well. Also, what is fantastic about piano and guitar is that you can really track your improvement by completing levels of music so you know you are getting better. Singing is more complicated. You have to be born with a certain amount of talent beyond your control. Lessons are important and help so much in singing, but it is different than piano playing. (You do need a certain amount of natural talent to be a concert pianist/guitarist of course- I am not referring to that). So consider putting learning the piano/guitar on your list of things to do to further your singing level. We can not tell you as a singer how many times it came in handy for me to be able to pluck out my parts, or play the harmonies with my part so we could practice singing against them. Piano/guitar especially helped me out of college because we are able to teach voice lessons. If you're interested in taking piano, guitar or singing lessons on Zoom or In Person in Burbank, Glendale or North Hollywood, we have some of the best piano, guitar and singing lessons in Los Angeles. Our instructors are picked by interviewing hundreds of drum instructors and we have really high standards on both their teaching ability as well as their personality. If you'd like to talk to one of our instructors or set up a first lesson we have a guarantee that if you don't absolutely love your first lesson you don't have to pay for it. Please contact us at (818)902-1233 or on our website at https://www.losangelesmusicteachers.com/contact-us-for-info.html
Vocal Warm Up Lesson for Beginners!
1/4/2023
1. YAWN-SIGH TECHNIQUE - For this quick vocal exercise, simply yawn (take in air) with your mouth closed. Then, exhale through your nose as if you are sighing. This will help relax your voice and improve its range.
2. HUMMING WARM-UPS - Humming is one of the best vocal warm-ups because it doesn’t put a lot of strain on your vocal cords. Place the tip of your tongue behind your bottom front teeth and hum up and down the major scale while keeping your mouth closed. Each note should sound like (hmmm) including the (h) sound is less taxing on your voice. 3. VOCAL STRAW EXERCISE - To perform the vocal straw exercise (also known as straw phonation), take a straw and hum through it. Start at the bottom of your range and slide up to the top slowly and evenly. Then, hum your favorite song through the straw. You can also place the straw in a partially full glass of liquid and blow controlled bubbles in the glass. 4. LIP BUZZ VOCAL WARM-UP - As far as vocal warm-ups go, lip buzz (or lip trill, as it is sometimes called) is very simple. The goal is to make a motorboat sound by making your lips vibrate as you blow air through your mouth and nose. You can incorporate pitch slides as well. 5. TONGUE TRILL EXERCISE - The tongue trill vocal exercise is difficult for some singers. It involves curling your tongue and rolling your R’s as you go through your range from low to high. 6. JAW LOOSENING EXERCISES - When singing, you want to drop your jaw lower than when you are just talking. With your finger, trace back along your jawline from your chin to your ear. That curved space between your jaw and your ear is where you want to drop your jaw. Pretend you are yawning with your mouth closed and feel where your jaw drops. Avoid just dropping your chin. 7. TWO-OCTAVE PITCH GLIDE WARM-UP - For this easy vocal warm-up, make an (eeee or ohhhh) sound and gradually glide through the chromatic notes of a two-octave range. Glide up and then back down. This will transition from your chest voice to your head voice. 8. VOCAL SIRENS EXERCISE - Much like the pitch glide, the siren exercise takes an (oooo) sound and gradually goes from the lowest note of your range to the highest and back down, like a siren for an emergency vehicle. The sound is continuous and covers the tones between the notes. 9. VOCAL SLIDES TECHNIQUE - This technique is also known as a portamento, which is Italian for (the act of carrying) Much like the siren exercise, you slide from one note to the next in your range, but you don’t sing the in-between notes. If you're interested in taking vocal lessons on Zoom or In Person in Burbank, Glendale or North Hollywood, we have some of the best vocal lessons in Los Angeles. Our vocal instructors are picked by interviewing hundreds of vocal instructors and we have really high standards on both their teaching ability as well as their personality. If you'd like to talk to one of our instructors or set up a first lesson we have a guarantee that if you don't absolutely love your first lesson you don't have to pay for it. Please contact us at (818)902-1233 or on our website at https://www.losangelesmusicteachers.com/online-voice-lessons-in-burbank-ca.html As much as every budding violinist would love to pick up their instrument and begin playing beautiful music, the work required to get there is much more mudane. Every breathtaking performance requires strategic and focused warm up exercises beforehand. These routines help develop and maintain your basic violin skills as well as gear for more advanced techniques too. For beginners, it may be difficult to know even where to start; after all, everything seems to need work. However, using the beginning of each practice session for a warm up will optimize each days result and pave the way for strong playing for months and years to come. Although warm up excursuses will vary from person to person based on the advice of your violin teacher, there are certain exercises that can benefit everyone. Here are five beginner violin tips that will help you grasp the fundamentals. 1. Long Open Strings Playing long open strings does several things: it lets your practice consistent intonation from each stroke, it allows you to become familiar with your bows weight and speed across the strings and lastly, it helps ensure that your bow remains in the proper location on the strings in relation to the bridge. Look into a mirror and place the bow on the string in the proper point and pull the bow across the string, listening for a clear, clean and consistent note. As you play, continually check in the mirror for your bows contact point. Repeat at least five up and down bows before moving on to the next string. 2. Finger Placement Correct finger placement is essential for playing the right notes on the violin, and to learn this correctly, you must practice! One of the tried and true beginner violin tips is to play simple scales in first position. This trains your finger to understand where they belong on the fingerboard in relation to other fingers, and it trains your ear to hear each note as it should be played. To practice, pick any scale, and play each note slowly, separately and precisely. Always play with a tuner so that you can tweak your fingers placement for a proper intonation. 3. Fourth Finger Practice Placing your fourth finger on a string creates the same note as the subsequent higher open string. Some beginner violinists use the open string to play the note because it is much easier and you know that the note will be correct. However, as you advance, there will be times where you cannot access the open string to play the note, or it is much less efficient to do so. Therefore, you need to strengthen your pinky finger! Start by playing the open string, then mimic the note using your pinky on the lower string about five times for each string. Listen carefully - does the fourth finger note match that of the open string? Don’t get discouraged if its difficult to even stretch your pinky at first - it will take time for it to gain strength and flexibility 4. Slurs A slur allows you to play two or more notes in a single bow stroke. To do this, start by placing the end of your bow close to the frog on the string. As you slowly but steadily bring your bow across the strings, place and then remove your first finger in the proper place while keeping your bow straight. Also, make sure that you place your finger on and off the strings at regular intervals - using a metronome will help. Start with two notes per stroke. 5. String Crossing The final of the beginner violin tips is the ability to make a clean change from string to string while playing. Keep your elbow at a right angle to form a square - include the bow and trace an imaginary line from your shoulder to prove where the bow hair touches the string. Rock the bow to each string while practicing your long bow strokes. Make sure that your arm and bow remains in the same plane and use the natural weight of your arm on each string. Because these warm up exercises set the tone for your practice session and for your learning overall, always perform them with focus and intent. They don’t need to take long, a dedicated five or 10 minutes should be fine. If you are unsure of what to practice or how to practice, ask your violin instructor for some violin tips - they have the knowledge and experience to guide you in the right direction If you're interested in taking Violin lessons on Zoom or In Person in Burbank, Glendale or North Hollywood, we have some of the best Violin lessons in Los Angeles. Our violin instructors are picked by interviewing hundreds of violin instructors and we have really high standards on both their teaching ability as well as their personality. If you'd like to talk to one of our instructors or set up a first lesson we have a guarantee that if you don't absolutely love your first lesson you don't have to pay for it. Please contact us at (818)902-1233 or on our website at https://www.losangelesmusicteachers.com/online-violin-lessons-in-burbank-ca.html
|
Archives
October 2022
Categories
All
|
Music Lessons Available on All Instruments:
Piano Lessons
Guitar Lessons Voice Lessons Drum Lessons Violin Lessons Cello Lessons Saxophone Lessons Jazz Improvisation Lessons Flute Lessons Clarinet Lessons Singing Lessons Acoustic & Elec Bass Songwriting & Production |
Contact Us Now
|
Website by Never Alone Business Services